
My Journey to a better sounding car!


Thread Starter
|
Senior Member Stereo Guru..Almost A Mod :)
Joined: Feb 2011
Posts: 862
From: louisiana
We will start off with a little background. When I was in highschool I had an s-10 that I had two kicker compvr 10" subs in.
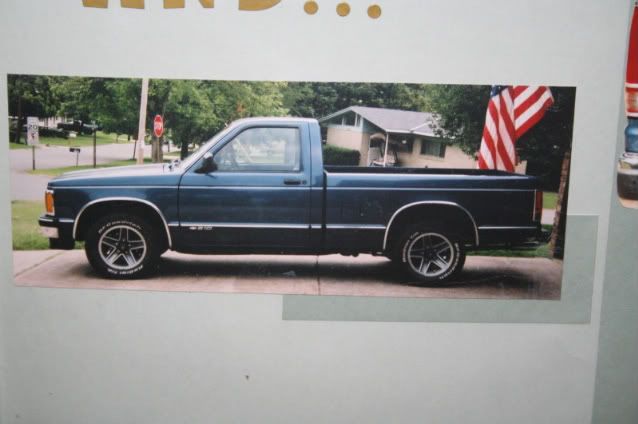
Needless to say I blew those subs. When I replaced them I decided that I needed to go big so, spl being my primary concern, I invested some money in two kicker solobaric L7 10" subs. My truck then died. I bought a ranger and rode around with these tens in there for a while and sold the truck. These L7 subs sat in my garage for 2 years until my wonderful girlfriend bought me an amp kit for christmas. I decided to put these subs in my accord.
it was then that I realized that I did not have near enough power. I invested some money at this time in a 2000 watt amp. This amp more than powered these subs. In fact i could not use any of my mirrors. This is when I realized that Sound quality meant a lot more to me than volume. so I ordered some milla mat from ebay.
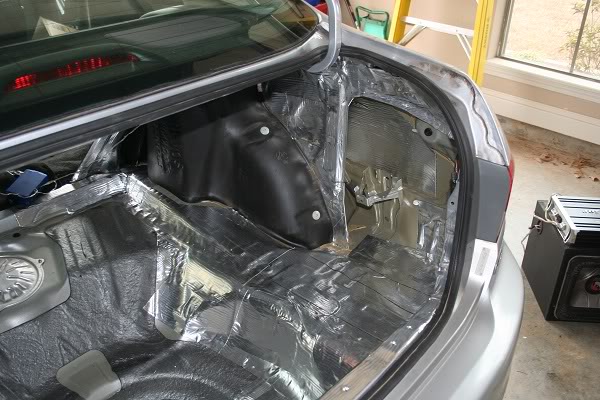
100 feet for 139 dollars. This stuff is not nearly as thick as second skin or dynamat but for this price it can be layered much heavier for much cheaper. I deadened my entire trunk.
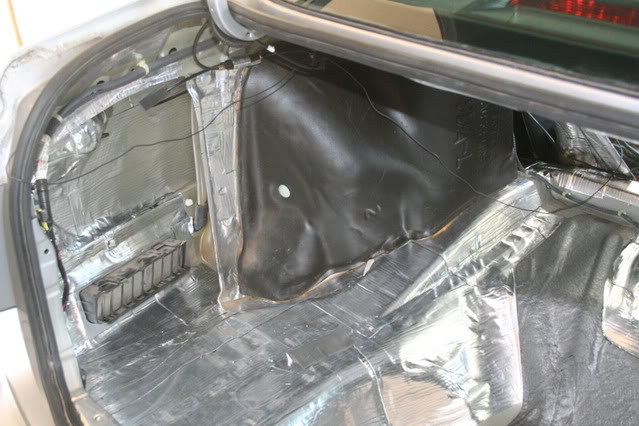
This improved the SQ greatly but was still not what I wanted. It was at this point that I decided to overhaul the system and truly build the system that I wanted. SO here we go:
Needless to say I blew those subs. When I replaced them I decided that I needed to go big so, spl being my primary concern, I invested some money in two kicker solobaric L7 10" subs. My truck then died. I bought a ranger and rode around with these tens in there for a while and sold the truck. These L7 subs sat in my garage for 2 years until my wonderful girlfriend bought me an amp kit for christmas. I decided to put these subs in my accord.
it was then that I realized that I did not have near enough power. I invested some money at this time in a 2000 watt amp. This amp more than powered these subs. In fact i could not use any of my mirrors. This is when I realized that Sound quality meant a lot more to me than volume. so I ordered some milla mat from ebay.
100 feet for 139 dollars. This stuff is not nearly as thick as second skin or dynamat but for this price it can be layered much heavier for much cheaper. I deadened my entire trunk.
This improved the SQ greatly but was still not what I wanted. It was at this point that I decided to overhaul the system and truly build the system that I wanted. SO here we go:
Last edited by neophyte; May 3, 2011 at 10:38 AM.
Thread Starter
|
Senior Member Stereo Guru..Almost A Mod :)
Joined: Feb 2011
Posts: 862
From: louisiana
i will start with a run down of what i bought and amount spent:
two diamond d3 12" sub woofers in an enclosed box built to spec. (119 a piece for the subs. 35 dollars for boxes, built them myself) while sq is my overall goal i am a bit of a bass head too.
diamond m3 series 6.5's in the rear. (had them for a while, get comparable speakers now about 150)
mb quart onyx series 6.5's in the front. (100)
the diamond tweeters are going in custom tweeter pods in the sail pillars and the mb quart tweeters are replacing the stock.
lanzar 2000 watt mono block for subs (250, picked it up for 40)
pheonix gold 400 watt 4 channel for speakers (if i were to guess it was about $300, i didnt buy it)
tweeter pods and baffels for front i made.
wiring from knuconceptz.com (4 awg $1.55 a foot) two runs. about 35 feet total
speaker wiring monster 202 series ($20 for 25 feet, although if i were to go back i would get the 404 series) i used 50 feet of 12 gauge plus a little bit of 12 awg rockford fosgate i had laying around)
two 100 amp fuses (10.00)
equalizer (got a power acoustic off ebay for $50 bux. may replace it if it doesnt meet my needs)
fiber glass kit ($15)
bondo gold body filler ($12, the gold is specifically made for fiberglass adhesion)
rca cables (not sure but not too expensive.)
inddor/outdoor capret ($17 a roll at lowes, if you want to carpet the box)
loc ($30)
sound deadner. (i use milla mat. it is $130 for 100 feet. it is not as thick as dynamat or second skin but for that price it can be doubled if need be. i did one layer in my trunk and it made a noticeable difference)
that puts my total monetary investment right around $1500.
This has been an ongoing project that is months in the works. Total time spent if it were continual work would probably be somewhere around a week. I have easily spent this much time researching and discussing things with people to find the best way to do this to fit my needs.
Disclaimer: this is not the order in which the work was done.
We will start with the integration of the stock head unit.
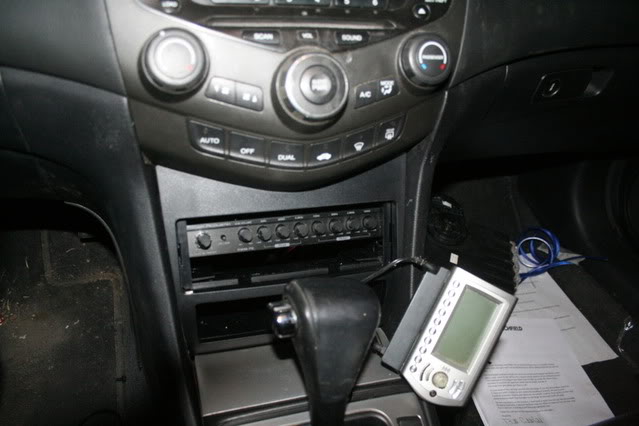
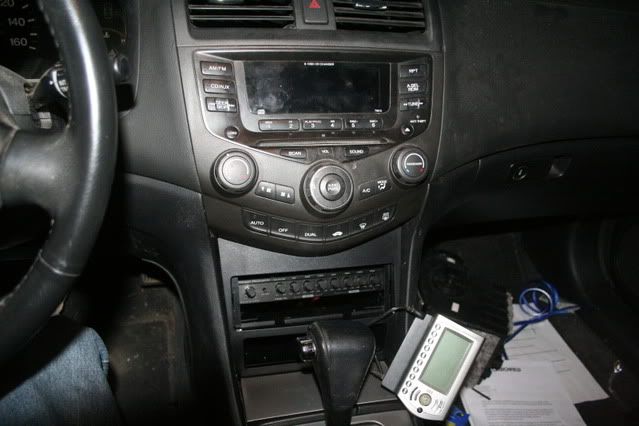
I spent weeks searching for a head unit that would replace the stock head unit to no avail. Finally i decided that I would just mount an EQ in the lower dash in order to get the adjustment of my system that I wanted.
I started by removing the center console and the lower cubby.
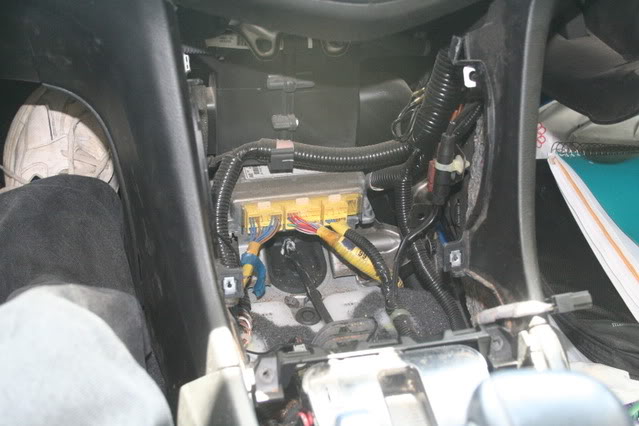
I ran a piece of twelve guage automotive wire to the back side of the console and soldered a pice of 12 guage automotive wire to a sanded bare piece of metal inside that cubby to provide me with a power and ground for the EQ. I then pulled the head unit and splice in a LOC to the front channels of the radio and mounted it to a metal support on the back side of the firewall. Next I ran 3 sets or RCA cables down the passenger side of the car and into the trunk (sub, front, rear). I ordered the metra lower dash kit from Crutchfield. I used the mounting hardware that came with that kit and some of the mounting hardware that came with the EQ in a modified fashion in order to get the EQ monted in the kit. I tied in the leads off of the EQ into the new wiring I had run for it and then clipped in place. Most of this was pretty simple stuff, but I did have to pull it out a couple of times to get it just how I wanted it.
There is still a small hole under the EQ. I had a piece of 3/32" mdf cut to 13/16" x 7". It filled the hole perfect but I broke it during install and am going to cut another.
two diamond d3 12" sub woofers in an enclosed box built to spec. (119 a piece for the subs. 35 dollars for boxes, built them myself) while sq is my overall goal i am a bit of a bass head too.
diamond m3 series 6.5's in the rear. (had them for a while, get comparable speakers now about 150)
mb quart onyx series 6.5's in the front. (100)
the diamond tweeters are going in custom tweeter pods in the sail pillars and the mb quart tweeters are replacing the stock.
lanzar 2000 watt mono block for subs (250, picked it up for 40)
pheonix gold 400 watt 4 channel for speakers (if i were to guess it was about $300, i didnt buy it)
tweeter pods and baffels for front i made.
wiring from knuconceptz.com (4 awg $1.55 a foot) two runs. about 35 feet total
speaker wiring monster 202 series ($20 for 25 feet, although if i were to go back i would get the 404 series) i used 50 feet of 12 gauge plus a little bit of 12 awg rockford fosgate i had laying around)
two 100 amp fuses (10.00)
equalizer (got a power acoustic off ebay for $50 bux. may replace it if it doesnt meet my needs)
fiber glass kit ($15)
bondo gold body filler ($12, the gold is specifically made for fiberglass adhesion)
rca cables (not sure but not too expensive.)
inddor/outdoor capret ($17 a roll at lowes, if you want to carpet the box)
loc ($30)
sound deadner. (i use milla mat. it is $130 for 100 feet. it is not as thick as dynamat or second skin but for that price it can be doubled if need be. i did one layer in my trunk and it made a noticeable difference)
that puts my total monetary investment right around $1500.
This has been an ongoing project that is months in the works. Total time spent if it were continual work would probably be somewhere around a week. I have easily spent this much time researching and discussing things with people to find the best way to do this to fit my needs.
Disclaimer: this is not the order in which the work was done.
We will start with the integration of the stock head unit.
I spent weeks searching for a head unit that would replace the stock head unit to no avail. Finally i decided that I would just mount an EQ in the lower dash in order to get the adjustment of my system that I wanted.
I started by removing the center console and the lower cubby.
I ran a piece of twelve guage automotive wire to the back side of the console and soldered a pice of 12 guage automotive wire to a sanded bare piece of metal inside that cubby to provide me with a power and ground for the EQ. I then pulled the head unit and splice in a LOC to the front channels of the radio and mounted it to a metal support on the back side of the firewall. Next I ran 3 sets or RCA cables down the passenger side of the car and into the trunk (sub, front, rear). I ordered the metra lower dash kit from Crutchfield. I used the mounting hardware that came with that kit and some of the mounting hardware that came with the EQ in a modified fashion in order to get the EQ monted in the kit. I tied in the leads off of the EQ into the new wiring I had run for it and then clipped in place. Most of this was pretty simple stuff, but I did have to pull it out a couple of times to get it just how I wanted it.
There is still a small hole under the EQ. I had a piece of 3/32" mdf cut to 13/16" x 7". It filled the hole perfect but I broke it during install and am going to cut another.
Last edited by neophyte; May 3, 2011 at 03:48 PM.
Thread Starter
|
Senior Member Stereo Guru..Almost A Mod :)
Joined: Feb 2011
Posts: 862
From: louisiana
Now the front stage.
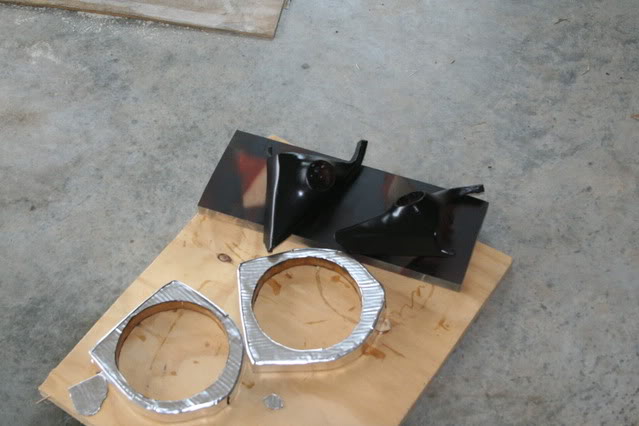
i started by deciding where to put my tweeters. Everything I had read/heard said that the A-pillars were the best place to put the tweeters. My car, however, has curtain airbags. I am not much on messing with air bags because they are so temperamental. Also I did not want to get into a wreck and have a tweeter hitting me in the face with the force an airbag exerts. I decided that it would be best to mount them on the sail pillar. Another goal of mine was to maintain as much of a factory look as I could. I decided that I would mount the tweeters with the pods that came with the tweeters. Then I covered the sail pillar in some material. I used crazy glue to hold the material in place. I then fiber glassed that material. After the glass had cured, I sanded down the high spots. Then I covered the Fiberglass with Bondo Gold body filler. The gold is made for fiberglass adhesion. It is only a few bux more.
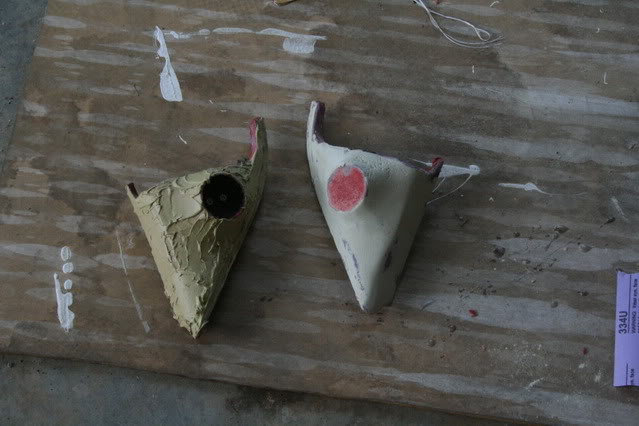
They required sanding, then rebondoing then resanding. It was a lot of work but the results were nice. I painted them with a satin black semi gloss paint. 2 coats of primer sanded with finishing paper, then 2 coats of paint.
I removed the front speakers and traced the original speaker baffle onto a piece of 3/4 mdf. I cut two of these baffles. I then sealed them with Fiber glass resin and covered them in deadning.
I then deadened each door. cleaning every surface with alcohol and allowing to dry before placing the deadener on the metal.
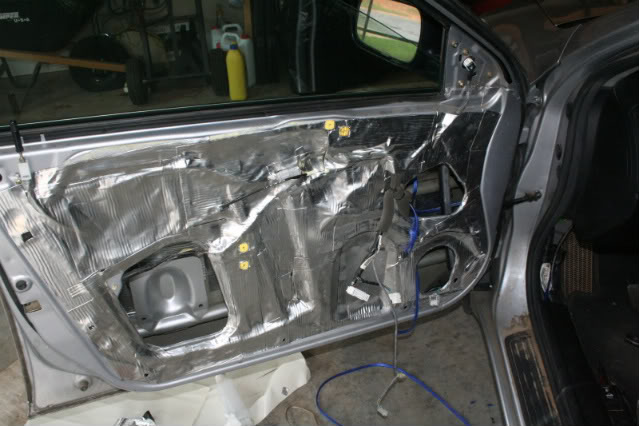
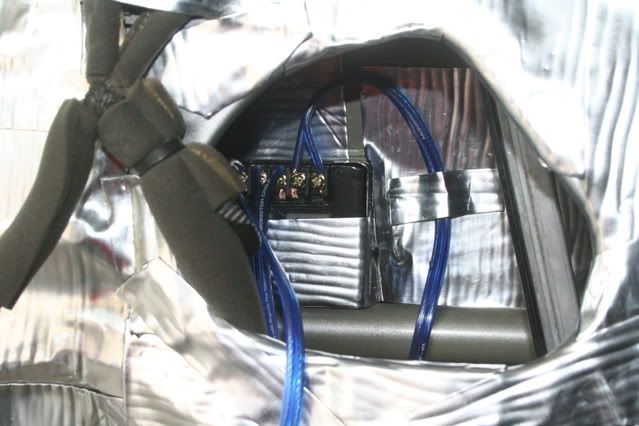
I siliconed the crossover to the inside of the door because there was really no place to screw it to in the door. I didn't want to run anymore wire into the door so I made sure they were in the Door. I had to drill a hole to run the wire in on the driver side. The rubber boot that I used on the passenger side is not the same on the Driver side. It ended with a plug. A harness inside the driver door then plugged in at this plug. leaving no room in the hole for the boot. Siliconed that hole. I used strips of deadener to hold the crossover in place while the silicon dried. Then left it in afterwards. I also used small strips of deadener inside the door to create the tension breaks for the wire and to hold the wire out of the way of the window.
I then mounted the new baffles. I drilled a hole through the baffle and then through the sheet metal on the door. I figured this is the best way to make sure the baffle does not shift. Since the original speaker was held in place with clips the factory holes are much larger than the bolts I used. I secured the backside of the bolt with a nut using blue loctite. (The blue can easily be broken loose with a wrench but will not let the nut vibrate off. Know that if you use red or higher strength it will require a heat gun to break the loctite loose.) And then covered the new baffle with deadener once more.
On the passenger side I had to dremel out a little bit of the stock speaker hole because the basket was hitting it. I shifted that side up slightly because on the driver side the baffle doesn't allow the clip to clip into place. The rest clip in and there are no rattles so it doesn't bother me. I just tried to change it on the other side.
I then test fit the tweeter pod (this had been done multiple times in between glassing and bondoing. just wanted to check again) and the front speaker.
Then mounted the door speaker.
The leads for the tweeters are soldered. Since there were two wires coming together I went ahead and soldered and heat shrinked them. I used QD fittings on the speakers.
It was raining pretty hard the day I installed these. I took this as an opportunity to locate the wettest spots in the door. it seems that the majority of water actually comes into the door through the holes at the bottom meant to be for drainage.
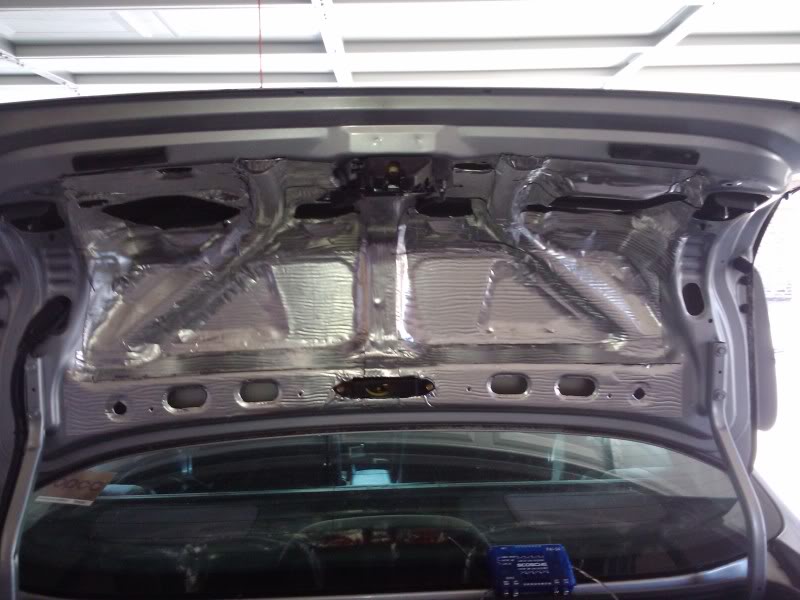
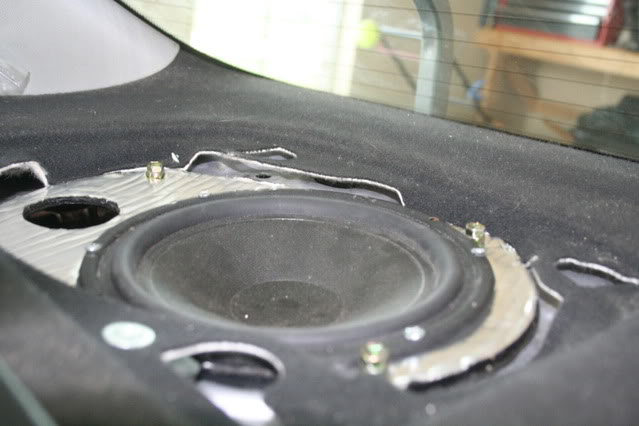
The Rear Stage:
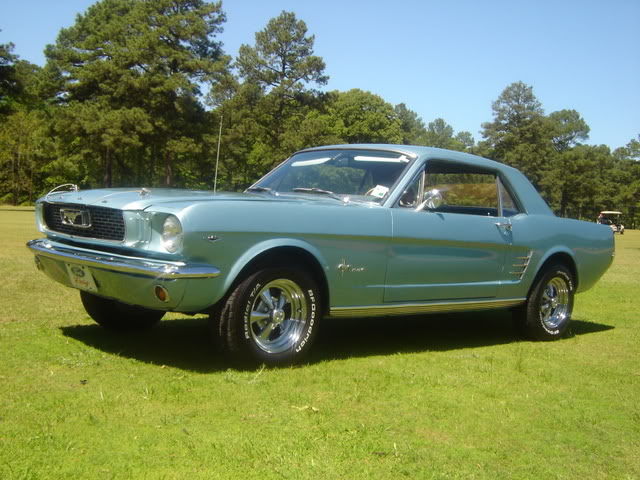
The speakers I chose for the rear were a set of diamond audio m3 series I had from a system in a 66 mustang.

the tweeter on the right is the one I used in the tweeter pods.
and that mustang I mentioned. (just cause I think it is smexy)
I ordered some adapters off of the internet to mount the rear speakers. I was unsure of how much depth the speaker covers in the rear would allow and as I said earlier I wanted to retain a somewhat factory look to the car. They took some pretty heavy sanding to and a little bit of cutting with a hot knife to get the speakers to fit.
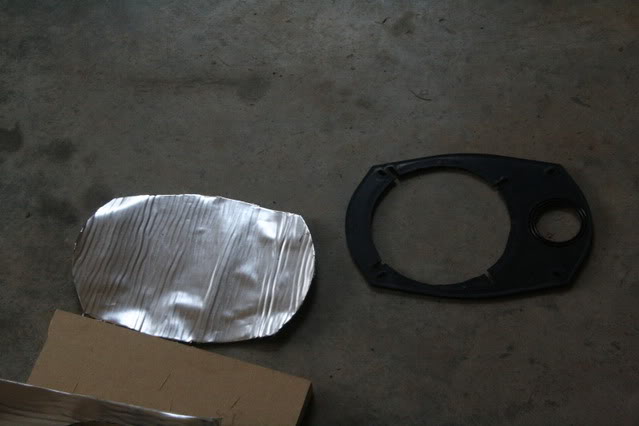
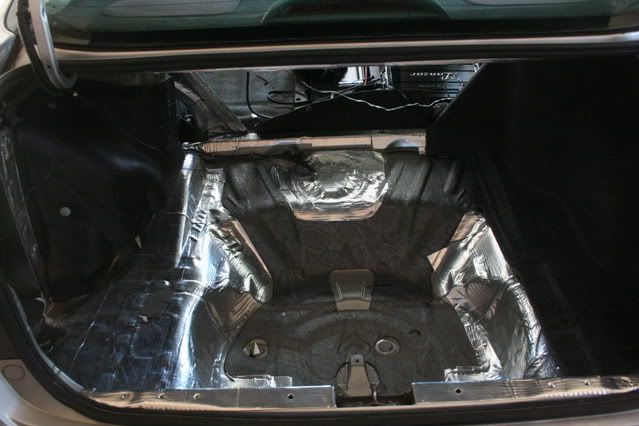
On the right you can see the adapter plate.I went ahead and cut the holes in the plates for the tweeters hoping it would relieve some of the pressure from the cone. I plan on enclosing the rear speakers and will update when I do, but as of now I keep my ski hatch open and try to minimize the pressure in the trunk as much as possible.
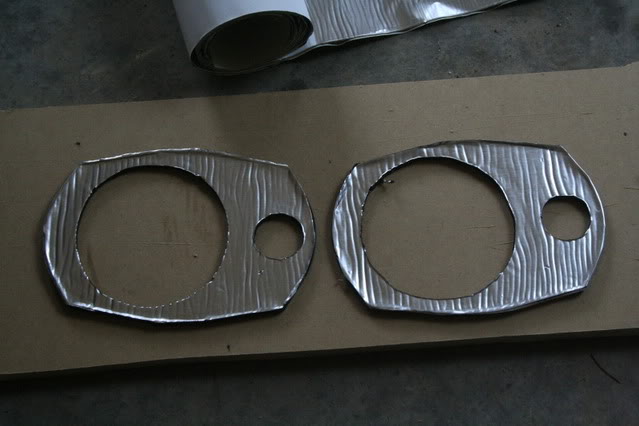
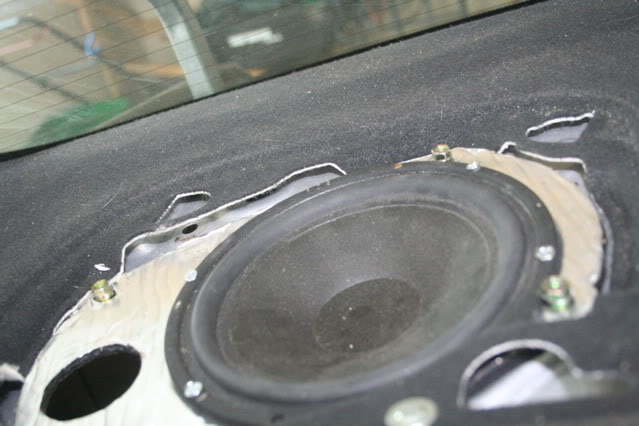
I then cut some deadner to the shape of the adapters and applied it to both sides.
I test fit the plates and was thoroughly surprised at how well they fit. I had to use an exacto knife to cut back some of the formed carpet to get them in completely. But all in all very easy to get them in there.
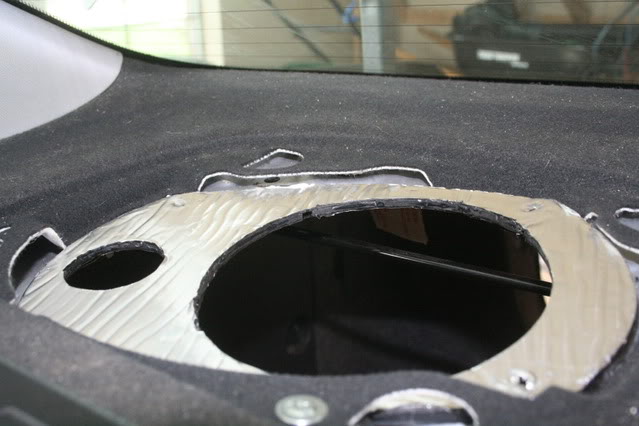
Then it was as simple as dropping the speakers in place and screwing them in.
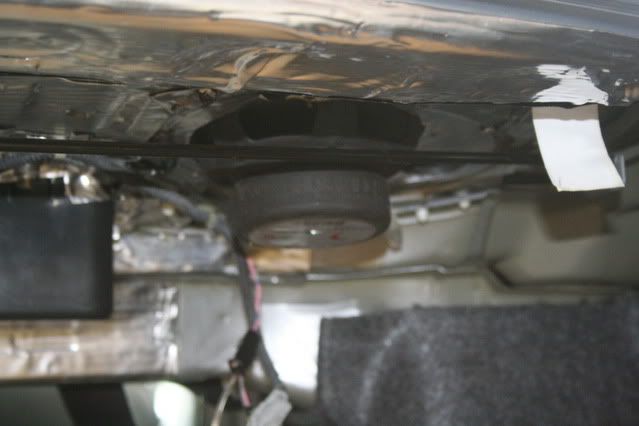
and a view from the trunk.
i started by deciding where to put my tweeters. Everything I had read/heard said that the A-pillars were the best place to put the tweeters. My car, however, has curtain airbags. I am not much on messing with air bags because they are so temperamental. Also I did not want to get into a wreck and have a tweeter hitting me in the face with the force an airbag exerts. I decided that it would be best to mount them on the sail pillar. Another goal of mine was to maintain as much of a factory look as I could. I decided that I would mount the tweeters with the pods that came with the tweeters. Then I covered the sail pillar in some material. I used crazy glue to hold the material in place. I then fiber glassed that material. After the glass had cured, I sanded down the high spots. Then I covered the Fiberglass with Bondo Gold body filler. The gold is made for fiberglass adhesion. It is only a few bux more.
They required sanding, then rebondoing then resanding. It was a lot of work but the results were nice. I painted them with a satin black semi gloss paint. 2 coats of primer sanded with finishing paper, then 2 coats of paint.
I removed the front speakers and traced the original speaker baffle onto a piece of 3/4 mdf. I cut two of these baffles. I then sealed them with Fiber glass resin and covered them in deadning.
I then deadened each door. cleaning every surface with alcohol and allowing to dry before placing the deadener on the metal.
I siliconed the crossover to the inside of the door because there was really no place to screw it to in the door. I didn't want to run anymore wire into the door so I made sure they were in the Door. I had to drill a hole to run the wire in on the driver side. The rubber boot that I used on the passenger side is not the same on the Driver side. It ended with a plug. A harness inside the driver door then plugged in at this plug. leaving no room in the hole for the boot. Siliconed that hole. I used strips of deadener to hold the crossover in place while the silicon dried. Then left it in afterwards. I also used small strips of deadener inside the door to create the tension breaks for the wire and to hold the wire out of the way of the window.
I then mounted the new baffles. I drilled a hole through the baffle and then through the sheet metal on the door. I figured this is the best way to make sure the baffle does not shift. Since the original speaker was held in place with clips the factory holes are much larger than the bolts I used. I secured the backside of the bolt with a nut using blue loctite. (The blue can easily be broken loose with a wrench but will not let the nut vibrate off. Know that if you use red or higher strength it will require a heat gun to break the loctite loose.) And then covered the new baffle with deadener once more.
On the passenger side I had to dremel out a little bit of the stock speaker hole because the basket was hitting it. I shifted that side up slightly because on the driver side the baffle doesn't allow the clip to clip into place. The rest clip in and there are no rattles so it doesn't bother me. I just tried to change it on the other side.
I then test fit the tweeter pod (this had been done multiple times in between glassing and bondoing. just wanted to check again) and the front speaker.
Then mounted the door speaker.
The leads for the tweeters are soldered. Since there were two wires coming together I went ahead and soldered and heat shrinked them. I used QD fittings on the speakers.
It was raining pretty hard the day I installed these. I took this as an opportunity to locate the wettest spots in the door. it seems that the majority of water actually comes into the door through the holes at the bottom meant to be for drainage.
The Rear Stage:
The speakers I chose for the rear were a set of diamond audio m3 series I had from a system in a 66 mustang.
the tweeter on the right is the one I used in the tweeter pods.
and that mustang I mentioned. (just cause I think it is smexy)
I ordered some adapters off of the internet to mount the rear speakers. I was unsure of how much depth the speaker covers in the rear would allow and as I said earlier I wanted to retain a somewhat factory look to the car. They took some pretty heavy sanding to and a little bit of cutting with a hot knife to get the speakers to fit.
On the right you can see the adapter plate.I went ahead and cut the holes in the plates for the tweeters hoping it would relieve some of the pressure from the cone. I plan on enclosing the rear speakers and will update when I do, but as of now I keep my ski hatch open and try to minimize the pressure in the trunk as much as possible.
I then cut some deadner to the shape of the adapters and applied it to both sides.
I test fit the plates and was thoroughly surprised at how well they fit. I had to use an exacto knife to cut back some of the formed carpet to get them in completely. But all in all very easy to get them in there.
Then it was as simple as dropping the speakers in place and screwing them in.
and a view from the trunk.
Last edited by neophyte; May 4, 2011 at 10:56 PM.
Thread Starter
|
Senior Member Stereo Guru..Almost A Mod :)
Joined: Feb 2011
Posts: 862
From: louisiana
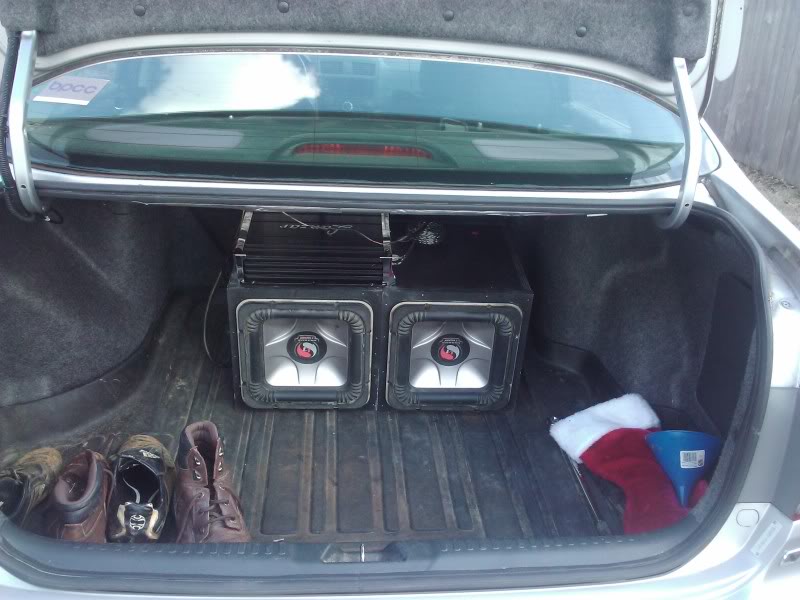
When deciding on subs I knew that I did not want any more kickers. I had a low opinion of the comps and the solobarics did not provide the sq that I wanted. My mother has a 12" diamond in her car and I liked the way that sounded. So I decided to go with Diamonds for the subs too. I do like Bass and I do like it to be loud, but I want it to be an accurate reproduction of the music. I decided to go with two D3 12" subwoofers.
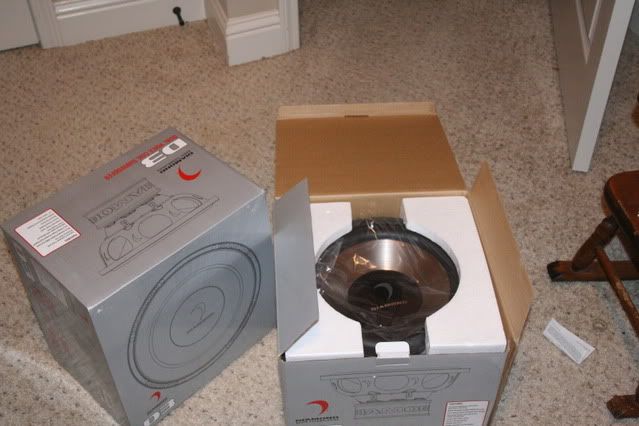
I ordered these before I had my solobarics sold. My goal was to have the boxes ready by the time I sold my solobarics. That did not work out. I built a temporary box for one of them out of some scrap mdf I had laying around. My boxes were a project in themselves. But after a ton of bondo and a good bit of painting and sanding and silicon I got them finished.
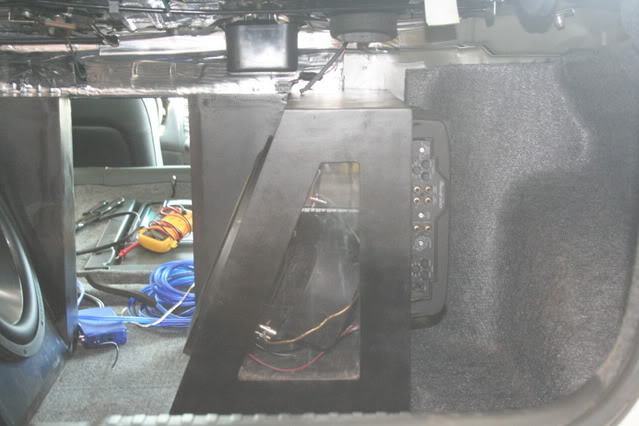
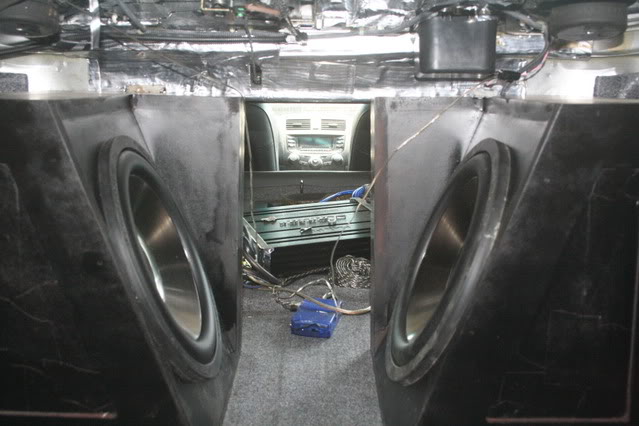
I decided that for cosmetic reasons I would have the subs firing towards each other. My original plan was to mount the amps in between the two boxes. I knew when I did this I ran the risk of some distortion. Luckily I do not get distortion as of now. The amp mounting did not work out. I am contemplating Building a couple more style boxes to see which I like the best. Maybe sealed to the cabin or a ported box. But for now I am content with them the way they are.
some wiring work:
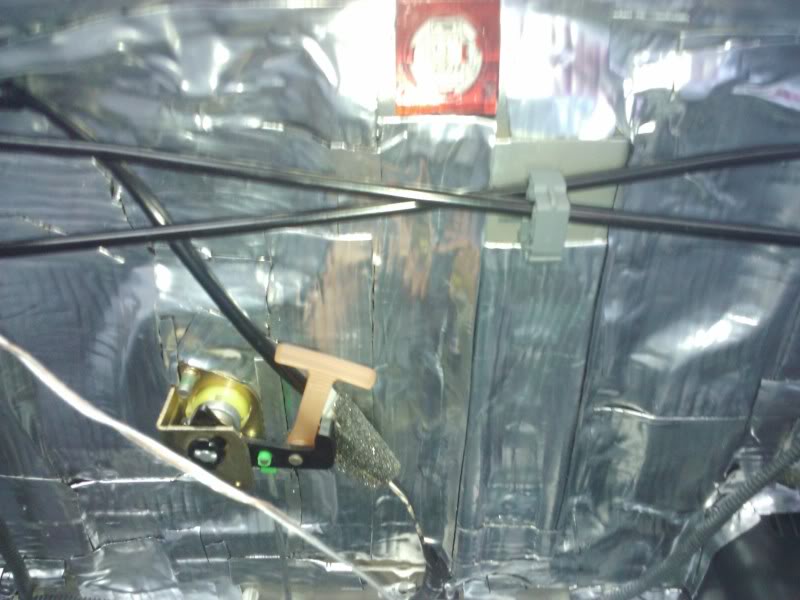
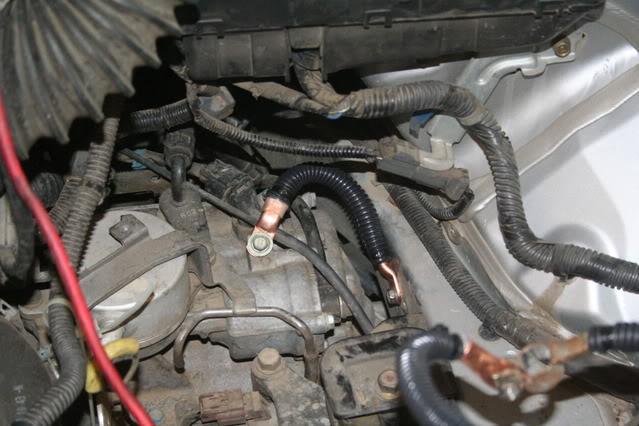
I had some spare 4AWG laying around so I decided that I would go ahead and upgrade the grounds.
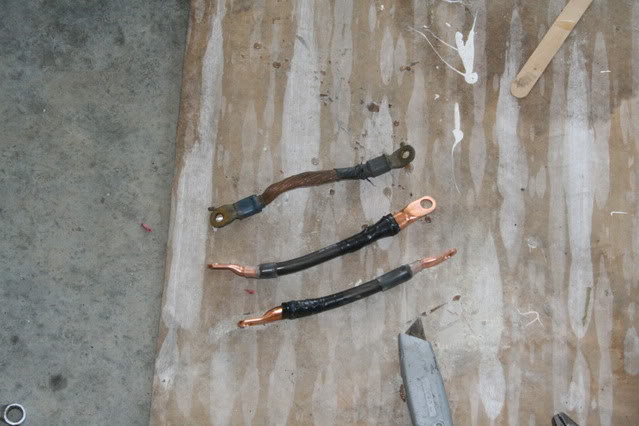
The top wire in the picture is my factory engine-Chasis ground. The other two are my new ones.
I pulled the air box and the battery to see this:
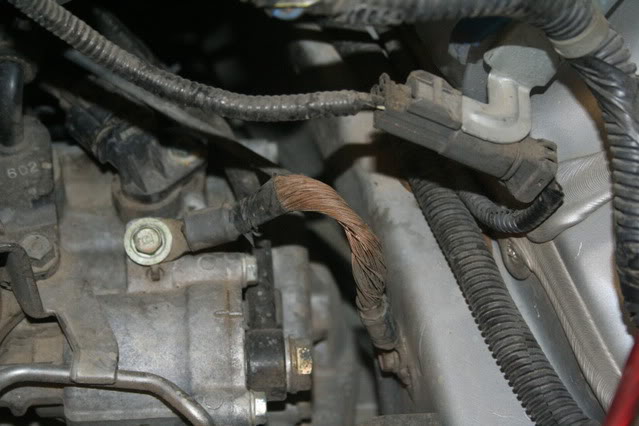
Needless to say I wasn't to pleased. So I replaced it with a new one.
I ordered these before I had my solobarics sold. My goal was to have the boxes ready by the time I sold my solobarics. That did not work out. I built a temporary box for one of them out of some scrap mdf I had laying around. My boxes were a project in themselves. But after a ton of bondo and a good bit of painting and sanding and silicon I got them finished.
I decided that for cosmetic reasons I would have the subs firing towards each other. My original plan was to mount the amps in between the two boxes. I knew when I did this I ran the risk of some distortion. Luckily I do not get distortion as of now. The amp mounting did not work out. I am contemplating Building a couple more style boxes to see which I like the best. Maybe sealed to the cabin or a ported box. But for now I am content with them the way they are.
some wiring work:
I had some spare 4AWG laying around so I decided that I would go ahead and upgrade the grounds.
The top wire in the picture is my factory engine-Chasis ground. The other two are my new ones.
I pulled the air box and the battery to see this:
Needless to say I wasn't to pleased. So I replaced it with a new one.
Last edited by neophyte; May 9, 2011 at 10:53 PM.

Super Moderator
Joined: Dec 2009
Posts: 3,279
From: Quad Cities, IL
Thanks for sharing, we look forward to more.
I locate crossovers on the face of the door, behind the plastic interior panel, but not inside the door. this keeps it dry and accessible. In a few years your crossovers will rust and need to be replaced. I have replaced crossovers inside the door several times on other cars.
Nice work so far.
I locate crossovers on the face of the door, behind the plastic interior panel, but not inside the door. this keeps it dry and accessible. In a few years your crossovers will rust and need to be replaced. I have replaced crossovers inside the door several times on other cars.
Nice work so far.
Thread Starter
|
Senior Member Stereo Guru..Almost A Mod :)
Joined: Feb 2011
Posts: 862
From: louisiana
i figured when i mounted them there that i would have problems in the future. i was not sure which pieces of foam were ok to remove and which werent so i left all of the foam on the door panel. my biggest concern was the speakers i tried to block as many paths for water as i could from the speakers themselves.
Super Moderator
Joined: Dec 2009
Posts: 3,279
From: Quad Cities, IL
The foam on the door panel is pointless. I will remove a piece that let's me put a crossover in it's place. I like your baffles. Lately I have folded deadener to make a lip above the speaker hole, to direct water on the inside face around the speaker. I have pulled rusty speakers out of doors before, only a few years old. The last trick is sealing up the access holes, that is what really makes a difference in both mid bass and road noise.
Thread Starter
|
Senior Member Stereo Guru..Almost A Mod :)
Joined: Feb 2011
Posts: 862
From: louisiana
i covered all except the rear. the reason i didnt cover it, again, had to do with the foam. there is a piece that goes through. it looked like it was there to protect the window so i didnt remove it.
Thread Starter
|
Senior Member Stereo Guru..Almost A Mod :)
Joined: Feb 2011
Posts: 862
From: louisiana
i may have to pull my panels back off then. do you think two layers of deadner would be sufficient for a hole that size of would i need to cut some steel plates?
Last edited by neophyte; May 5, 2011 at 08:39 PM.