How to- Turbocharge your honda
#1
 06-19-2010, 12:46 AM


Join Date: May 2010
Location: Phenix City, Alabama
Posts: 451
How to Turbocharge your Honda:
Objective:
--> This is a step by step procedure on how to turbocharge your Honda. This DIY would work for most 4 cylinder cars.
Pre Installation Information:
Parts Needed:
-->(1) Turbocharger: Pick which size and trim turbo is going to work best for your application and goals.
-->(2) Exhaust Manifold: Either log/cast/equal length. Make sure it was made for your turbo(t3, 4bolt, 5bolt, dsm, etc)and motor.
-->(3) Downpipe: Must be custom for your turbo/manifold choice. A flex pipe and o2 bung are nice to have while creating a downpipe.
-->(4) Wastegate: Choose a wastegate size (also what psi spring you'd like to run) according to application such as amount of air flow and psi from turbo
-->(5) Intercooler: Choose either a FMIC (Front Mount Intercooler) or a SMIC (Side Mount Intercooler).
-->(6) Blow off valve: This is optional but highly recommeded.
-->(7) Fuel Manegment Unit: One of the most important parts on your turbocharged car. I would highly suggest running a programable chiped ecu or standalone
device, but running a AFC hack controller can be used as well.
-->(8) Fuel Pump : You will probably need an upgraded fuel pump to support the added fuel consumption. Can be either internal or external.
-->(9) Injectors : To support added air induction, more fuel is needed. Hence bigger injectors. Buy size according to application
-->(10) Map Sensor: Stock maps can only read "up to" 10.63 psi. If you plan to go higher you may want to upgrade to a 2bar or 3bar map sensor.
-->(11) Intercooler Piping: You can buy an intercooler piping kit, but usally it will always take some modification to fit your exact application.
-->(12) Couplers/t-bolts: You will need silicone couplers to bind the two intercooler pipes together as well as t-bolts (or screw clamps which i dont
recommend to tighten those couplers down.
-->(13) Oil drain/feed lines: Every turbo needs oil, so you must buy an oil feed and drain line kit. stainless steel lines are recommended.
-->(14) Vacuum Manifold: Not required but recommened to help organize vacuum lines and allow for good vacuum sources.
-->(15) Gauges: Although not required, it's highly recommend so you can keep some status of motor operation. Boost/Oil pressure are highly recommended.
-->(16) Spark plugs: Although not required, turbo temperatures can get very high, so I recommend you step down two steps colder in your spark plugs.
Tools Needed:
-->(1) Extensive Socket/Rachet Set: Metric and Standard Sizes. The more variety, the less likely you wont have the socekt you need for the job.
-->(2) Extensive wrech set: Metric sizes. Racheting wrenchs are gonna work great for tight places.
-->(3) Floor jack and jack stands: you gotta get that car up for some things, and safety is a must.
-->(4) Screw driver set: Again, the more variety, the better.
-->(5) Dremel: You may need to cut or sand some things down, so a dremel will be perfect for the job.
-->(6) Wire strippers: Your gonna do some spliceing and wire cutting at some point.
-->(7) Multi-meter: Not required, but is handy to have around to troubleshoot and test wires.
-->(8) PB-Blaster or any other rust breaking spray: This is extremely useful for getting old rusted bolts off.
Estimated Time and Skill level:
--> I Would give your self at least week or more to finish this install properly. Depending on how much free time you have. It will take time, dont expect to get it done in a day. Unplaned bumps in the road will occur, but dont be discouraged.
--> Skill level: I'd say a full turbo install would have to be from a 6-8 difficutly in the import world depending on your skill level. Building a motor
being 10.
Installation Proceduces:
Step 1: Remove all N/a parts from your motor
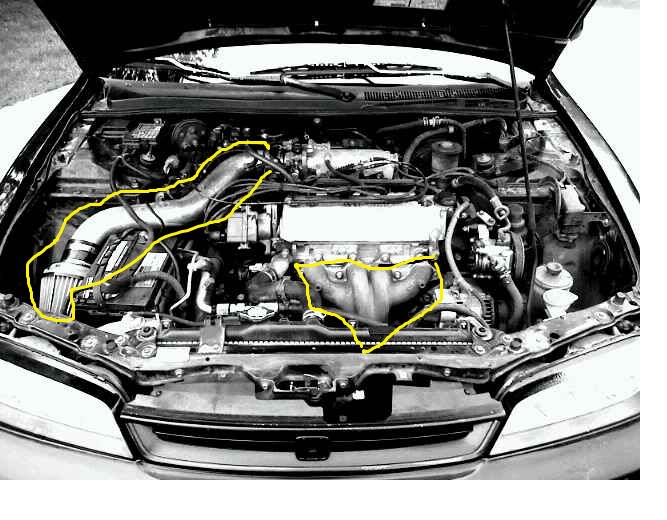
-->Take a look into your engine bay and find where your Intake and Header/Manifold are, since you will be replacing both with new parts, these will not be needed any longer.
-->Remove the Intake by unscrewing the two screw clamps holding the silicone coupler on the throttle body, and a bolt down near the air filter where intake is holding onto chassis.
-->Your gonna have to get under the car for the rest of this project, so it's a good idea to jack the car up and make sure to use two jack stands for safety reasons.
-->Remove the 9-12mm nuts that hold header to engine head studs.
-->Remove the three bolts that hold cat and exhaust together. After you un-bolt these three bolts, there should be two bolts that are holding the header in place on the bracket hanging from the back of the block. Remove those two bolts as well and the header should be free to drop out of place.
Step 2: Assemble and Install manifold/turbo/downpipe
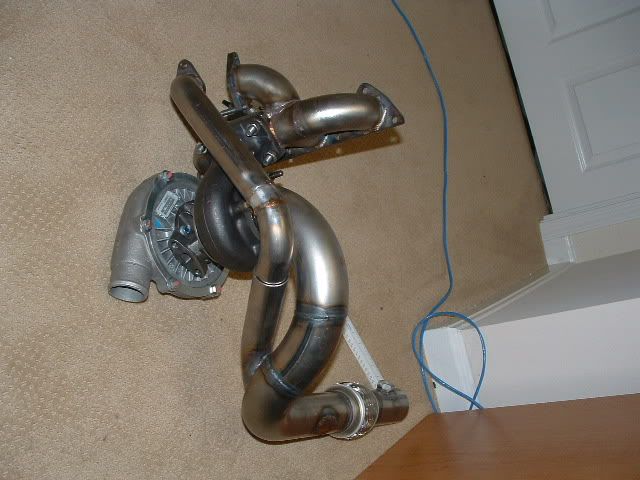
-->Whether or not you bought your manifold and downpipe brand new or custom made it, I suggest assembling it just to test fit before you try installing into the car. Check for turbo placement, and dp route.
-->First, you will want to apply some PB-Blaster to the o2 sensor on your n/a header, this way, removal is easy. Once you get it out, screw it onto the new Downpipe o2 sensor bung.
-->Slide the manifold on to the engine block exhaust studs
-->Next, if needed, clock your turbo to fit your setup correctly. To Clocking your turbo means to rotate the compressor/turbine housings relative to the center housing. It's easy to do, you just need to loosen the bolts that hold the housings down tight, and rotate. Tighten back up when it's in the right spot.
-->You are now going to want to hand tighten the turbo to the manifold so that you can test fit on the block.
-->If the manifold sits flush with head of engine, and turbo is clocked to fit your setup correctly, it is time to tighten down the head studs to hold
manifold securely. Tighten turbo manifold bolts as well.
Step 3: Mark and Remove Oil Pan and install oil drain line
-->Get under the car and take a look at your oil pan while you have your manifold/turbo/dp on for fitment. Your going to want to grab your oil drain line that was supplied in your oil line kit that you purchased for this step.
-->Take one end of the stainless steel line and line it up with the oil drain hole on the turbo.
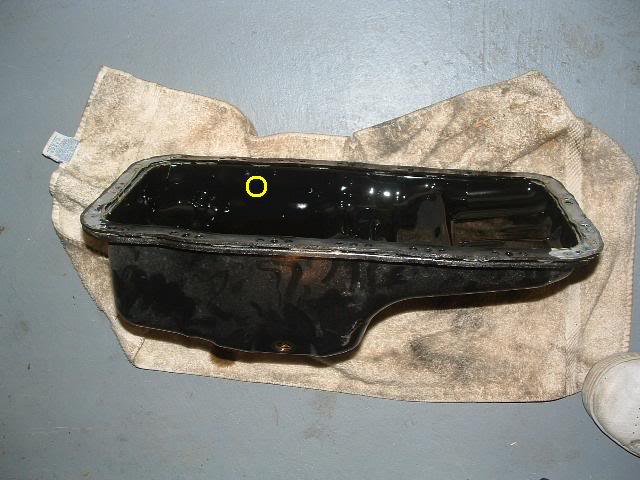
-->Take the other end, and find a way to make the line reach a designated spot on the oil pan. The spot on the oil pan can most likely be anywhere in the "deep" section of the oil pan, located at the highest point of the "deep" part. Run the line the best you can without touching the downpipe or making any sharp turns or positive slope. The oil return line is important to have correctly so that your turbo gets effective oil cooling and lubricant for the seals.
-->Mark where oil drain hose lines up on the oil pan with a screwdriver or something sharp so it leaves a good clear mark.
-->If there is no way to run the line without pinching it, you can purchase straight/45 degree/90 degree fittings so that the line does not have a kink in it. Also, if the oil line is touhcing the downpipe, you need to look into purchasing some kind of heat wrap so that your oil line doesnt wear over time, as well as that your "inner" rubber line doesnt melt.
-->The oil pan has got about 26 or so bolts/nuts that are holding it on. First things first, you must drain the oil from your engine so taking off the pan wont be the messiest thing you've ever done. 17mm socket to the drain plug will do the trick.
-->Once you get all the oil out, your ready to start the removal process. You will need to remove all of the bolts and the pan should drop freely. Make sure to keep track of oil pan gasket cus you'll need to make sure to put that on when you re-install.
-->Now it's time to either weld the oil drain bung or drill a hole for the "weld-less" oil drain that you have. Either way, it's the same concept, make a hole for oil.
-->After the hole is made, use your kit's instructions on how to install the fittings you have. Make sure to use any given rubber washers or seals so that there are no leaks. Clean and re-install oil pan in reverse of removal.
-->Find the Oil drain flange and oil drain gasket from your kit. Bolt the flange with the gasket between the flange and the turbo securely.
-->Connect the oil line from the turbo to the oil pan fitting. Make sure you tighten everything down so there are no leaks.
Step 4: Install Turbo oil Feed Line
-->Go underneath your car, as if you were going to remove the oil filter. Just to the left of the oil filter, you will see a black rubber plug that is
running into the back of the block. This is your stock oil pressure sensor. Give it a little tug and it should snap off with alittle force.
-->Once the plug is unconnected, you can take a socket and rachet to remove the stock pressure sensor. It's going to be big, and a deep socket as well. Something like a 21mm I believe. This is your stock sensor removed and your new "Oil- T" you got in your kit.
-->With your Oil-T, you should have recieved a small black screw/plug to plug up a hole on the T if you do not have a need for the 2nd hole. You must plug this whole if you dont have anything to go there such as a aftermarket oil pressure sensor.
-->Gently screw the Oil T into the stock oil pressure sensor hole on the block. Using a 17mm socket, tighten it down, but not extremely tight because it could crack the block if it goes in too hard. be careful. Once it's in firmly, screw the Stock sensor into the back hole of the Oil-T and tighten it down firmly, but not too tight.
-->Now it's time to get out your oil feed line that was found in your oil kit. It should be the 3ft or so, skinny stainless steel line. take one side and run it down to the Oil-T you just installed, and thread it into the last hole that is open. Again firmly but not too tight.
-->It's your choice on how you run the line to get to your turbo's feed fitting. You run the line through your intake manifold runners and over your vavle cover to your turbo. Thread it into the turbo and firmly tighten it down. Now your feed line is complete.
Step 5: Install Front Mount Intercooler

-->This step is really going to vary depending on what intercooler you have choosen for your turbo kit. If you get the Johnny Racecar fmic, then all your going to have to do is two holes and mount it up.
-->First thing your gonna have to do is take off the front bumper.
-->Do a test fit to see what needs to be done for it to fit. You may have to cut off bumper supports to allow fitment of the fmic you purchased. You can hold the fmic with a jack and kinda "eye" what needs to be cut off. Mark what needs to be cut.
-->Now that you marked it, you just gotta start cutting away. It will be easiest to start real softly untill you have got a complete hole through a small section of the metal. Once you can fit the whole cut-off wheel through and start cutting through the metal from the side, it starts to get alittle easier.
-->You now can mark where the holes on the intercooler mounts are in relation to the bumper support, then drill those marks out. Go buy some
bolts/nuts/washers from homedepot to put in those newly drilled holes.
Step 6: Modify Bumper to fit FMIC
-->Now that you have your fmic mounted, you can test fit your bumper again. It's not gonna fit without a little cutting of the center grille. It is just easier to just cut the whole front grill out instead of trying to just cut some and save it.
-->Again you can use a dremel with a cut-off wheel adaptor to cut this off which works pretty good but you have to go slow because it tends to melt from heat. You can also use a hack saw but dremel is more accurate. Once you got it all cut out, it should look like this.
-->Once you get this done try to mount it again and see how it looks. If everything looks good, assemble it back together.
Step 7:Internal Fuel Pump Installation

-->First things first, you need to un-hook both negative/positive cables from the battery to be safe.
-->Next, pop you trunk and remove all of the things you have accumulated in there. Clean it out and remove the trunk mat/spare tire/ect.
-->Now that you have the fuel tank access cover exposed, it's time to release fuel tank pressure. to do this, you should open up your gas cap, as well as relieve pressure from your fuel filter. Make sure you have good ventalation.
-->Releaseing pressure from the fuel filter is pretty easy. There is one "service" bolt that is threaded into the Banjo bolt on top of the fuel filter. Use a wrench to hold banjo bolt in place, while using a rachet to loosen the service bolt. Prepare for some fuel to leak out, so put a rag around the fuel filter.
-->It's time to take of the access cover, simple unscrewing of 4 screws will do the trick.
-->Pull out the cord from the connector first
-->use a rachet to loosen the banjo bolt (prepare for small fuel leak, have rag on hand) as well as pull vaccum hose off of the nipple. Lastly, there will be 6 nuts that hold down the cover plate, remove those.
-->Now you are ready to pull the fuel pump out of the gas tank. Pull up and at a diagonal to remove it, should just slide out.
-->Once you have it out of the car, it's ready to swap the old fuel pump with the new fuel pump. using a flat head screw driver, gently pop off the green "safety clip" that is holding the wire plug together. Once you poped it off, unplug the connector. Make sure not to lose the green safety clip because you will need it again to reinstall.
-->Using plyers, pull the rubber hose off the nipple. Now the fuel pump is free to come off the mount, just pull on it and it should come off. It may feel as if it is hard to come off, but that's just cus the rubber bushing makes it have a tight fit.
-->Compare your new pump to your oem fuel pump to make sure everything looks the same. In some cases, the company will send you the wrong filter to for your application, if so re-use the stock filter.
-->For reinstallation, just do all removal backwards. snap fuel pump into mount, connect rubber hose to nipple, plug connector back into place, snap "safety clip" onto the connector, slide fuel pump down and diagonal into fuel tank, hook up rubber hose, tighten banjo bolt, plug wire connector, tighten 6 nuts to fuel plate, screw down fuel tank access plate back down tight, put everything back into your trunk. COMPLETE
Step 8: Installing Dsm Injectors
-->Buy a set of dsm injectors
-->First, relieve fuel pressure just like you did while installing the fuel pump, if not relieved already.
-->Using a flat head screwdriver, you can unclip the metal wire that holds the injector clips onto the stock injectors.
-->Take a 10mm socket with an extension on it, loosen and remove the three nut that hold the fuel rail down to the manifold.
-->The fuel rail should now be able to pulled off. When the injectors slip out of the manifold, there will be two o-rings below it, make sure you dont loose them. The injectors pop right out of the fuel rail.
-->Cut the two wires leading to the stock injector clips, leave enough wire on either side so that you can rewrire the stock clips back in if you need/want to.
-->Strip the two wires
-->The four pairs wires coming off the fuel rail will have a common color of wire and one random color wire. If you look at the dsm clips, it will also have one common color wire and one random color wire. The fuel rail has common yellow/black wire, and the dsm has common red wire. Take the common from each side, and solder them together for each clip. Then take the random wires and solder those together. Order does not matter.
-->Solder the wires together and use electrical tape to cover and protect the exposed wire.
-->Now that the clips are on, it's on to perparing the o-rings for installation. The tip of the injector on the dsm is wider in diameter then the stock injectors. This means you need to either buy larger o-ring injectors, or bore out the o-rings to fit.
-->Only use the larger hard o-ring because the soft ones will not work with the dremel.
-->Install the injectors just like you took them out. tighten down 3 nuts to hold fuel rail in.
Step 9: Installing Injector Resistor Box
-->Some obd0 Honda's and some other cars use low impedance injectors which need a resistor box. You can find these at a junk yard or for cheap on ebay.
-->On obd1 Honda's, there is a "dead end" clip on the wiring harness in the right corner of the engine bay. (obd2 has this clip under the intake manifold). This clip has the electrical power running through it that goes to the injectors. It is right next to the clutch master cylinder.
-->When you find the clip, pop off the Protecting cover so it exposes the inside.
-->Using a multimeter, check for conductivity between each clip and the end's of the "dead-end" connector. The idea is to find which wires actually are routed to the injector clips, so seeing if electricity can flow, you can guess-and-check and find out.There are eight different wires going into the "dead-end" connector, all of which you must check to see if they are the winners. It could be random placed, so do not assume. CHECk TO MAKE SURE!
-->Once you found out which ones are conductive, move down 2-4 inches and cut the wire. This break in to wire is where you will have your resistor tie into the system. Strip both sides of the new striped wires.
-->If you take a look at your resistor box, there should be 5 wires coming out of it. Four of them should be common color and one of them should be a different color. Strip all the ends if they are not already.
-->Next, Take the Single different color wire from the resistor box and solder it to all Four of the wires on the "dead-end" side.
-->Connect Each one of the Four common color wires from the resistor box to one of the four yellow/black wires on the Injector side of the cut. Solder each wire seperately, no order is nessecary.
-->Wrap all the exposed wires up with electrical tape and mount the resistor box in the corner.
Step 10: Installing Gm 3bar Map Sensor
-->Purchase Gm 3bar Map Sensor with Pigtail connector From Camp1320.com. It's like ($80) shipped new! You must find the stock map sensor(it is located right above the throttle body). Clip off the old connector on the harness side of the sensor. Strip and get the wires ready to solder to somethign new. The new Gm map sensor should have came with a "pigtail" which is the male side of the connector with wires coming out of it ready to solder together. Strip them.
-->Refrence hondata.com's picture of a gm 3bar for the clip wire order...
-->Connect a vacuum hose from the map sensor to a good vacuum source. You can use a GE vaccume manifold again for a good relieable source. You do not want to "t" this vaccuum source off of anything else, nor does it need to be too long of a hose. The map sensor is sensitive and extremely important to the performance of your vehicle.
-->To check for proper installation, use multimeter to check voltages and conductivity. Between wire A and C, there should read 5volts. With ignition "on" but car not running, There should be 1.6Volts between A(GND) and B(map signal).
Step 11: Installing Golden Eagle Vacuum Manifold
-->Purchase a Vacuum manifold if you want a cleaner install or need it for multiple vacuum lines. A Golden Eagle Manifold is a great choice. You can go to (http://www.Camp3120.com) to purchase one!
-->Go to your local automotive parts store to get the vacuum fittings that are needed. You will need to buy fittings that are 1/4"npt threaded side, and 1/8" ****** size.
-->This manifold does not come Pre-drilled, that way you can choose how many holes you want open without having to purchase plugs. Using a 5/16th drill bit, Drill out the amount of hole that you will be using for your setup. Try not to hit the threads on the side's of the holes. Once you make it through, blow out
any scrapes of metal.
-->Use teflon tape and wrap it around the threads of the fitting to insure tight seal with manifold. Screw them in and tighten them up with a wrench
-->Now is the time to find a place to mount it. The location should be no more then 5" away from the main source vacuum(brake booster line). You can use the center-top area on your firewall where nothing was located. Using a 15/32 bit, make two holes useing the manifold as a template before you drill.
-->To make it a nice, secure install, go ahead and remove the upper plastic vent infront of the windshield. There are about 10 little clips that hold it on.
-->Hold the manifold up and tighten it down with the bolts/nuts.
-->Using a 1/2" vacuum line, measure out the distance in which it will need to be. YOu need to use a bigger vacuum "t" that can support the 1/2" diameter lines. Cut the brake booster line "BEFORE" the check vavle.
-->Cut the brake booster line "BEFORE" the check valve.
-->Run the 1/2" line from the T to the side of the Vacuum Manifold.
-->Connect the rest of the normal size vacuum lines(not sure true size). These lines will run to your products that need a good vacuum source. clamp the lines on the fittings with hose clamps or zip ties.
Step 12: Installing Boost Gauge
-->Buy a boost guage of your choice. Ebay gauges are cheap! Why not buy an ebay guage? Because they are not accurate at all. First, you gotta wire up your boost gauge. pwr/gnd/dim. there are plenty of ways to do this wiring, but the easiest way is to use your fusebox. If you take a look at the fuse box, underneath your dash, you will find exactly the sources of pwr you will need. Your 12v pwr wire should plug in underneath the "radio/cigarettelighter 15a fuse" for continuous 12v action. You can plug your Dimming Control wire underneath your "low-beam" headlight fuse"
-->Now it's time to run your boost/vaccum line to a vaccum source. If you purchased a Golded Eagl vaccum manifold you can use it for good vaccum Source, make sure to tap the vaccum from the manifold side of the system so that you can read vaccum and boost. There is a small hole(just right of battery) that allows wires to travel through firewall, this is a perfect spot to feed your boost line through.
-->Keep running the line under and through the dash up to where ever you mounted your boost gauge. Pull it in and your all set to read your boost/vaccum!
Step 13: Install Hondata Ecu
-->Easiest part of the turbo installation. LAST PART as well!
Move to your passenger side of the car, and pull the carpet up from underneath the dash. You wil have to pop out a few clips to get carpet up and pulled back. YOu'll see your ecu come out from hiding on the side of the wall.
-->The ecu is being held up by a few nuts/bolts. Using a 10mm take them all off and pull your ecu from it's mounted position. Now that the ecu is free from it's wall, unclip the harness from the ecu. Plug the new ecu in.. and remount it back up! Push back carpet and push back all clips!
-->Congratulations! You have now sucessfully installed a turbocharger in your Honda. Get ready to be boosted!!!
Pre-Start Up: There are a few things you need/should do before you start it up and start driving.
-->(1)Refill/check oil and replace oil filter
-->(2)Flush/top off Coolant
-->(3)Go over all electrical wiring again to make sure it's all secure and connected
-->(4)Go over every vacuum hose to make sure it's tight and secure
-->(5)Connect exhaust back up if you have one
-->(6)Pull your spark plug wires and crank the motor a few times to get some oil into the brand new turbo
Start It Up:
-->Turn the ignition and start her up!
-->Let it idle to normal operating tempatures before you drive. While it's idleing, check throughly around the oil lines to make sure there's no oil leaks.
-->Fix oil leaks if necessary and take that beast for a test drive. Dont push it at ALL if it's on a basemap of some sort. If your just running a hack or fuel management unit, take it easy till you know everything is running perfect. Drive down and back on the street, and re-check everything!
Objective:
--> This is a step by step procedure on how to turbocharge your Honda. This DIY would work for most 4 cylinder cars.
Pre Installation Information:
Parts Needed:
-->(1) Turbocharger: Pick which size and trim turbo is going to work best for your application and goals.
-->(2) Exhaust Manifold: Either log/cast/equal length. Make sure it was made for your turbo(t3, 4bolt, 5bolt, dsm, etc)and motor.
-->(3) Downpipe: Must be custom for your turbo/manifold choice. A flex pipe and o2 bung are nice to have while creating a downpipe.
-->(4) Wastegate: Choose a wastegate size (also what psi spring you'd like to run) according to application such as amount of air flow and psi from turbo
-->(5) Intercooler: Choose either a FMIC (Front Mount Intercooler) or a SMIC (Side Mount Intercooler).
-->(6) Blow off valve: This is optional but highly recommeded.
-->(7) Fuel Manegment Unit: One of the most important parts on your turbocharged car. I would highly suggest running a programable chiped ecu or standalone
device, but running a AFC hack controller can be used as well.
-->(8) Fuel Pump : You will probably need an upgraded fuel pump to support the added fuel consumption. Can be either internal or external.
-->(9) Injectors : To support added air induction, more fuel is needed. Hence bigger injectors. Buy size according to application
-->(10) Map Sensor: Stock maps can only read "up to" 10.63 psi. If you plan to go higher you may want to upgrade to a 2bar or 3bar map sensor.
-->(11) Intercooler Piping: You can buy an intercooler piping kit, but usally it will always take some modification to fit your exact application.
-->(12) Couplers/t-bolts: You will need silicone couplers to bind the two intercooler pipes together as well as t-bolts (or screw clamps which i dont
recommend to tighten those couplers down.
-->(13) Oil drain/feed lines: Every turbo needs oil, so you must buy an oil feed and drain line kit. stainless steel lines are recommended.
-->(14) Vacuum Manifold: Not required but recommened to help organize vacuum lines and allow for good vacuum sources.
-->(15) Gauges: Although not required, it's highly recommend so you can keep some status of motor operation. Boost/Oil pressure are highly recommended.
-->(16) Spark plugs: Although not required, turbo temperatures can get very high, so I recommend you step down two steps colder in your spark plugs.
Tools Needed:
-->(1) Extensive Socket/Rachet Set: Metric and Standard Sizes. The more variety, the less likely you wont have the socekt you need for the job.
-->(2) Extensive wrech set: Metric sizes. Racheting wrenchs are gonna work great for tight places.
-->(3) Floor jack and jack stands: you gotta get that car up for some things, and safety is a must.
-->(4) Screw driver set: Again, the more variety, the better.
-->(5) Dremel: You may need to cut or sand some things down, so a dremel will be perfect for the job.
-->(6) Wire strippers: Your gonna do some spliceing and wire cutting at some point.
-->(7) Multi-meter: Not required, but is handy to have around to troubleshoot and test wires.
-->(8) PB-Blaster or any other rust breaking spray: This is extremely useful for getting old rusted bolts off.
Estimated Time and Skill level:
--> I Would give your self at least week or more to finish this install properly. Depending on how much free time you have. It will take time, dont expect to get it done in a day. Unplaned bumps in the road will occur, but dont be discouraged.
--> Skill level: I'd say a full turbo install would have to be from a 6-8 difficutly in the import world depending on your skill level. Building a motor
being 10.
Installation Proceduces:
Step 1: Remove all N/a parts from your motor
-->Take a look into your engine bay and find where your Intake and Header/Manifold are, since you will be replacing both with new parts, these will not be needed any longer.
-->Remove the Intake by unscrewing the two screw clamps holding the silicone coupler on the throttle body, and a bolt down near the air filter where intake is holding onto chassis.
-->Your gonna have to get under the car for the rest of this project, so it's a good idea to jack the car up and make sure to use two jack stands for safety reasons.
-->Remove the 9-12mm nuts that hold header to engine head studs.
-->Remove the three bolts that hold cat and exhaust together. After you un-bolt these three bolts, there should be two bolts that are holding the header in place on the bracket hanging from the back of the block. Remove those two bolts as well and the header should be free to drop out of place.
Step 2: Assemble and Install manifold/turbo/downpipe
-->Whether or not you bought your manifold and downpipe brand new or custom made it, I suggest assembling it just to test fit before you try installing into the car. Check for turbo placement, and dp route.
-->First, you will want to apply some PB-Blaster to the o2 sensor on your n/a header, this way, removal is easy. Once you get it out, screw it onto the new Downpipe o2 sensor bung.
-->Slide the manifold on to the engine block exhaust studs
-->Next, if needed, clock your turbo to fit your setup correctly. To Clocking your turbo means to rotate the compressor/turbine housings relative to the center housing. It's easy to do, you just need to loosen the bolts that hold the housings down tight, and rotate. Tighten back up when it's in the right spot.
-->You are now going to want to hand tighten the turbo to the manifold so that you can test fit on the block.
-->If the manifold sits flush with head of engine, and turbo is clocked to fit your setup correctly, it is time to tighten down the head studs to hold
manifold securely. Tighten turbo manifold bolts as well.
Step 3: Mark and Remove Oil Pan and install oil drain line
-->Get under the car and take a look at your oil pan while you have your manifold/turbo/dp on for fitment. Your going to want to grab your oil drain line that was supplied in your oil line kit that you purchased for this step.
-->Take one end of the stainless steel line and line it up with the oil drain hole on the turbo.
-->Take the other end, and find a way to make the line reach a designated spot on the oil pan. The spot on the oil pan can most likely be anywhere in the "deep" section of the oil pan, located at the highest point of the "deep" part. Run the line the best you can without touching the downpipe or making any sharp turns or positive slope. The oil return line is important to have correctly so that your turbo gets effective oil cooling and lubricant for the seals.
-->Mark where oil drain hose lines up on the oil pan with a screwdriver or something sharp so it leaves a good clear mark.
-->If there is no way to run the line without pinching it, you can purchase straight/45 degree/90 degree fittings so that the line does not have a kink in it. Also, if the oil line is touhcing the downpipe, you need to look into purchasing some kind of heat wrap so that your oil line doesnt wear over time, as well as that your "inner" rubber line doesnt melt.
-->The oil pan has got about 26 or so bolts/nuts that are holding it on. First things first, you must drain the oil from your engine so taking off the pan wont be the messiest thing you've ever done. 17mm socket to the drain plug will do the trick.
-->Once you get all the oil out, your ready to start the removal process. You will need to remove all of the bolts and the pan should drop freely. Make sure to keep track of oil pan gasket cus you'll need to make sure to put that on when you re-install.
-->Now it's time to either weld the oil drain bung or drill a hole for the "weld-less" oil drain that you have. Either way, it's the same concept, make a hole for oil.
-->After the hole is made, use your kit's instructions on how to install the fittings you have. Make sure to use any given rubber washers or seals so that there are no leaks. Clean and re-install oil pan in reverse of removal.
-->Find the Oil drain flange and oil drain gasket from your kit. Bolt the flange with the gasket between the flange and the turbo securely.
-->Connect the oil line from the turbo to the oil pan fitting. Make sure you tighten everything down so there are no leaks.
Step 4: Install Turbo oil Feed Line
-->Go underneath your car, as if you were going to remove the oil filter. Just to the left of the oil filter, you will see a black rubber plug that is
running into the back of the block. This is your stock oil pressure sensor. Give it a little tug and it should snap off with alittle force.
-->Once the plug is unconnected, you can take a socket and rachet to remove the stock pressure sensor. It's going to be big, and a deep socket as well. Something like a 21mm I believe. This is your stock sensor removed and your new "Oil- T" you got in your kit.
-->With your Oil-T, you should have recieved a small black screw/plug to plug up a hole on the T if you do not have a need for the 2nd hole. You must plug this whole if you dont have anything to go there such as a aftermarket oil pressure sensor.
-->Gently screw the Oil T into the stock oil pressure sensor hole on the block. Using a 17mm socket, tighten it down, but not extremely tight because it could crack the block if it goes in too hard. be careful. Once it's in firmly, screw the Stock sensor into the back hole of the Oil-T and tighten it down firmly, but not too tight.
-->Now it's time to get out your oil feed line that was found in your oil kit. It should be the 3ft or so, skinny stainless steel line. take one side and run it down to the Oil-T you just installed, and thread it into the last hole that is open. Again firmly but not too tight.
-->It's your choice on how you run the line to get to your turbo's feed fitting. You run the line through your intake manifold runners and over your vavle cover to your turbo. Thread it into the turbo and firmly tighten it down. Now your feed line is complete.
Step 5: Install Front Mount Intercooler
-->This step is really going to vary depending on what intercooler you have choosen for your turbo kit. If you get the Johnny Racecar fmic, then all your going to have to do is two holes and mount it up.
-->First thing your gonna have to do is take off the front bumper.
-->Do a test fit to see what needs to be done for it to fit. You may have to cut off bumper supports to allow fitment of the fmic you purchased. You can hold the fmic with a jack and kinda "eye" what needs to be cut off. Mark what needs to be cut.
-->Now that you marked it, you just gotta start cutting away. It will be easiest to start real softly untill you have got a complete hole through a small section of the metal. Once you can fit the whole cut-off wheel through and start cutting through the metal from the side, it starts to get alittle easier.
-->You now can mark where the holes on the intercooler mounts are in relation to the bumper support, then drill those marks out. Go buy some
bolts/nuts/washers from homedepot to put in those newly drilled holes.
Step 6: Modify Bumper to fit FMIC
-->Now that you have your fmic mounted, you can test fit your bumper again. It's not gonna fit without a little cutting of the center grille. It is just easier to just cut the whole front grill out instead of trying to just cut some and save it.
-->Again you can use a dremel with a cut-off wheel adaptor to cut this off which works pretty good but you have to go slow because it tends to melt from heat. You can also use a hack saw but dremel is more accurate. Once you got it all cut out, it should look like this.
-->Once you get this done try to mount it again and see how it looks. If everything looks good, assemble it back together.
Step 7:Internal Fuel Pump Installation
-->First things first, you need to un-hook both negative/positive cables from the battery to be safe.
-->Next, pop you trunk and remove all of the things you have accumulated in there. Clean it out and remove the trunk mat/spare tire/ect.
-->Now that you have the fuel tank access cover exposed, it's time to release fuel tank pressure. to do this, you should open up your gas cap, as well as relieve pressure from your fuel filter. Make sure you have good ventalation.
-->Releaseing pressure from the fuel filter is pretty easy. There is one "service" bolt that is threaded into the Banjo bolt on top of the fuel filter. Use a wrench to hold banjo bolt in place, while using a rachet to loosen the service bolt. Prepare for some fuel to leak out, so put a rag around the fuel filter.
-->It's time to take of the access cover, simple unscrewing of 4 screws will do the trick.
-->Pull out the cord from the connector first
-->use a rachet to loosen the banjo bolt (prepare for small fuel leak, have rag on hand) as well as pull vaccum hose off of the nipple. Lastly, there will be 6 nuts that hold down the cover plate, remove those.
-->Now you are ready to pull the fuel pump out of the gas tank. Pull up and at a diagonal to remove it, should just slide out.
-->Once you have it out of the car, it's ready to swap the old fuel pump with the new fuel pump. using a flat head screw driver, gently pop off the green "safety clip" that is holding the wire plug together. Once you poped it off, unplug the connector. Make sure not to lose the green safety clip because you will need it again to reinstall.
-->Using plyers, pull the rubber hose off the nipple. Now the fuel pump is free to come off the mount, just pull on it and it should come off. It may feel as if it is hard to come off, but that's just cus the rubber bushing makes it have a tight fit.
-->Compare your new pump to your oem fuel pump to make sure everything looks the same. In some cases, the company will send you the wrong filter to for your application, if so re-use the stock filter.
-->For reinstallation, just do all removal backwards. snap fuel pump into mount, connect rubber hose to nipple, plug connector back into place, snap "safety clip" onto the connector, slide fuel pump down and diagonal into fuel tank, hook up rubber hose, tighten banjo bolt, plug wire connector, tighten 6 nuts to fuel plate, screw down fuel tank access plate back down tight, put everything back into your trunk. COMPLETE
Step 8: Installing Dsm Injectors
-->Buy a set of dsm injectors
-->First, relieve fuel pressure just like you did while installing the fuel pump, if not relieved already.
-->Using a flat head screwdriver, you can unclip the metal wire that holds the injector clips onto the stock injectors.
-->Take a 10mm socket with an extension on it, loosen and remove the three nut that hold the fuel rail down to the manifold.
-->The fuel rail should now be able to pulled off. When the injectors slip out of the manifold, there will be two o-rings below it, make sure you dont loose them. The injectors pop right out of the fuel rail.
-->Cut the two wires leading to the stock injector clips, leave enough wire on either side so that you can rewrire the stock clips back in if you need/want to.
-->Strip the two wires
-->The four pairs wires coming off the fuel rail will have a common color of wire and one random color wire. If you look at the dsm clips, it will also have one common color wire and one random color wire. The fuel rail has common yellow/black wire, and the dsm has common red wire. Take the common from each side, and solder them together for each clip. Then take the random wires and solder those together. Order does not matter.
-->Solder the wires together and use electrical tape to cover and protect the exposed wire.
-->Now that the clips are on, it's on to perparing the o-rings for installation. The tip of the injector on the dsm is wider in diameter then the stock injectors. This means you need to either buy larger o-ring injectors, or bore out the o-rings to fit.
-->Only use the larger hard o-ring because the soft ones will not work with the dremel.
-->Install the injectors just like you took them out. tighten down 3 nuts to hold fuel rail in.
Step 9: Installing Injector Resistor Box
-->Some obd0 Honda's and some other cars use low impedance injectors which need a resistor box. You can find these at a junk yard or for cheap on ebay.
-->On obd1 Honda's, there is a "dead end" clip on the wiring harness in the right corner of the engine bay. (obd2 has this clip under the intake manifold). This clip has the electrical power running through it that goes to the injectors. It is right next to the clutch master cylinder.
-->When you find the clip, pop off the Protecting cover so it exposes the inside.
-->Using a multimeter, check for conductivity between each clip and the end's of the "dead-end" connector. The idea is to find which wires actually are routed to the injector clips, so seeing if electricity can flow, you can guess-and-check and find out.There are eight different wires going into the "dead-end" connector, all of which you must check to see if they are the winners. It could be random placed, so do not assume. CHECk TO MAKE SURE!
-->Once you found out which ones are conductive, move down 2-4 inches and cut the wire. This break in to wire is where you will have your resistor tie into the system. Strip both sides of the new striped wires.
-->If you take a look at your resistor box, there should be 5 wires coming out of it. Four of them should be common color and one of them should be a different color. Strip all the ends if they are not already.
-->Next, Take the Single different color wire from the resistor box and solder it to all Four of the wires on the "dead-end" side.
-->Connect Each one of the Four common color wires from the resistor box to one of the four yellow/black wires on the Injector side of the cut. Solder each wire seperately, no order is nessecary.
-->Wrap all the exposed wires up with electrical tape and mount the resistor box in the corner.
Step 10: Installing Gm 3bar Map Sensor
-->Purchase Gm 3bar Map Sensor with Pigtail connector From Camp1320.com. It's like ($80) shipped new! You must find the stock map sensor(it is located right above the throttle body). Clip off the old connector on the harness side of the sensor. Strip and get the wires ready to solder to somethign new. The new Gm map sensor should have came with a "pigtail" which is the male side of the connector with wires coming out of it ready to solder together. Strip them.
-->Refrence hondata.com's picture of a gm 3bar for the clip wire order...
-->Connect a vacuum hose from the map sensor to a good vacuum source. You can use a GE vaccume manifold again for a good relieable source. You do not want to "t" this vaccuum source off of anything else, nor does it need to be too long of a hose. The map sensor is sensitive and extremely important to the performance of your vehicle.
-->To check for proper installation, use multimeter to check voltages and conductivity. Between wire A and C, there should read 5volts. With ignition "on" but car not running, There should be 1.6Volts between A(GND) and B(map signal).
Step 11: Installing Golden Eagle Vacuum Manifold
-->Purchase a Vacuum manifold if you want a cleaner install or need it for multiple vacuum lines. A Golden Eagle Manifold is a great choice. You can go to (http://www.Camp3120.com) to purchase one!
-->Go to your local automotive parts store to get the vacuum fittings that are needed. You will need to buy fittings that are 1/4"npt threaded side, and 1/8" ****** size.
-->This manifold does not come Pre-drilled, that way you can choose how many holes you want open without having to purchase plugs. Using a 5/16th drill bit, Drill out the amount of hole that you will be using for your setup. Try not to hit the threads on the side's of the holes. Once you make it through, blow out
any scrapes of metal.
-->Use teflon tape and wrap it around the threads of the fitting to insure tight seal with manifold. Screw them in and tighten them up with a wrench
-->Now is the time to find a place to mount it. The location should be no more then 5" away from the main source vacuum(brake booster line). You can use the center-top area on your firewall where nothing was located. Using a 15/32 bit, make two holes useing the manifold as a template before you drill.
-->To make it a nice, secure install, go ahead and remove the upper plastic vent infront of the windshield. There are about 10 little clips that hold it on.
-->Hold the manifold up and tighten it down with the bolts/nuts.
-->Using a 1/2" vacuum line, measure out the distance in which it will need to be. YOu need to use a bigger vacuum "t" that can support the 1/2" diameter lines. Cut the brake booster line "BEFORE" the check vavle.
-->Cut the brake booster line "BEFORE" the check valve.
-->Run the 1/2" line from the T to the side of the Vacuum Manifold.
-->Connect the rest of the normal size vacuum lines(not sure true size). These lines will run to your products that need a good vacuum source. clamp the lines on the fittings with hose clamps or zip ties.
Step 12: Installing Boost Gauge
-->Buy a boost guage of your choice. Ebay gauges are cheap! Why not buy an ebay guage? Because they are not accurate at all. First, you gotta wire up your boost gauge. pwr/gnd/dim. there are plenty of ways to do this wiring, but the easiest way is to use your fusebox. If you take a look at the fuse box, underneath your dash, you will find exactly the sources of pwr you will need. Your 12v pwr wire should plug in underneath the "radio/cigarettelighter 15a fuse" for continuous 12v action. You can plug your Dimming Control wire underneath your "low-beam" headlight fuse"
-->Now it's time to run your boost/vaccum line to a vaccum source. If you purchased a Golded Eagl vaccum manifold you can use it for good vaccum Source, make sure to tap the vaccum from the manifold side of the system so that you can read vaccum and boost. There is a small hole(just right of battery) that allows wires to travel through firewall, this is a perfect spot to feed your boost line through.
-->Keep running the line under and through the dash up to where ever you mounted your boost gauge. Pull it in and your all set to read your boost/vaccum!
Step 13: Install Hondata Ecu
-->Easiest part of the turbo installation. LAST PART as well!
Move to your passenger side of the car, and pull the carpet up from underneath the dash. You wil have to pop out a few clips to get carpet up and pulled back. YOu'll see your ecu come out from hiding on the side of the wall.
-->The ecu is being held up by a few nuts/bolts. Using a 10mm take them all off and pull your ecu from it's mounted position. Now that the ecu is free from it's wall, unclip the harness from the ecu. Plug the new ecu in.. and remount it back up! Push back carpet and push back all clips!
-->Congratulations! You have now sucessfully installed a turbocharger in your Honda. Get ready to be boosted!!!
Pre-Start Up: There are a few things you need/should do before you start it up and start driving.
-->(1)Refill/check oil and replace oil filter
-->(2)Flush/top off Coolant
-->(3)Go over all electrical wiring again to make sure it's all secure and connected
-->(4)Go over every vacuum hose to make sure it's tight and secure
-->(5)Connect exhaust back up if you have one
-->(6)Pull your spark plug wires and crank the motor a few times to get some oil into the brand new turbo
Start It Up:
-->Turn the ignition and start her up!
-->Let it idle to normal operating tempatures before you drive. While it's idleing, check throughly around the oil lines to make sure there's no oil leaks.
-->Fix oil leaks if necessary and take that beast for a test drive. Dont push it at ALL if it's on a basemap of some sort. If your just running a hack or fuel management unit, take it easy till you know everything is running perfect. Drive down and back on the street, and re-check everything!
Last edited by corvetteking; 06-19-2010 at 07:36 PM.
#2
06-19-2010, 12:53 AM

Been Around A Long Time Member
Join Date: Dec 2005
Location: In The Desert ( Sahara ? )
Posts: 4,754
#3
06-19-2010, 02:57 PM
Join Date: May 2010
Location: Phenix City, Alabama
Posts: 451
Thank you for stickying this... Although, i cant take all the credit for this writeup...It is a modified thread from another forum, made for our cars...There are a few things that arent necessary for certain applications, but if you have any questions, post em up, me or someone else on here should be able to get you an anwser...


Thread
Thread Starter
Forum
Replies
Last Post
Melissa
PRIVATE For Sale / Trade Classifieds
2
08-25-2009 12:44 AM
importedminds
Audio/Visual Electronics
3
08-06-2008 08:43 PM
Honda_Dude
Engine & Internal
2
01-13-2007 08:11 PM