Power steering pressure hose replacement
#1
 03-01-2014, 12:34 PM


Hello all. Just curious if anyone has any tips for replacement of the high pressure hose for power steering on a 1998 VTEC 6 cyl. Accord.
Looks like that thing goes into never never land back behind the engine. I haven't jacked the car up to get under it yet for a look but I'm wondering how you'd even get a line wrench on the fitting on the rack.
Also having a hard time finding one, even rock auto doesn't stock it???
Any suggestions are appreciated. Thanks!
EDIT: ouch.. looks like I'm finding out more about this job searching some forums and it is a nightmare to reach the HP fitting on the rack. some talk of even lowering subframe to access.. Ugh.. Also found link posted by one of the mods. Thanks Redbull-1
Looks like that thing goes into never never land back behind the engine.
I haven't jacked the car up to get under it yet for a look but I'm wondering how you'd even get a line wrench on the fitting on the rack.Also having a hard time finding one, even rock auto doesn't stock it???
Any suggestions are appreciated. Thanks!
EDIT: ouch.. looks like I'm finding out more about this job searching some forums and it is a nightmare to reach the HP fitting on the rack. some talk of even lowering subframe to access.. Ugh.. Also found link posted by one of the mods. Thanks Redbull-1
Last edited by Spinninwrenches; 03-01-2014 at 12:51 PM.
#2
03-01-2014, 01:05 PM

I just did my on my 96.Its a real PITA.I ended up breaking the old hi side line off since I was removing the rack anyway.The low side line flare nut was not too bad to get off or install.
Putting it back together,I barely got my arm down there to get the high side line back on.I could NOT do it.I went under the car and was able to get one arm up in there,but the other side,I cant squeeze through.
Lucky my wife is tall with thin arms,from the top of the engine in the rear,she got both arms down back there and was able to twist the new hose line into the rack as far as she could by hand.All on the first try!
Saved my AZZ! I then reached down and tightened it up a few 1/4 turns at a time.
I think your V6 is even tighter to do,compared to the smaller 4 I have.Good Luck and keep us posted.
#3
03-01-2014, 08:42 PM
I just did my on my 96.Its a real PITA.I ended up breaking the old hi side line off since I was removing the rack anyway.The low side line flare nut was not too bad to get off or install.
Putting it back together,I barely got my arm down there to get the high side line back on.I could NOT do it.I went under the car and was able to get one arm up in there,but the other side,I cant squeeze through.
Lucky my wife is tall with thin arms,from the top of the engine in the rear,she got both arms down back there and was able to twist the new hose line into the rack as far as she could by hand.All on the first try!
Saved my AZZ! I then reached down and tightened it up a few 1/4 turns at a time.
I think your V6 is even tighter to do,compared to the smaller 4 I have.Good Luck and keep us posted.
Putting it back together,I barely got my arm down there to get the high side line back on.I could NOT do it.I went under the car and was able to get one arm up in there,but the other side,I cant squeeze through.
Lucky my wife is tall with thin arms,from the top of the engine in the rear,she got both arms down back there and was able to twist the new hose line into the rack as far as she could by hand.All on the first try!
Saved my AZZ! I then reached down and tightened it up a few 1/4 turns at a time.
I think your V6 is even tighter to do,compared to the smaller 4 I have.Good Luck and keep us posted.
So I eyed up the job completely now at this point, but didn't even investigate down underneath. After knowing for sure all the areas that are of concern, I could actually see everything right from the top side. Surprisingly enough the HP fitting on the rack isn't as bad as what I thought..
However, the flare nut is rusty as can be on mine. (Guess that's what happens in 250k miles and winters in the rust belt). I sprayed all the spots where I have to remove bolts and such with PB blaster today. I'm going to keep hitting them for the next few days while I wait for my part to come in.
I actually ended up having to get the hose from O-Riley here locally, there wasn't even one I could easily find online! Yea, and price is a freaking rip-off.. $140!
Oh well, I can't have power steering fluid spewing all over the place so it will soon be off to the races with this job attempt. It might be a while before I check back in as the part won't be here till Wed. or so, and then I've gotta go out of town for a week or so.
#4
03-23-2014, 09:19 AM
Ok, so I figured I'd come and update the topic to share the pure joy that this job is to do. ") Again, what's critical to note here is the model vehicle for the job we're talking about. The 6 Cyl. VTEC is significantly different than a 4 as the hose attaches on the passenger side of the motor and chases all along behind the motor and onto the subframe and then into the rack.
Again, what's critical to note here is the model vehicle for the job we're talking about. The 6 Cyl. VTEC is significantly different than a 4 as the hose attaches on the passenger side of the motor and chases all along behind the motor and onto the subframe and then into the rack.
Some searching here led me to a post that Redbull-1 gave a link to that was a MAJOR help to know what I'd be getting into:
Power Steering Hose Replacement - V6 - 6th Gen Accord DIY and Performance Forums
In there the guy outlines all the locations of the bolts and clamps, basically letting you go right to the spots that fasten the hose. I'm going to make a few points about his post here since I'm not a member at that other forum. I'll make this post somewhat of a supplement to the nice job he did for everyone putting that together. Hope he wouldn't get upset that I copied his comments and posted them here:

1) Item (19) Easy. I don't know why he says that's tough.
2) P clamp bolts - Not as awful as he makes it out to be. The one under the rack can be done from up top if you just use long extensions / assortment of wobble extensions. Even my rusty one came right out. The other one can be done with a ratcheting wrench.
3) Flare nut - OUCH. This is where my trouble was. See below for the nightmare outcome.
4) Getting line in / out - not too bad. I even did it by myself. I don't know why he says he refrained from bending the old line getting it out... Who cares? It's shot anyway!
Now the part about removing the fitting on the rack.. I read about doing the job and put my order in to even find the dang part weeks ago. In the meantime, driving around with a rag zip-tied around the leaking joints on the hose! But during the last few weeks, I've even been spraying the fitting with PB Blaster since I could see it was all rusty from the 250k miles on my car and these tough Wisconsin salty winters. Thankfully, the other guy posts about the fact that the nut is not the same material as the rack it goes into either, so I was even aware that this was NOT going to be fun.
In the end, that PB Blaster didn't make a difference. I had even bought a 14mm crow foot flare nut wrench in order to prepare for the job. Strike 1. After reefing on it pretty hard I decided to give up and try like the other guy and use a heat gun... Again, that little !@#$* fitting just wouldn't budge. After screwing around with putting a line wrench on from above and tugging at that, I managed to round the fitting off. Nice. WTF am I gonna do now?
After contemplating my next move I knew I was doomed to have to try to weld the crowfoot to the fitting next. Ugh. There's barely enough room to even fit your HAND up in there much less the welder tip and a ground clamp! Luckily I had an older 14mm regular crow foot that I decided I would have to offer up to the Honda gods for sacrifice. I test fit everything and even found that from above, I could sneak a 90 die grinder with a mini wire wheel on it to clean up the rusty nut to get a good weld.
I was really concerned though with the fact that I would not be able to rotate the fitting around all the way once the crow foot was welded on there because it would hit the return line from the rack! Oh well, guess I'll deal with that fact later once I get it broke loose.
So I was off to welding it next. Luckily my MIG welder tip fit up in there nicely and I could even put the ground clamp on the other part of the crow foot and leave room to weld. A few zaps later she was welded on there and I accidentally burned my way right through the line! Whoops! Bath of power steering fluid time - there's no turning back now!
Finally. When the fitting went POP and started to budge just a hair, I stopped since my welds were not super mega duty holding power strong. Tighten, loosen, repeat. Enough of that motion loosened it nicely to the point I could finally just move it by hand. I removed the ratchet and used the long extension to pry up and down motion on the crowfoot and by god the welds broke for me! Awesome. I was relieved.
And the rest is pretty self explanatory. OH.. But one more thing. He doesn't even mention what a PITA that threading the new line into the rack can be! IF you're trying to be careful and not cross thread the new flare nut - it can be a real bear trying to fit your hand up in there! I found the best angle for doing this came from above and using a nice pair of mechanix gloves to keep your hands intact.
And that's it! I'd consider this job to be an "afternoon" job for most people that don't have to go to these extremes. However, if your car is similar condition to mine I wish you good luck and make sure you have your welder handy before beginning! Get that nut broke loose FIRST, that's the key.
Photos:

Here's the fitting with the crowfoot being welded and the welder's ground clamp in place from above.
And POP! It's loose and fluid is flowing!

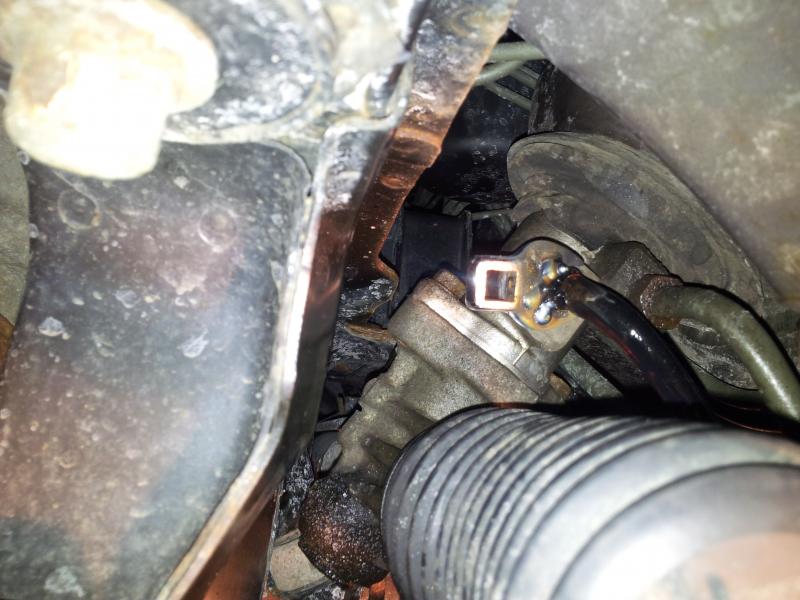
Just a photo that shows the limited space to work with / lack of room to maneuver.

And finally.. THE CULPRIT! (or what's left of him!)
Hope this helps somebody in the future when they think about doing this job. My suggestion is to make sure you take a peek at that fitting PRIOR to even ordering the hose and thinking you'd get yourself involved in this job. Heck, you might even want to try to break the fitting loose first. But don't round it off if you're going to give up and take it to a shop to do!
Good luck!
Again, what's critical to note here is the model vehicle for the job we're talking about. The 6 Cyl. VTEC is significantly different than a 4 as the hose attaches on the passenger side of the motor and chases all along behind the motor and onto the subframe and then into the rack. Some searching here led me to a post that Redbull-1 gave a link to that was a MAJOR help to know what I'd be getting into:
Power Steering Hose Replacement - V6 - 6th Gen Accord DIY and Performance Forums
In there the guy outlines all the locations of the bolts and clamps, basically letting you go right to the spots that fasten the hose. I'm going to make a few points about his post here since I'm not a member at that other forum. I'll make this post somewhat of a supplement to the nice job he did for everyone putting that together. Hope he wouldn't get upset that I copied his comments and posted them here:
1) Item (19) Easy. I don't know why he says that's tough.
2) P clamp bolts - Not as awful as he makes it out to be. The one under the rack can be done from up top if you just use long extensions / assortment of wobble extensions. Even my rusty one came right out. The other one can be done with a ratcheting wrench.
3) Flare nut - OUCH. This is where my trouble was. See below for the nightmare outcome.
4) Getting line in / out - not too bad. I even did it by myself. I don't know why he says he refrained from bending the old line getting it out... Who cares? It's shot anyway!
Now the part about removing the fitting on the rack.. I read about doing the job and put my order in to even find the dang part weeks ago. In the meantime, driving around with a rag zip-tied around the leaking joints on the hose!
But during the last few weeks, I've even been spraying the fitting with PB Blaster since I could see it was all rusty from the 250k miles on my car and these tough Wisconsin salty winters. Thankfully, the other guy posts about the fact that the nut is not the same material as the rack it goes into either, so I was even aware that this was NOT going to be fun.In the end, that PB Blaster didn't make a difference. I had even bought a 14mm crow foot flare nut wrench in order to prepare for the job. Strike 1. After reefing on it pretty hard I decided to give up and try like the other guy and use a heat gun... Again, that little !@#$* fitting just wouldn't budge. After screwing around with putting a line wrench on from above and tugging at that, I managed to round the fitting off. Nice. WTF am I gonna do now?
After contemplating my next move I knew I was doomed to have to try to weld the crowfoot to the fitting next. Ugh. There's barely enough room to even fit your HAND up in there much less the welder tip and a ground clamp! Luckily I had an older 14mm regular crow foot that I decided I would have to offer up to the Honda gods for sacrifice. I test fit everything and even found that from above, I could sneak a 90 die grinder with a mini wire wheel on it to clean up the rusty nut to get a good weld.
I was really concerned though with the fact that I would not be able to rotate the fitting around all the way once the crow foot was welded on there because it would hit the return line from the rack! Oh well, guess I'll deal with that fact later once I get it broke loose.
So I was off to welding it next. Luckily my MIG welder tip fit up in there nicely and I could even put the ground clamp on the other part of the crow foot and leave room to weld. A few zaps later she was welded on there and I accidentally burned my way right through the line! Whoops! Bath of power steering fluid time - there's no turning back now!
Finally. When the fitting went POP and started to budge just a hair, I stopped since my welds were not super mega duty holding power strong. Tighten, loosen, repeat. Enough of that motion loosened it nicely to the point I could finally just move it by hand. I removed the ratchet and used the long extension to pry up and down motion on the crowfoot and by god the welds broke for me! Awesome. I was relieved.
And the rest is pretty self explanatory. OH.. But one more thing. He doesn't even mention what a PITA that threading the new line into the rack can be! IF you're trying to be careful and not cross thread the new flare nut - it can be a real bear trying to fit your hand up in there! I found the best angle for doing this came from above and using a nice pair of mechanix gloves to keep your hands intact.
And that's it! I'd consider this job to be an "afternoon" job for most people that don't have to go to these extremes. However, if your car is similar condition to mine I wish you good luck and make sure you have your welder handy before beginning! Get that nut broke loose FIRST, that's the key.
Photos:
Here's the fitting with the crowfoot being welded and the welder's ground clamp in place from above.
And POP! It's loose and fluid is flowing!
Just a photo that shows the limited space to work with / lack of room to maneuver.
And finally.. THE CULPRIT! (or what's left of him!)
Hope this helps somebody in the future when they think about doing this job. My suggestion is to make sure you take a peek at that fitting PRIOR to even ordering the hose and thinking you'd get yourself involved in this job. Heck, you might even want to try to break the fitting loose first. But don't round it off if you're going to give up and take it to a shop to do!
Good luck!
#5
03-23-2014, 10:24 AM

Congrats on accomplishing a really difficult DIY!
I tried this job on Acura MDX (same PS hose arrangements) and gave up when I tried to access the LP and HP fittings from over the engine.
The shop procedure is to lower the subframe to allow working from beneath. This doesn't lend itself to DIY work on jack stands, but can be done.
good luck
I tried this job on Acura MDX (same PS hose arrangements) and gave up when I tried to access the LP and HP fittings from over the engine.
The shop procedure is to lower the subframe to allow working from beneath. This doesn't lend itself to DIY work on jack stands, but can be done.
good luck
#6
03-23-2014, 04:07 PM
Congrats on accomplishing a really difficult DIY!
I tried this job on Acura MDX (same PS hose arrangements) and gave up when I tried to access the LP and HP fittings from over the engine.
The shop procedure is to lower the subframe to allow working from beneath. This doesn't lend itself to DIY work on jack stands, but can be done.
good luck
I tried this job on Acura MDX (same PS hose arrangements) and gave up when I tried to access the LP and HP fittings from over the engine.
The shop procedure is to lower the subframe to allow working from beneath. This doesn't lend itself to DIY work on jack stands, but can be done.
good luck
Thanks! I agree - going at it from above has got to be impossible. I'm not surprised to hear that the manual says to drop the subframe for access. And right you are - pretty much impossible to do on jack stands unless you've got a lot of time and patience on your hands!

#9
05-25-2017, 09:56 PM

Since you're replacing the line anyway, break the line off flush (or even hacksaw it off flush) with the nut, and use a 6 point 14mm socket on it. When I did the return line on my 99 Accord, I had to use a 17mm socket with a wobble and an extension (after I snapped the line off, since it had a rust hole in it) to get the fitting out. Might be worth a try.

Thread
Thread Starter
Forum
Replies
Last Post
gcmlfm
General Tech Help
4
07-05-2012 08:25 PM
EXV6NIGHTHAWK
General Tech Help
3
04-24-2011 10:33 PM