water filled tail-light signal
#11
 12-16-2014, 11:34 AM

Ongoing battle update:
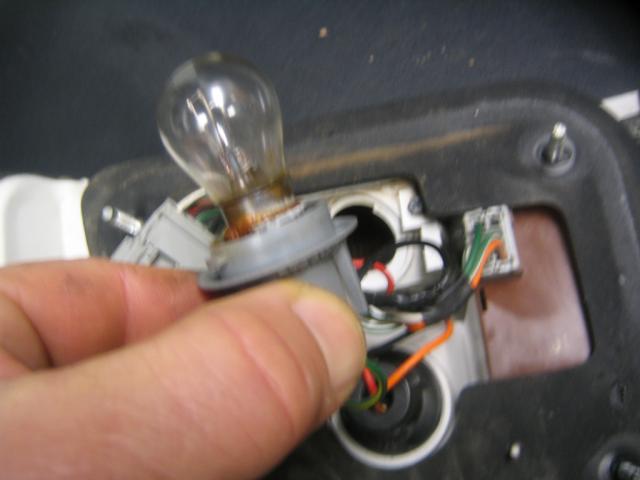
I drilled a small hole into the base of the lens and drained all the remaining trapped water out from within the lens. Then I reinstalled the assembly back onto the car. But I didn't use any RTV on the foam gasket for now anyway. Because the bulb socket was so rusted I couldn't get the bulb out of it, even after applying PB Blaster (rust penetrating fluid) best I could into the rusted area where the bulb base contacts the socket, letting it sit and trying to work it loose, but no go. So the bulb does still work but of course I want to be able to replace it when it does burn out. So I figure I'll need to acquire a replacement un-rusted socket to fix it up. So until I do I didn't want to goop/glue up the foam gasket onto the car body with the RTV at this time. Plus I might go ahead and be on the lookout for a new replacement gasket while I'm at it. fun.
I drilled a small hole into the base of the lens and drained all the remaining trapped water out from within the lens. Then I reinstalled the assembly back onto the car. But I didn't use any RTV on the foam gasket for now anyway. Because the bulb socket was so rusted I couldn't get the bulb out of it, even after applying PB Blaster (rust penetrating fluid) best I could into the rusted area where the bulb base contacts the socket, letting it sit and trying to work it loose, but no go. So the bulb does still work but of course I want to be able to replace it when it does burn out. So I figure I'll need to acquire a replacement un-rusted socket to fix it up. So until I do I didn't want to goop/glue up the foam gasket onto the car body with the RTV at this time. Plus I might go ahead and be on the lookout for a new replacement gasket while I'm at it. fun.
#12
12-18-2014, 12:38 AM
I'm noticing a couple things since I was able to remove that water from within the rear left signal light lens. One is that the light intensity is still dim as compared to that of the right. Also, the blinking frequency is faster/shorter intervals on the left as compared to the right. I took a few short videos to show what I'm talking about (links posted below). The first here shows the left rear signal operating with the headlights off, and the second shows the right rear signal operating with the headlights off:
http://vid207.photobucket.com/albums...psp5f03bj4.mp4
http://vid207.photobucket.com/albums...ps2awp3knk.mp4
The next two videos show (first) the left rear signal operating with the headlights on, and then (second) the right rear signal operating with the headlights on:
http://vid207.photobucket.com/albums...psgnvuunam.mp4
http://vid207.photobucket.com/albums...psinieu5nq.mp4
I still have the same old bulb and rusty socket installed in the left side, so I'm assuming the reason the left side is still dim like that (compared to the right) is because the bulb/socket performance has been compromised because it had been sitting in the water-filled lens so long? At first, before I emptied the water out, I thought the dim intensity was because the light was trying to shine through the water, but now that I've got the water out, I see the light is still pretty much just as dim as it was before. Any comments or possible explanations of this bizarre phenomenon would be appreciated.. Also, what's up with the fast/short blinking signal as compared with the right? I suppose that might mean I need to do some complicated/extensive troubleshooting and probably end up having to replace some expensive and hard-to-access relay or other such electrical lighting component somewhere?
#13
12-18-2014, 12:37 PM
Fast blinking is common when one bulb is burned out. If there's enough corrosion in the bulb socket, extra resistance, the bulb is operating at lower wattage. So maybe the relay is just doing it's normal thing. If you manage to get the bulb out, then you should burnish the contacts with a pencil eraser or something.
#14
12-18-2014, 12:53 PM
Fast blinking is common when one bulb is burned out. If there's enough corrosion in the bulb socket, extra resistance, the bulb is operating at lower wattage. So maybe the relay is just doing it's normal thing. If you manage to get the bulb out, then you should burnish the contacts with a pencil eraser or something.
#15
12-18-2014, 05:42 PM

Here is a "poorman's idea".....have the new bulb. Bust the glass off the old bulb, using a pair of needle nose pliers - twist, bend the metal base to get it out. Pay attention to where the tab(s) are on the metal base, and remember there is a slight push in and then twist to get it out.
Clean the socket as best as you can - light sandpaper/steel wool/small brass brush ? - lube the socket with a bit of greese. Install new bulb, seal the gasket and call it a day.
I've got a tail light socket set or two from/for a 3rd gen in the garage - 3rd gens had this same issue so I've been down this road a few times with the different ones I've had - so if you want a replacement, take a few more pic of the old one and let me compare those to the ones I have and if it looks like it will work.....shipping is like <$15. Of course I'll send pic's of mine before sending.
Good luck
#17
12-18-2014, 07:39 PM
Well good luck in what ever you do.
The bottom contact "pad" is spring loaded. So if you get the old one out, be sure the spring/pad moves. Also the contact pad(s) at the bottom are soft (lead ?) metal, so don't get crazy on them......spend the time on the socket where the outside of the bulb contacts the socket....hope this makes sense???
The bottom contact "pad" is spring loaded. So if you get the old one out, be sure the spring/pad moves. Also the contact pad(s) at the bottom are soft (lead ?) metal, so don't get crazy on them......spend the time on the socket where the outside of the bulb contacts the socket....hope this makes sense???

#19
12-19-2014, 01:21 PM
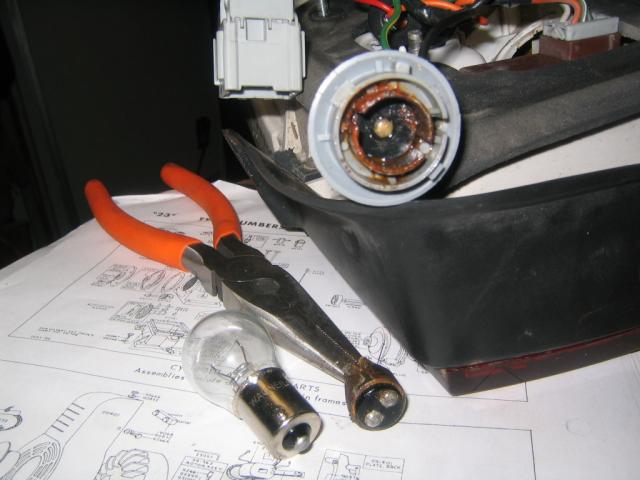
I broke the old light bulb out and was able to twist/free the remaining base out with needle nose and with another squirt of penetrating oil. The spring action of the socket loosened too, and so will still be fine. Inside the socket I noticed a single contact, whereas the old light bulb has two contacts! Apparently someone had put a 1157 bulb in where a 1156 belongs (new correct bulb shown in picture below).
#20
12-19-2014, 09:20 PM
http://vid207.photobucket.com/albums...psgnvuunam.mp4
After:
http://vid207.photobucket.com/albums...psgw0rgiwl.mp4
Think I can call it a day now. Could even call it a night.
