
Painting my '96 Accord


Thread Starter
|
Junior Member
Joined: May 2010
Posts: 29
Hey guys, I'm not sure if there's already a post on this already, but I've been wanting to put some color on my car and I'm not really sure where to start.
I've done some research and so far, its just cleaning the car, removing the wax and grease, then sanding it down to 2000 grit? then painting a couple coats then a clear coat....
Is there anybody that has done this and would care to elaborate? A newbie could use some help
thanks
I've done some research and so far, its just cleaning the car, removing the wax and grease, then sanding it down to 2000 grit? then painting a couple coats then a clear coat....
Is there anybody that has done this and would care to elaborate? A newbie could use some help
thanks
Member
Joined: Mar 2010
Posts: 145
From: Tampa
I've done this, and I actually in the process of doing it right now. I've got pictures and everything else you need. I can't elaborate right now (I'm on my way out the door, but if you bump this thread later today, I'd be glad to help!
Chip
Chip
Member
Joined: Mar 2010
Posts: 145
From: Tampa
Okay, let's get all this stuff cleared up right now!
First, "Bumping a thread": http://lmgtfy.com/?q=what+does+%22bu...thread+mean%3F
Now, with that out of the way, let's talk about painting!
This IS NOT every single step taken in a professional paint job, but it's pretty close. It will give you the best looking paint job with the least amount of resources. You actually found the perfect person (me) to tell you all about this method you're about to attempt! I TRIED to paint my girls car in our 1 car garage first (which is why it goes from green, to red, to primer in the photos). That was a huge disaster, and if you don't want to experience that upset. Follow these directions as best you can.
That being said:
1. First you want to remove all of the emblems, lights (Head, tail, blinkers) and moldings that you don't want to paint on the car. (I took off the emblems and decided to paint all the moldings, and put "eyelids" on the headlights.). It's also a good idea to remove the mirrors now, so you can sand/paint them easily.

2. Replace any body parts that you plan on replacing.


3. Next you need to tape everything off, and sand the car with 320 grit sandpaper. It's best to do this with a "dual action" sander if you can. Hand sanding will take forever, and it will not work well.


4. Now you want to do any/all of your body work and dent repair (sand any repairs again with 320 when you're done, to blend it in.) These pictures look out of order because I didn't take any pictures of the body work the second time around (The right way). Just be aware that these photos are technically wrong! I should have sanded the car first, then done the body work, then resanded (like I'm telling you now!):


5. Once the entire car has been sanded with 320, you SHOULD spray it with a primer/sealer (if you can). If you cannot, it's okay. you CAN get by w/o it, but the overall quality will suffer.

6. Once the primer has dried, spray the car with "Guide coat" and resand with 320 (This is a pretty quick process. You just want to give the car a quick sanding job. Just enough to remove the guide coat. This will help you make sure you have a smooth, even surface and ensure that your paint job doesn't look like a sack of walnuts when you're done.)


7. After you finish sanding off the guide coat, recheck your tape job, fix any areas that need fixing, then sand the entire car again, but use 600 this time. Do a really good job and make sure it's smooth, because this will be your painting surface. When you're done sanding with the 600, the primer (or paint - if you didn't prime it) should be so smooth that it shines (or reflects) a little bit, similar to paint. Basically you want it as smooth as possible. If there are any areas on the car that have exposed metal (where you've burnt through the paint during sanding) you need to prime and resand those before you sand with 600. This is what it should look like after you're done with the 600:


Once you've got all that done, you're ready to paint! It's best to retape the car, but you can get by without it, just make sure you check your tape job really well and fix any errors.......Unfortunately, I haven't gotten around to painting ours yet, so I don't have pictures of the final product yet. I should have it done in about two weeks. As soon as I have the time, I'll paint and post pics of the final product, but if you decide you want to start before I update this post, remember to wipe the entire car down with a good AUTO BODY/PAINTERS wax and grease remover! Otherwise you will have fish eyes everywhere!
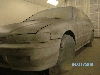
Also, DO NOT USE RATTLE CAN SPRAY PAINT!!!!!! Spray paint never actually hardens, so when you try to sand it, it turns into bubble gum and it's a nightmare to get off/fix. If you are going to paint your car yourself, you need real paint, a compressor, a decent paint gun, air line filters and some sort of dust free paint booth. Otherwise your paint job will come out looking like ****. I tried to cut corners the first time, and look at what happened to me:


This ^^^ wasted A LOT of my time, and A LOT of my money! I had to do it all over again, because I thought I could cut corners!
Remember, this write up is already a "short cut", slightly hillbilly way of painting your car, but if you take your time and follow all the steps, you SHOULD have a pretty decent paint job.
The paint and supplies are just as important as the steps I outlined above, so if you don't know anything about paints and painting supplies, I suggest you research those things first! This can become a VERY expensive hobby real quick! So do your homework!!!
If I can help with anything else, let me know.....and I'll update this with finished pics as soon as possible.
Good luck and be safe,
Chip
First, "Bumping a thread": http://lmgtfy.com/?q=what+does+%22bu...thread+mean%3F
Now, with that out of the way, let's talk about painting!
This IS NOT every single step taken in a professional paint job, but it's pretty close. It will give you the best looking paint job with the least amount of resources. You actually found the perfect person (me) to tell you all about this method you're about to attempt! I TRIED to paint my girls car in our 1 car garage first (which is why it goes from green, to red, to primer in the photos). That was a huge disaster, and if you don't want to experience that upset. Follow these directions as best you can.
That being said:
1. First you want to remove all of the emblems, lights (Head, tail, blinkers) and moldings that you don't want to paint on the car. (I took off the emblems and decided to paint all the moldings, and put "eyelids" on the headlights.). It's also a good idea to remove the mirrors now, so you can sand/paint them easily.
2. Replace any body parts that you plan on replacing.
3. Next you need to tape everything off, and sand the car with 320 grit sandpaper. It's best to do this with a "dual action" sander if you can. Hand sanding will take forever, and it will not work well.
4. Now you want to do any/all of your body work and dent repair (sand any repairs again with 320 when you're done, to blend it in.) These pictures look out of order because I didn't take any pictures of the body work the second time around (The right way). Just be aware that these photos are technically wrong! I should have sanded the car first, then done the body work, then resanded (like I'm telling you now!):
5. Once the entire car has been sanded with 320, you SHOULD spray it with a primer/sealer (if you can). If you cannot, it's okay. you CAN get by w/o it, but the overall quality will suffer.
6. Once the primer has dried, spray the car with "Guide coat" and resand with 320 (This is a pretty quick process. You just want to give the car a quick sanding job. Just enough to remove the guide coat. This will help you make sure you have a smooth, even surface and ensure that your paint job doesn't look like a sack of walnuts when you're done.)
7. After you finish sanding off the guide coat, recheck your tape job, fix any areas that need fixing, then sand the entire car again, but use 600 this time. Do a really good job and make sure it's smooth, because this will be your painting surface. When you're done sanding with the 600, the primer (or paint - if you didn't prime it) should be so smooth that it shines (or reflects) a little bit, similar to paint. Basically you want it as smooth as possible. If there are any areas on the car that have exposed metal (where you've burnt through the paint during sanding) you need to prime and resand those before you sand with 600. This is what it should look like after you're done with the 600:
Once you've got all that done, you're ready to paint! It's best to retape the car, but you can get by without it, just make sure you check your tape job really well and fix any errors.......Unfortunately, I haven't gotten around to painting ours yet, so I don't have pictures of the final product yet. I should have it done in about two weeks. As soon as I have the time, I'll paint and post pics of the final product, but if you decide you want to start before I update this post, remember to wipe the entire car down with a good AUTO BODY/PAINTERS wax and grease remover! Otherwise you will have fish eyes everywhere!
Also, DO NOT USE RATTLE CAN SPRAY PAINT!!!!!! Spray paint never actually hardens, so when you try to sand it, it turns into bubble gum and it's a nightmare to get off/fix. If you are going to paint your car yourself, you need real paint, a compressor, a decent paint gun, air line filters and some sort of dust free paint booth. Otherwise your paint job will come out looking like ****. I tried to cut corners the first time, and look at what happened to me:
This ^^^ wasted A LOT of my time, and A LOT of my money! I had to do it all over again, because I thought I could cut corners!
Remember, this write up is already a "short cut", slightly hillbilly way of painting your car, but if you take your time and follow all the steps, you SHOULD have a pretty decent paint job.
The paint and supplies are just as important as the steps I outlined above, so if you don't know anything about paints and painting supplies, I suggest you research those things first! This can become a VERY expensive hobby real quick! So do your homework!!!
If I can help with anything else, let me know.....and I'll update this with finished pics as soon as possible.
Good luck and be safe,
Chip
Last edited by chip; May 18, 2010 at 07:48 PM.
Thread Starter
|
Junior Member
Joined: May 2010
Posts: 29
sorry to hear about that man, good luck on your next paint job
Do you know where i can get the paint? i've been looking at a ton of sites and a lot of them are confusing... how much primer and paint would i need to cover the average size car?
Do you know where i can get the paint? i've been looking at a ton of sites and a lot of them are confusing... how much primer and paint would i need to cover the average size car?
Member
Joined: Mar 2010
Posts: 145
From: Tampa
It's okay, luck has nothing to do with it. It was my own fault! I knew what I needed to do, but I tried to cut corners, and that's what happens when you don't do something the right way!
Look in your phone book for your local paint supply. They'll have everything you need! It should be listed in the automotive section of the yellow pages.
If I had to guess, I'd say a gallon of each (Primer, base & clear) should be enough. You can get all the tools you need (Gun, Compressor, dryer) at Harbor freight for pretty cheap. They'll get the job done, just remember that you get what you pay for!