
My C27 teardown/rebuild


Thread Starter
|
Newest Of Newbies
Joined: Mar 2010
Posts: 26
well now that i got the honda up and running its about time i tell you guys the process. first a little back story; last aug/sep(cant remember) while racing 1/2mile the water hose burst. and like an idiot i tried to drive it back home which in turn blew the rear head. so i treat every break as a chance to upgrade or improve some kinda way. so here's how it went:
{warning: I am a amateur at this! a lot of the thing i did were not safe and could kill your car or you! but i'm a cheap bastard who likes taking short cut }
}
this shall be your bible

and always wear your safety equipment:

Tear Down:
ok so there was a little argument on how to approach this. some people think you should set the engine to TDC before you touch anything. while other think leaving it alone is the better way to go. I left it along only cuz at the time i didnt have the proper tools to set TDC so i just took a chance and made a note of the positions of the gears

so 1st thing was to disconnect the battery after that unhook the fuel hose from the fuel filter using a towel to catch the gas.
next unplug the wiring harness from the injectors.
there were four bolts holding the manifold down on the heads. one in each corner. before removing it though make sure the sensors connected to it, the EGR, and the TB are all unhooked. after that it easily came up.

next was the valve covers which was pretty straight removal

then the alternator which had two bolt that release the tension from the belt and one wire from the wiring harness. i also took off the side cyliner covers in oder to get to the bolt on the underside of the heads

after that i removed all the spark plug wires labeled them according to cylinders(although its not hard to mix them up seeing that they all are set to spec length)

then after all that is done he looked like this:


Note: if you noticed all the screws are sticking out. this is a habbit i picked up from my dad working on the cougar. after i unbolt anything i put the screw/bolt back it helps me keep up with them:wink:
{warning: I am a amateur at this! a lot of the thing i did were not safe and could kill your car or you! but i'm a cheap bastard who likes taking short cut
}this shall be your bible
and always wear your safety equipment:
Tear Down:
ok so there was a little argument on how to approach this. some people think you should set the engine to TDC before you touch anything. while other think leaving it alone is the better way to go. I left it along only cuz at the time i didnt have the proper tools to set TDC so i just took a chance and made a note of the positions of the gears
so 1st thing was to disconnect the battery after that unhook the fuel hose from the fuel filter using a towel to catch the gas.
next unplug the wiring harness from the injectors.
there were four bolts holding the manifold down on the heads. one in each corner. before removing it though make sure the sensors connected to it, the EGR, and the TB are all unhooked. after that it easily came up.
next was the valve covers which was pretty straight removal
then the alternator which had two bolt that release the tension from the belt and one wire from the wiring harness. i also took off the side cyliner covers in oder to get to the bolt on the underside of the heads
after that i removed all the spark plug wires labeled them according to cylinders(although its not hard to mix them up seeing that they all are set to spec length)
then after all that is done he looked like this:
Note: if you noticed all the screws are sticking out. this is a habbit i picked up from my dad working on the cougar. after i unbolt anything i put the screw/bolt back it helps me keep up with them:wink:
Thread Starter
|
Newest Of Newbies
Joined: Mar 2010
Posts: 26
Tear Down cont:
next i took out the spark plugs. i found the front ones very easy....the rear not so much. since the extention that was long enough to reach was too long to get pass the firewall what i did was take two short ones, dropped one down in there with the spark plug socket then with the other one attached to the rench i connected them inside the cylinder:wink:
next i had to loosen up the timing belt to get the cam gears off. there is a small timing belt tension bolt right above the crank pulley, loosen it then push the tension pulley back with a flat-head screw driver, then tighten the tension bolt (these first three steps give you enough slack on the belt to allow you to work with the timing belt) its easier to wiggle the belt off the rear cam first since thats where the slack ends up. once the belt is off take a flat head screw driver and wedge it between the spokes of the cam gear. this will keep it from rotating while you take the 3bolts holding it on.

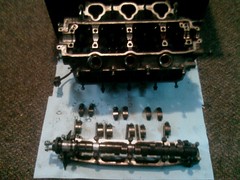
once i got those off then off cam the cam holders

(^^that was a before and after chem bath shot)
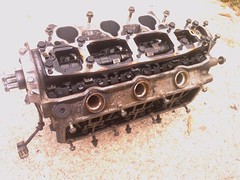
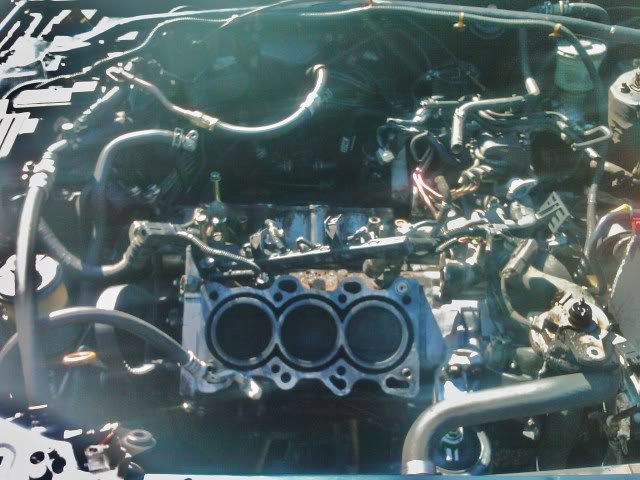
now i found that its a hell of a lot easier to leave the exhaust manifold on the heads and unbolt them from the downpipe. instead of trying to snake your way up to them while the engine is still in the car. once the cam are out its easy the see the top 4 bolts holding the cylinder down. the bottom(the ones cover by the lower cylinder cover) ones are another story all together. after those 8 are out the cylinder head is still connected to the water pump. now it can be pried off. although if you're trying to save the gaskets i'd suggest some kinda finesse. also be careful seeing that gravity will show up around this point and the cylinder(especially the front side) can fall down into the bay and get stuck!
but after thats all said and done this is what i had:

next i took out the spark plugs. i found the front ones very easy....the rear not so much. since the extention that was long enough to reach was too long to get pass the firewall what i did was take two short ones, dropped one down in there with the spark plug socket then with the other one attached to the rench i connected them inside the cylinder:wink:
next i had to loosen up the timing belt to get the cam gears off. there is a small timing belt tension bolt right above the crank pulley, loosen it then push the tension pulley back with a flat-head screw driver, then tighten the tension bolt (these first three steps give you enough slack on the belt to allow you to work with the timing belt) its easier to wiggle the belt off the rear cam first since thats where the slack ends up. once the belt is off take a flat head screw driver and wedge it between the spokes of the cam gear. this will keep it from rotating while you take the 3bolts holding it on.
once i got those off then off cam the cam holders
(^^that was a before and after chem bath shot)
now i found that its a hell of a lot easier to leave the exhaust manifold on the heads and unbolt them from the downpipe. instead of trying to snake your way up to them while the engine is still in the car. once the cam are out its easy the see the top 4 bolts holding the cylinder down. the bottom(the ones cover by the lower cylinder cover) ones are another story all together. after those 8 are out the cylinder head is still connected to the water pump. now it can be pried off. although if you're trying to save the gaskets i'd suggest some kinda finesse. also be careful seeing that gravity will show up around this point and the cylinder(especially the front side) can fall down into the bay and get stuck!
but after thats all said and done this is what i had:
Thread Starter
|
Newest Of Newbies
Joined: Mar 2010
Posts: 26
Cleaning
now that i have the whole top end out i can start cleaning all the parts and prep for painting..
this was my make shift chem bath

it was a plastic tote box i stole from behind petsmart
filled with
water
Dicholorsulfate powder
and purple power degreaser(which my boss swears by)

paint stripper was added later for the painted pieces..

you've already seen the cam holders before and after but here are some more parts that got dipped:


needless to say the stuff worked ****ing amazing. i didnt even have to scrub just let sit in there for an hour the hose down!!!
now that i have the whole top end out i can start cleaning all the parts and prep for painting..
this was my make shift chem bath
it was a plastic tote box i stole from behind petsmart
filled with
water
Dicholorsulfate powder
and purple power degreaser(which my boss swears by)
paint stripper was added later for the painted pieces..
you've already seen the cam holders before and after but here are some more parts that got dipped:
needless to say the stuff worked ****ing amazing. i didnt even have to scrub just let sit in there for an hour the hose down!!!
Thread Starter
|
Newest Of Newbies
Joined: Mar 2010
Posts: 26
Cleaning cont:
now for the covers:
ten minutes in!

as a scientist i was purely amazed
after

i used 600grade sandpaper to get the rest off. it was a little harsh though

i thought these were painted but turns out thses are rubber inserts!?!?!?
now for the covers:
ten minutes in!
as a scientist i was purely amazed
after
i used 600grade sandpaper to get the rest off. it was a little harsh though
i thought these were painted but turns out thses are rubber inserts!?!?!?
Thread Starter
|
Newest Of Newbies
Joined: Mar 2010
Posts: 26
Clean cont
now some parts i didnt feel comfortable drowning in the bath; heads, EGR, alternator... so i just dipped a scrub pad in the bath and cleaned them by hand.
the heads you must be really careful with. since NONE of the moving pieces are bolted down once you take off the cam holder it could all fall apart like a jega tower. before i cleaned it i took out all the small parts and laid them out in order
this is cuz the pieces all wear and form around the parts they are on so to mix them up put them put the grove they set which could break them. now once i got them out i was able to see inside needed some serious cleaning


then when i flipped it over i discovered another problem:

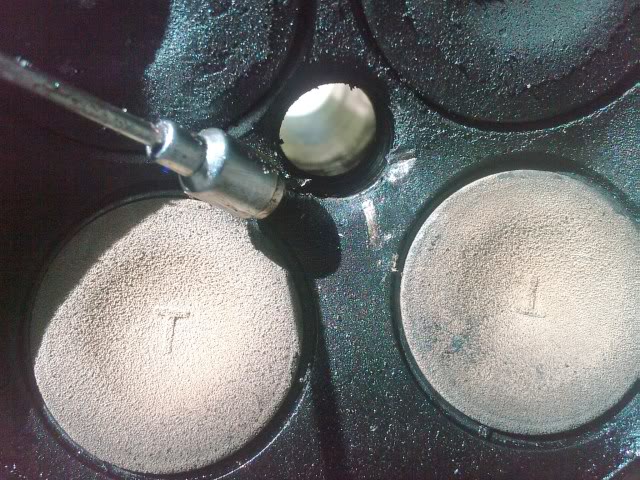
LOOKED LIKED A ROCK HAD BEEN BOUNCING AROUND!clearly needed replacing....
after that was the EGR which was simple enough. but there was a lot of build up inside which i had to chisel out with a phillips head

now some parts i didnt feel comfortable drowning in the bath; heads, EGR, alternator... so i just dipped a scrub pad in the bath and cleaned them by hand.
the heads you must be really careful with. since NONE of the moving pieces are bolted down once you take off the cam holder it could all fall apart like a jega tower. before i cleaned it i took out all the small parts and laid them out in order
this is cuz the pieces all wear and form around the parts they are on so to mix them up put them put the grove they set which could break them. now once i got them out i was able to see inside needed some serious cleaning
then when i flipped it over i discovered another problem:
LOOKED LIKED A ROCK HAD BEEN BOUNCING AROUND!clearly needed replacing....
after that was the EGR which was simple enough. but there was a lot of build up inside which i had to chisel out with a phillips head
Thread Starter
|
Newest Of Newbies
Joined: Mar 2010
Posts: 26
I also took some of the bath to the block:
myfirst time seeing my engine stamp

Painting
well while i was taking him apart we were debating to paint it black and gold or white and gold so i went with white. i used dupicolor engine gold and header white
 and sticking with the whole broke man shortcut theme of this project i actually used foil to cover the pieces that would get painted gold!


myfirst time seeing my engine stamp
Painting
well while i was taking him apart we were debating to paint it black and gold or white and gold so i went with white. i used dupicolor engine gold and header white
and sticking with the whole broke man shortcut theme of this project i actually used foil to cover the pieces that would get painted gold!
Thread Starter
|
Newest Of Newbies
Joined: Mar 2010
Posts: 26
Painting
after 1st 2coats


i painted outside but brought the pieces inside to dry to keep bugs and dirt from sticking.
for detailed parts i used small brushes and sprayed paint into the cap till i got a nice little puddle to dip out of


after 1st 2coats
i painted outside but brought the pieces inside to dry to keep bugs and dirt from sticking.
for detailed parts i used small brushes and sprayed paint into the cap till i got a nice little puddle to dip out of
Thread Starter
|
Newest Of Newbies
Joined: Mar 2010
Posts: 26
Paint cont
as the painting continued i got the bright idea of cuting a window in the cam covers:

i didnt just cut them in half. i actually left the back spine on so it would still be able to bolt on

next i wanted to get some purple accents in there so i decided to make the wiring purple. but after being yelled at by my loving girlfriend, i was forced to figure out how to piant them without taking it out....

as the painting continued i got the bright idea of cuting a window in the cam covers:
i didnt just cut them in half. i actually left the back spine on so it would still be able to bolt on
next i wanted to get some purple accents in there so i decided to make the wiring purple. but after being yelled at by my loving girlfriend, i was forced to figure out how to piant them without taking it out....
Thread Starter
|
Newest Of Newbies
Joined: Mar 2010
Posts: 26
Rebuild
So by the time everything was painted all the seals and gaskets arrived:

now i actually bought the 1st gen legend pack cuz it was a hell of a lot cheap and the only difference is the gaskets for the intake manifold.
which later i found out i needed anyway:idiots:

exhaust gaskets also needed replacing badly!

as i was bolting everything back together i tried my best not to scratch the paint by using shop towels over tools:


still chipped some stuff though....
So by the time everything was painted all the seals and gaskets arrived:
now i actually bought the 1st gen legend pack cuz it was a hell of a lot cheap and the only difference is the gaskets for the intake manifold.
which later i found out i needed anyway:idiots:
exhaust gaskets also needed replacing badly!
as i was bolting everything back together i tried my best not to scratch the paint by using shop towels over tools:
still chipped some stuff though....
Thread Starter
|
Newest Of Newbies
Joined: Mar 2010
Posts: 26
Rebuild:
as i was checking out the bay before i put it all back together i found another problem!

front engine mount broke in half!!!!
bolting the heads back on there is a specific pattern....i cant remember right now though....its some sort of cross pattern

trying to be cheap again i used the engine paint on the rubber pieces...and this is what i got

side view:

and here's finished product

as i was checking out the bay before i put it all back together i found another problem!
front engine mount broke in half!!!!
bolting the heads back on there is a specific pattern....i cant remember right now though....its some sort of cross pattern
trying to be cheap again i used the engine paint on the rubber pieces...and this is what i got
side view:
and here's finished product