
front end damage (working thread)


Well I now have the engine and everything else hooked up except for the drive belts, crankshaft pulley, power steering pulley (was bent in the accident and I need to purchase a replacement this week), and the driver side front engine mount bracket/mount. For the mount/bracket I will have to make my own...the tap and die set wouldn't work at all. :/ But my father is a great welder/craftsman so he said he would gladly make a bracket and mount. Just need a good place to mount it to now that the three bolt holes in the front of the motor are no good...any ideas?
Here are the pictures. Sorry that a few of them are dark (the last ones), it was last minute last night when I was putting everything away...and I forgot to take pictures before I started piling stuff on top of the motor lol.
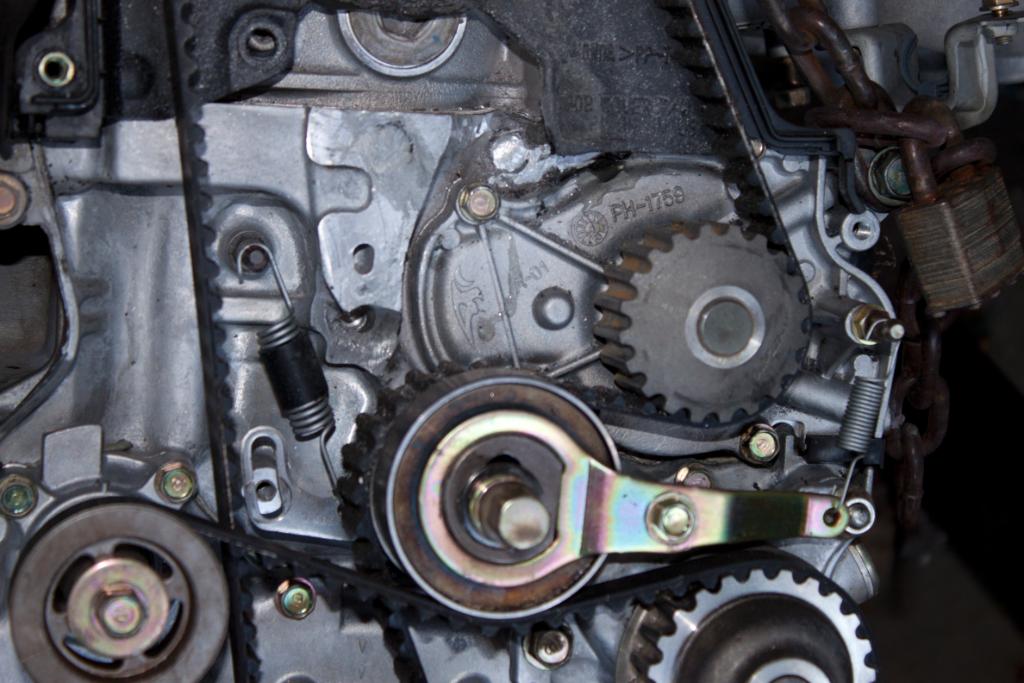
picture of the timing belt and tensioner
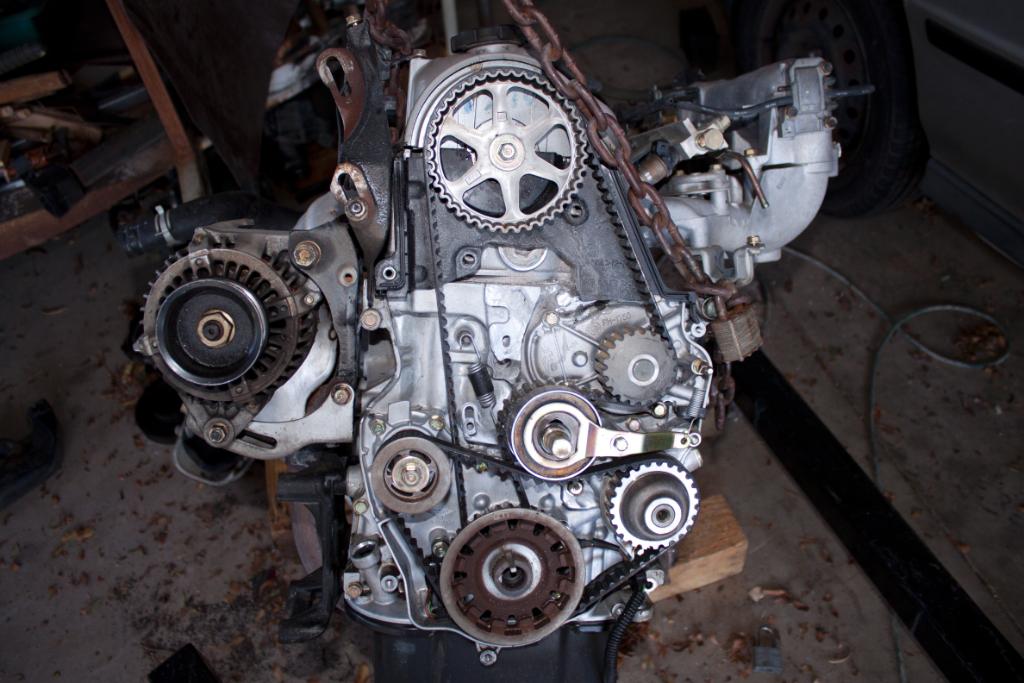
The bolt that is missing was not actually there when I took the timing belt cover(s) off. Do any of you know what it is actually supposed to look like? Oh, and there was a tiny chip in the top of the water pump so I sealed it as well. hopefully it is not over more than 2000psi...
tried a little welding. I thought I was doing a great job until I tried to put the engine mount in this bracket. Turns out that the 94 I got the bracket and core support from is about 3/4" different than the 96. Now I have to cut this all off and move it back 3/4"

Of course I will not cut the entire thing off and redo it, I'll just cut the mounting bracket off and move it back...this is a picture of the weld my dad did. It was sputtering and spitting because of the paint and I don't own welding gloves...so he helped me out on this one.

Well it is in, at least mostly. There is one bracket that is not attached among other things as well.

And then today after I was finished. There wasn't much to see today. I attached the exhaust and all the engine wiring harness...broke the throttle position sensor when I was putting the engine in so I have to solder it back together...and of course I have one of the models where that sensor doesn't come off of the unit so I will need to save up another $300 for a new one eventually. Hopefully I soldered it back together good enough... Also added some epoxy to keep the plug together if it does end up working. lol
Ah, took a cleaner picture after all. :P

during the week after work I plan on buying all the fluids, filters, and oil for the car. Hopefully I will get this thing running in the next week!! So excited.
Here are the pictures. Sorry that a few of them are dark (the last ones), it was last minute last night when I was putting everything away...and I forgot to take pictures before I started piling stuff on top of the motor lol.
picture of the timing belt and tensioner
The bolt that is missing was not actually there when I took the timing belt cover(s) off. Do any of you know what it is actually supposed to look like? Oh, and there was a tiny chip in the top of the water pump so I sealed it as well. hopefully it is not over more than 2000psi...
tried a little welding. I thought I was doing a great job until I tried to put the engine mount in this bracket. Turns out that the 94 I got the bracket and core support from is about 3/4" different than the 96. Now I have to cut this all off and move it back 3/4"
Of course I will not cut the entire thing off and redo it, I'll just cut the mounting bracket off and move it back...this is a picture of the weld my dad did. It was sputtering and spitting because of the paint and I don't own welding gloves...so he helped me out on this one.
Well it is in, at least mostly. There is one bracket that is not attached among other things as well.
And then today after I was finished. There wasn't much to see today. I attached the exhaust and all the engine wiring harness...broke the throttle position sensor when I was putting the engine in so I have to solder it back together...and of course I have one of the models where that sensor doesn't come off of the unit so I will need to save up another $300 for a new one eventually. Hopefully I soldered it back together good enough... Also added some epoxy to keep the plug together if it does end up working. lol
Ah, took a cleaner picture after all. :P
during the week after work I plan on buying all the fluids, filters, and oil for the car. Hopefully I will get this thing running in the next week!! So excited.
Last edited by rhamza161; Jun 18, 2012 at 11:20 AM.
Oh, I forgot to mention that I rented a power washer (3500psi) and power washed the engine while it was out of the car. I also did the engine compartment. It made everything SO much nicer to work on when putting everything back together. I used purple power (or purple something) for the soap in the power washer and have been cleaning everything thatI happened to have missed by hand with a scrubber brush and the spray bottle (old armor all spray bottle you see sitting around in the pictures). It cleans the grease and everythign else off really easily, except a small part where the exhaust pipe goes under the motor...but you'll never see that when it is back in place...right?!?!?! wait, I just told everyone it is there now. :P Just don't look at it, okay?
okay, I have nearly everything for the car now...another $200 down the drain, well sort of. CV joints, power steering pulley, belts, oil, oil filter, passenger headlight and battery. Soon it will be up and running! I need a radiator fan and a radiator cap and an 80 volt/something fuse for the battery and a windshield. another $150-$200 it seems like. for a total of nearly $1600 I'll have a car that will be around for some time...I hope. Plus I got to learn how to take nearly everything off and put it back together again. I found out the things work on the inside at least. all the lights work and other various internal electronic stuff, so that is a good sign. ran into more problems though. There is a curse with the bolts on this car...seriously. I feel like melting them all down and making a few bars of metal for keep sake...to show them who is boss, you know. :P
Referring to the bolts from hell:
bolts in the steering wheel (to remove the air bag) had super glue on them.
three bolts that go into the front motor mount (by the radiator)
water pump bolt
side motor mount bracket, bolt closest to the fender well
ALL screws holding interior trim to the frame (I think that was the ugly mixture of drinks that were spilled on them though)
Rusted screws on the back of the front seat on the plastic headrest regulator - driver side
OH and I forgot the entire driver side motor mount fiasco...three bolts
I think I could get a few ingots out of those bolts/screws...lol Tomorrow I need to buy a new bolt for the water pump, SOMEHOW when I took it out the threads got messed up and now it simply will not thread properly and gets bound 1/2 way into the hole...I took it off by accident, I thought it was the back to the timing chain cover... oh well... :/ It is coming together quickly now. Have oil and all other fluids in the car now just need to make the bracket on the drivers side function and the other few miscellaneous parts...
QUESTION:
Will radiator fans from 94-97 work on my 96? I bought a brand new radiator but only have one good fan. I must buy one soon and need to know if they are interchangeable before I go to the yards looking for one. Thank you!

Thanks TexasHonda, I;ll be sure to look it up.
Got the motor to run today! it was amazing hearing it finally run after having to do everything that I did...and realizing that I did everything correctly and things were smooth. I had to replace the water pump like I thought. It broke off way more than I thought. Regardless, it runs.
Question:
The Idle weird...I broke the tps (throttle position sensor off the back of the throttle body when I took the motor out of the car and I had to solder it back on because I happen to have to model where the sensor is riveted to the !(#U(J$ throttle body! -_-' when the car is at idle it is consistently revving, RPM goes from 1k-2.5k and back again. I assume that is not how the car was built...lol is this the TPS or is it something else? Any ideas?
When I had to install the new water pump I think I may have moved the cam shaft gear a little. When I was finished with the water pump install I had to move the top gear back a little in order to slip the timing belt back into place. I think I'll have to re-time it now, but I'm not entirely sure how to do that. Is there any special tools I will require to do this and if so, what are they? Do you have any tips or advice on doing this?
I installed two new CV joints, one on each side, and I seriously hope that they last more than a few years. It was a pain in the butt to get everything right...and to top it off the axle assembly for the driver side will not fit through the small hole when all attached. was difficult getting everything back into place again but it's there and it is new again. Wish I would have replaced them all while I had them apart, just to save myself from having to take it apart again but money is starting to get tight and if I have to buy a throttle body I can't afford to waste anything on CV joints that don't need replacing yet. lol
Last edited by rhamza161; Jun 24, 2012 at 12:58 AM.

Super Moderator
Joined: May 2010
Posts: 11,834
From: Kenton, TN
Those "rivets" are actually screws....If you cut a slot into the top of them you can then use a screw driver and remove them....as this "could be part of the idle issue". Another thought for the idle, be sure to bleed all of the air out of the cooling system...air pockets can/will cause the idle to "loop".
Setting/checking the timing is not that hard. Check the manual, but basically you set #1 to TDC and make sure all of the "marks" on the gears are in the correct place.
Setting/checking the timing is not that hard. Check the manual, but basically you set #1 to TDC and make sure all of the "marks" on the gears are in the correct place.
Awesome, thank you Poorman! I'll see if that is the problem first, then remove the sensor and if it doesn't fix it, then worse case I'll buy a used one off of ebay for $80. I'll report back tonight with the results!
So I do have a question...is there any easy way of bleeding the air from the coolant line(s)?
I set the timing up properly and it turned over and started within seconds. Just need to make the custom motor mount and fix the idle issue.
I set the timing up properly and it turned over and started within seconds. Just need to make the custom motor mount and fix the idle issue.
Poorman was right, it is just a screw that appears to be a rivet, it even says so in the instruction manual. So I replaced it and set it in place and started the car again...worked for a few seconds idling at 1k then it started revving up to 2 and back down to 1k. I started started looking around and decided to remove the plug for the map sensor on the throttle body and...as soon as I did, it started idling right at 1k steady. I had to replace the TPS because when I took the old one out the spring popped out and away it went down the drive way and into some unknown place. the little plastic thing that holds it on had snapped when we crushed it. Good thing I replaced it. Now I need to track down a good priced map sensor. the local places want nearly $100 for it...unless that is reasonable.
okay so I have a question before I go out and buy the Sensor assy,map for the throttle body tomorrow. The part on my car says tn079800-3280 5V PS-30 but the replacement part that the auto parts store sells is 079800-4250 5v PS-33. The vehicle compatibility chart says that it works with my year and model (as well as about 300 other cars in the honda/acura lineup) Is this going to be an okay replacement or should I find an exact replacement with the same model number?
Here is mine

Here is the store's

Here is mine
Here is the store's