
92 Accord 4 dr LX 4AT Timing belt job


Been Around A Long Time Member
Joined: Dec 2005
Posts: 4,754
From: In The Desert ( Sahara ? )
if that is not the pump out of your car, no need to remove the whole thing,, just pop the seals out and install new ones .. put a bit of grease on the inside of the seal.. put a retainer on the frt balancer shaft seal,
It sounds like the water pump is leaking a bit,, replace it when doing t-belt,
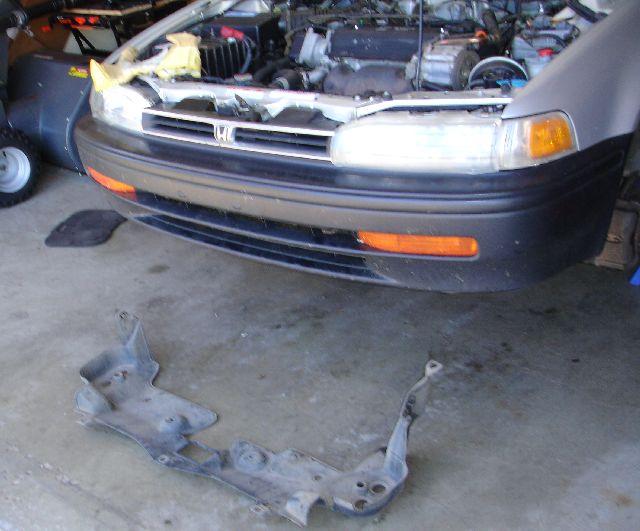
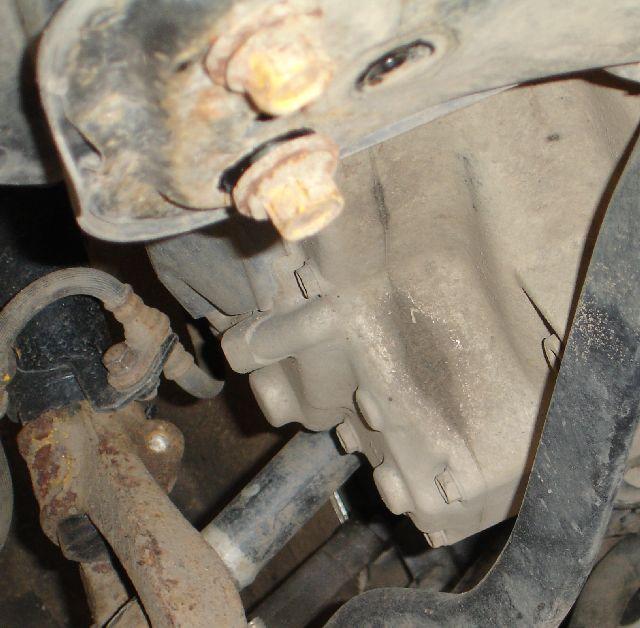
Yes it is the beam on the frt of car , # 3 on the pic remove the 2, 17mm bolts on the driver side and loosen up the ones on the rt side ,, it will givw you a lot more room to remove and reinstall the lower cover,, also make sure to reinstall the rubber o-ring on the timing belt adjuster nut..if you don't i have seen a few covr bulge out and rub against the crank pulley ,,
It sounds like the water pump is leaking a bit,, replace it when doing t-belt,
Yes it is the beam on the frt of car , # 3 on the pic remove the 2, 17mm bolts on the driver side and loosen up the ones on the rt side ,, it will givw you a lot more room to remove and reinstall the lower cover,, also make sure to reinstall the rubber o-ring on the timing belt adjuster nut..if you don't i have seen a few covr bulge out and rub against the crank pulley ,,

Thread Starter
|
Senior Member
Joined: Dec 2005
Posts: 774
From: Canada
Desert,
You have been a great help to me. Without it, I doubt whether I'd have had the courage to undertake this job.
I believe that I am now ready, willing and able to do this job. I know the steps by memory.
I hope to have received the parts by mid to late next week and I'll post when I'm either done or in real trouble.
Thanks again.
 go for it,, if you get stomped, there is a lot of us ready to jump in and help...
Thread Starter
|
Senior Member
Joined: Dec 2005
Posts: 774
From: Canada
Well, my parts finally arrived and I think I've already forgotten 50% of what I thought I knew a couple of weeks ago. Time to study the manual again.
Here's the list of Genuine Honda parts I have, plus, not shown, I have two Koyo tensioners that are supposed to be indentical replacements:
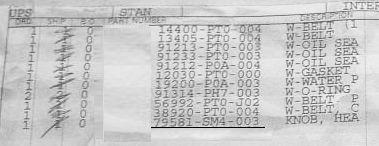
This were originally bought by a person owning a 93 Accord, but he sold the car before using them. Our car is a 92. I compared part numbers at a couple of on-line parts places and indeed the "internal" part numbers used by those sites for those two years are identical.
But none of the sites I can find on line use the Genunine Honda part numbers. So, beyond the obvious parts such as water pump, valve cover gasket kit, and all belts, I cannot tell which "O-ring" or "seal" goes exactly where on the car.
Of course I could just dive right in and start taking things apart and compare the new parts to the old, but I then run the risk of having not bought the correct part and then I'm stuck for maybe a couple of days until the part arrives at Honda.
So, I wonder if one of the members who has the genuine Honda part numbers for the various parts needed for this job, would tell me if the part numbers on that list above are the correct part numbers, and, most importantly, what part number goes where on the car. I can then write the correct location for each part right on its individual bag or box.
Also, I do not have the rear balancer shaft GEAR HOUSING O-ring (the one you can see in the photo above of the front of oil pump, in the general area of that aqua-colored arrow. It's the oblong-shaped O-ring.). Do you think it is even necessary to replace that O-ring?
So, do you think I have all of the proper parts for this job?
Thanks very much for your expertise.
BTW, if it would be a good thing, I will try to photograph as much of this procedure, step by step, as possible and write something to accompany it. What do you think?
Here's the list of Genuine Honda parts I have, plus, not shown, I have two Koyo tensioners that are supposed to be indentical replacements:
This were originally bought by a person owning a 93 Accord, but he sold the car before using them. Our car is a 92. I compared part numbers at a couple of on-line parts places and indeed the "internal" part numbers used by those sites for those two years are identical.
But none of the sites I can find on line use the Genunine Honda part numbers. So, beyond the obvious parts such as water pump, valve cover gasket kit, and all belts, I cannot tell which "O-ring" or "seal" goes exactly where on the car.
Of course I could just dive right in and start taking things apart and compare the new parts to the old, but I then run the risk of having not bought the correct part and then I'm stuck for maybe a couple of days until the part arrives at Honda.
So, I wonder if one of the members who has the genuine Honda part numbers for the various parts needed for this job, would tell me if the part numbers on that list above are the correct part numbers, and, most importantly, what part number goes where on the car. I can then write the correct location for each part right on its individual bag or box.
Also, I do not have the rear balancer shaft GEAR HOUSING O-ring (the one you can see in the photo above of the front of oil pump, in the general area of that aqua-colored arrow. It's the oblong-shaped O-ring.). Do you think it is even necessary to replace that O-ring?
So, do you think I have all of the proper parts for this job?
Thanks very much for your expertise.
BTW, if it would be a good thing, I will try to photograph as much of this procedure, step by step, as possible and write something to accompany it. What do you think?
Thread Starter
|
Senior Member
Joined: Dec 2005
Posts: 774
From: Canada
OK guys, I found out which seal is which.
Cam seal 91213
Balance 91233
crank 91212
t'stat housing 91314
"Just in case", I'm going to buy a bal-gear-housing O-ring 15114 - PT0 - 003 cause it's only $6.
I'm going to start the job pretty early tomorrow and hope to finish it by tomorrow night.
Cam seal 91213
Balance 91233
crank 91212
t'stat housing 91314
"Just in case", I'm going to buy a bal-gear-housing O-ring 15114 - PT0 - 003 cause it's only $6.
I'm going to start the job pretty early tomorrow and hope to finish it by tomorrow night.
Been Around A Long Time Member
Joined: Dec 2005
Posts: 4,754
From: In The Desert ( Sahara ? )
ORIGINAL: Tony1M
BTW, if it would be a good thing, I will try to photograph as much of this procedure, step by step, as possible and write something to accompany it. What do you think?
BTW, if it would be a good thing, I will try to photograph as much of this procedure, step by step, as possible and write something to accompany it. What do you think?
I have been playing with the idea to write it up but without pics it is hard to understand for some less experienced members + it is a long procedure
get pics of all the alignments,, at top dead center # 1 ,,,,,,,,camshaft,, frt balancer shaft ,, rear balancer shaft etc etc
Thread Starter
|
Senior Member
Joined: Dec 2005
Posts: 774
From: Canada
Desert,
I'll give it a try on the photos. The only difficulty I can see is getting good shots of the engine in its rather hidden position. I don't think I'll have any problem with the TDC through that little port, but getting the various other views of the timing marks may be a challenge. I'll do the best I can, though.
As I was thinking about the job, I realize that I need a few more parts other than just the gear assembly O-ring and front seal retainer.
Because they have NEVER been replaced, I want to replace the rubber coolant hoses and thermostat. (How's that for luck with those hoses and thermostat?! Want to hear something unbelievable? We replaced the original Panasonic battery LAST YEAR! Yes, it lasted 13 years. I tried to find another Panasonic to replace it, but could not find one anywhere. Now we've got a DieHard in there and I doubt it lasts half the time of that Panny. I think our cool climate is good on batteries.)
I also want to take this opportunity to do the transmission fluid (which has been replaced only twice), and the coolant. Of course the transmission fluid can be changed after this job, but it's on the list of stuff to be picked up anyway.
So I 've got to go to Honda tomorrow to get that stuff. By the time that's done, I think I'll heed the old "measure twice and cut once" adage and devote the rest of the day to studying the procedure in the manual as I look at things under the hood - just to once again get everything straight in my head. Then I'll start early Wed morning, so you probably won't hear me pleading for help before Wednesday afternoon.
BTW, the Honda parts guy and I had a bit of a "discussion" about the rear balancer gear assembly. His belief is that this assembly is the oil pump's drive mechanism and has nothing to do with the balance shaft, and my belief is that the crank shaft turns the oil pump and that little gear set installed on the upper right part of the oil pump is solely there to drive the rear balancer shaft. He also said that the only seal on the "rear" of the engine is the rear main seal and that the rear balancer shaft's seal does not have to be replaced. "None of our guys ever replace it" - he said.
I was quite amazed as I listened to the man. Maybe the labor shortage around here is worse than I thought.
Anyway, I re-checked my Haynes manual and it seems to back up my version of things, so wish me luck dealing with this guy. I think I'm going to need it.
BTW, where, exactly, on the engine block is the coolant drain plug? In the Haynes manual it isn't well shown, and in the Honda diagram it appears to be near the oil filter, but maybe I'm wrong about that. (I know to also open the radiator drain valve, the air bleed valve, and keep heater in the "hot" position while draining the coolant. And don't get any coolant on either myself or anything else.)
Thread Starter
|
Senior Member
Joined: Dec 2005
Posts: 774
From: Canada
Well, it's done and the car runs great.
I replaced:
Timing and balance shaft belts, crank seal, front balancer shaft seal, cam shaft seal, water pump, both tensioners, coolant, alt and pwr steering belts, and all gaskets and seals for the valve cover.
Here we go:
1. To set number one cylinder at TDC:
A. Jack up the car and put on jack stands.
B. Take neg battery cable off the battery.
C. Remove front wheels.
D. Put a 19mm socket on a long extension, and, going through the access hole in the driver's side wheel well, put on the crank pulley bolt.
E. Remove that rectangular rubber plug on front of engine.
F. Put a breaker bar on the socket extension and rotate the engine counter-clockwise untill stationary v-notch and line on flywheel, indicating 1 TDC, are aligned. (Another set of eyes helps.)
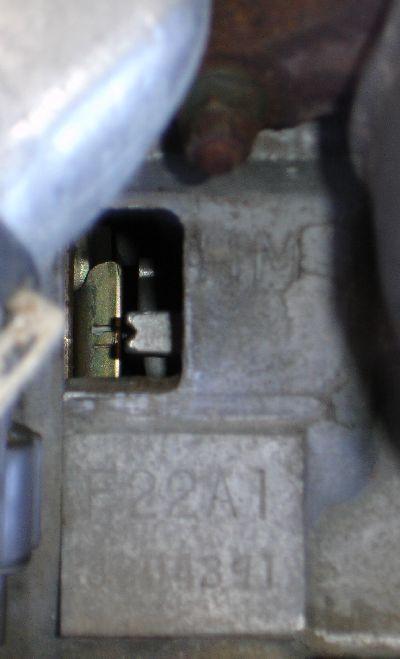
Also find TDC using distributor rotor with contact pointing at #1 location below #1 plug wire on cap.
2. Remove splash guard.
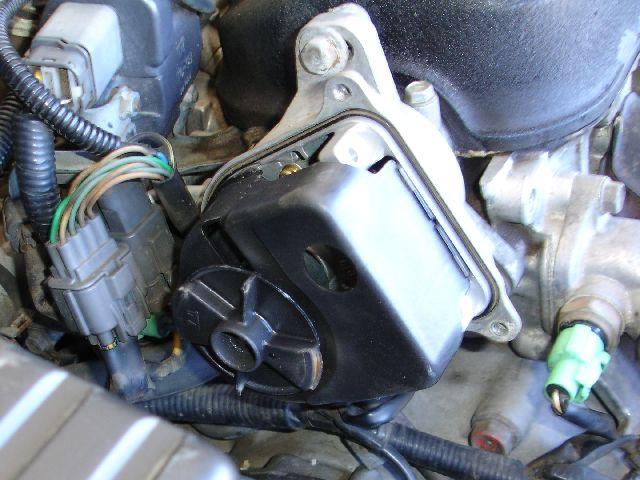
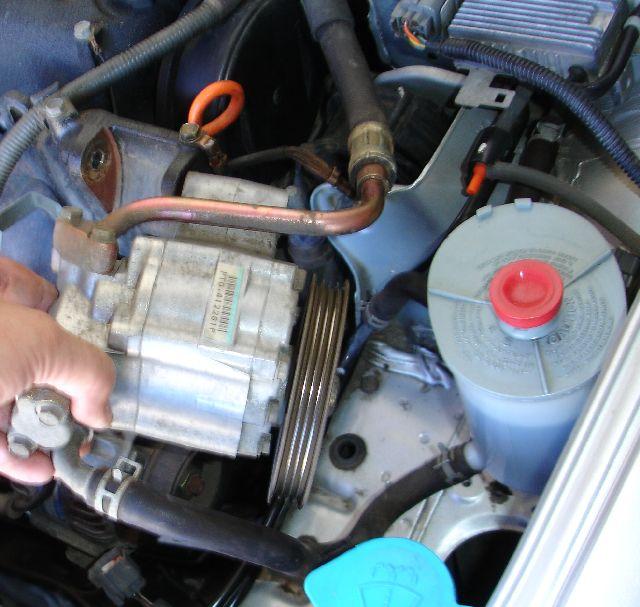
3. Remove cruise control unit and place "out of the way". Remove power stering pump and move out of the way.
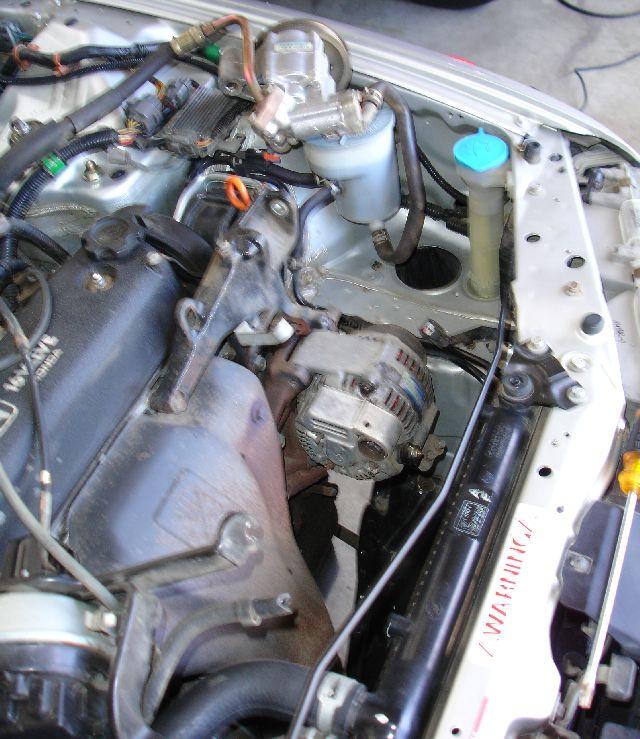
4. Remove alternator. (This is what I decided would be best, anyway.)
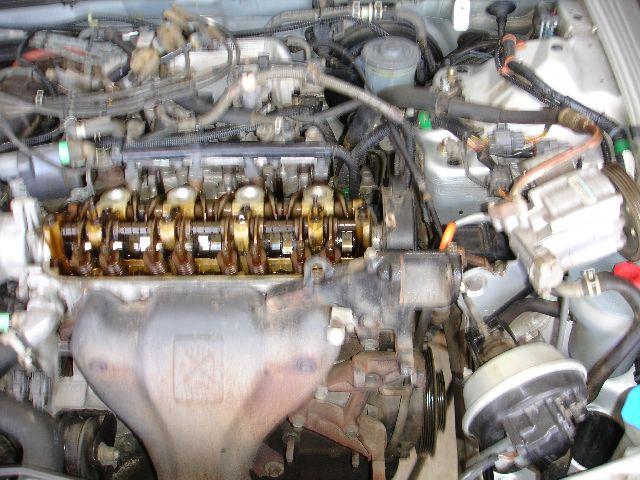
5. Remove valve cover. (I had to temporarily move the cruise unit back to the right to allow removal of the cover.)
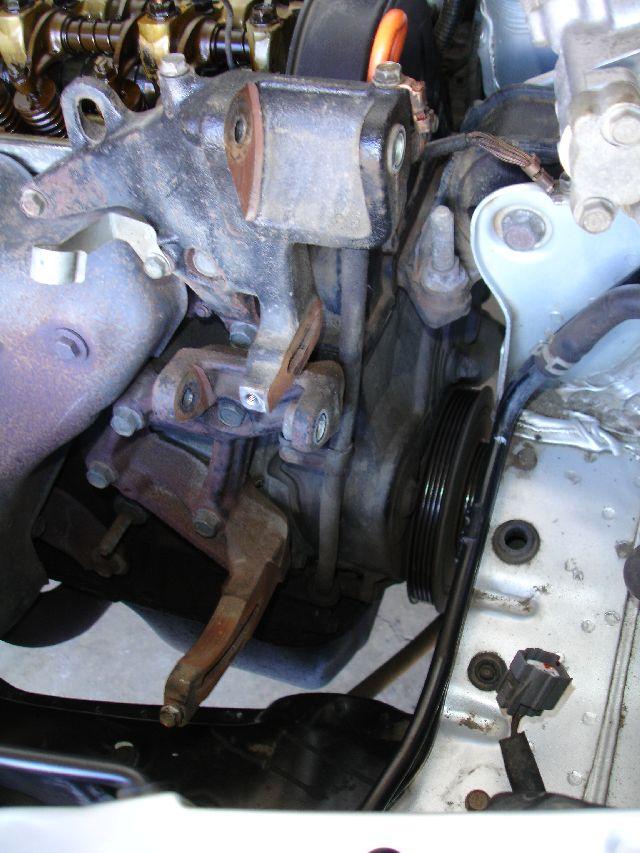
6. Remove motor mount, then upper cover.
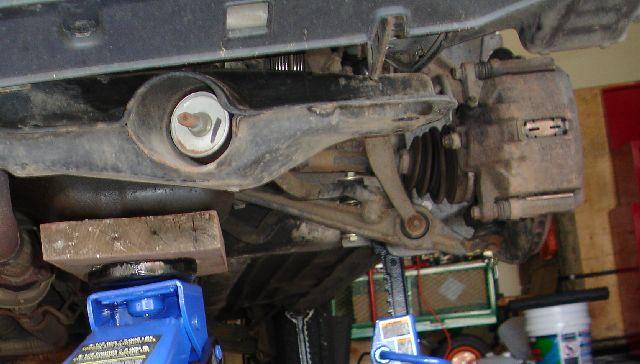
7. Loosen passenger side front beam bolts.
8. Support engine using jack and block of wood up against oil pan, then remove 2 bolts from driver's end of main beam and lower engine about 3 or 4 inches.
9. Remove crank pulley bolt (Good luck if you don't have an impact wrench.)
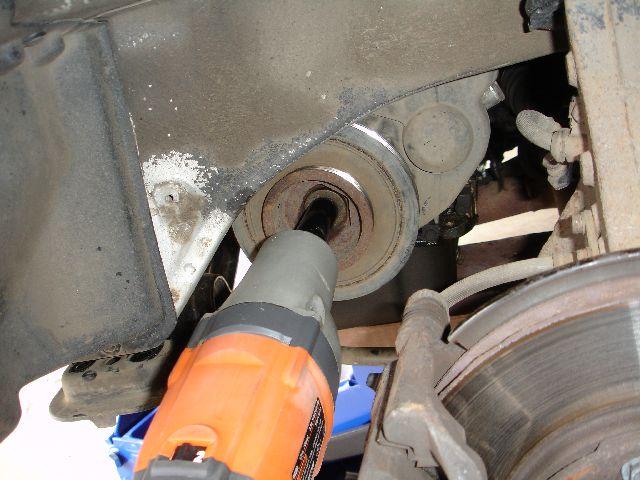
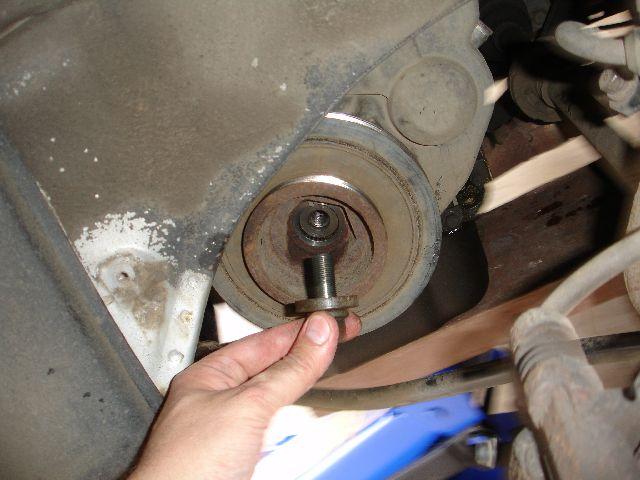
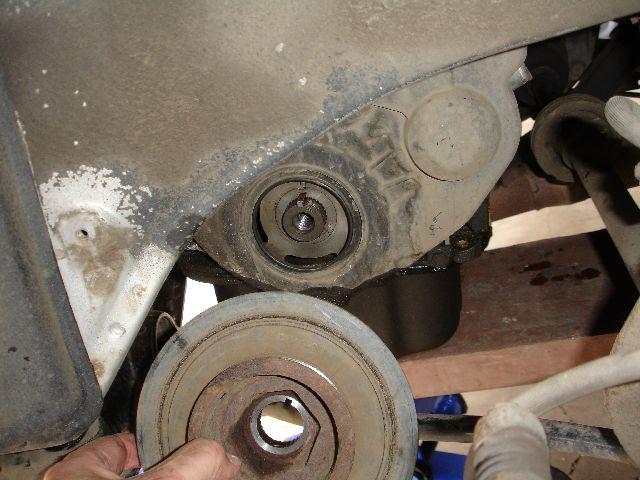
and pull off crank pulley. Mine came off very easily.
10. Remove lower cover. Don't forget to remove adjusting nut - mine was a bugger to remove.
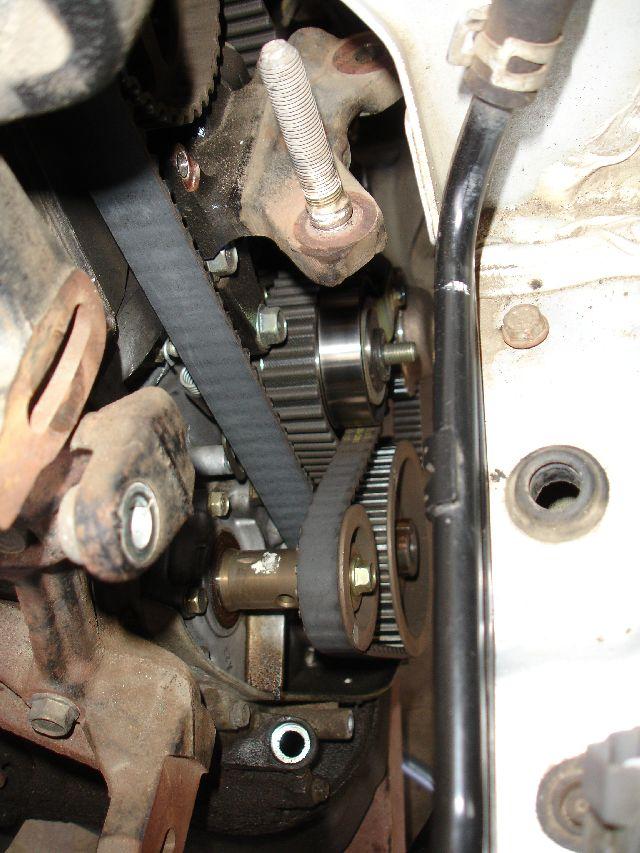
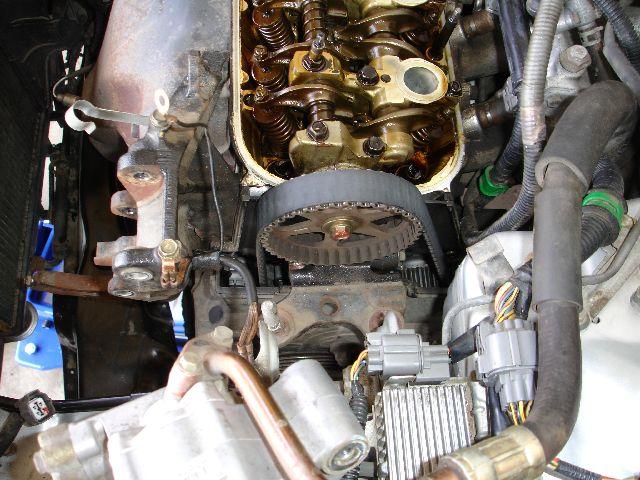
And what you see is a Honda technological marvel.
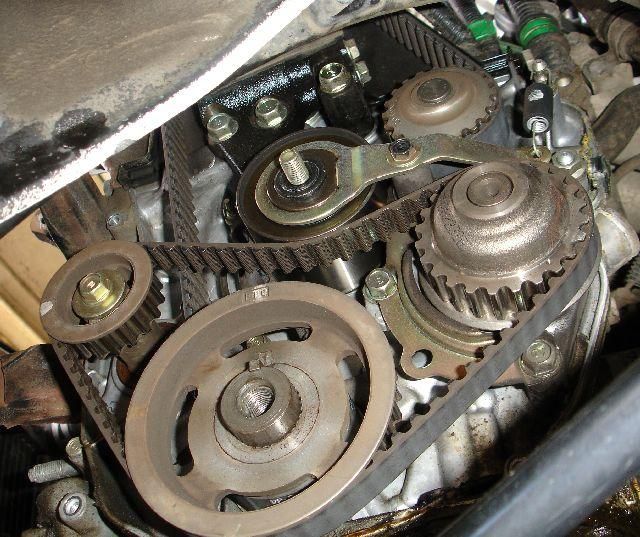
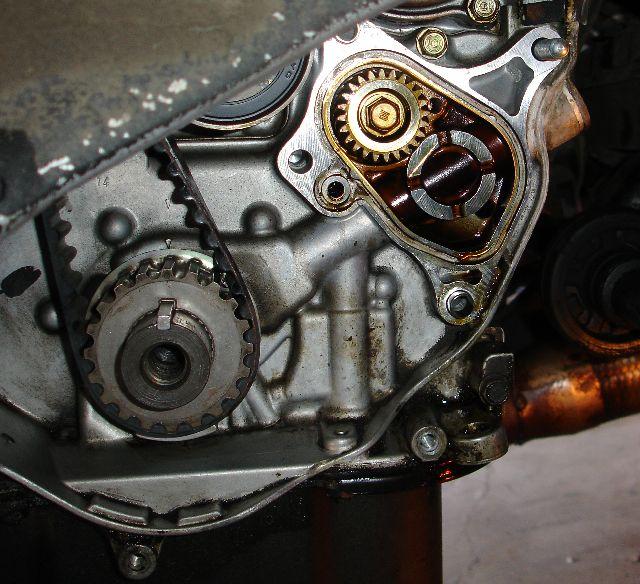
11. Ensure TDC by looking at various marks on the crank's balancer belt pulley, front balance shaft pulley, rear balance shart gear assembly, and cam pulley.
Crank pulley mark with corresponding mark on oil pump behind it.
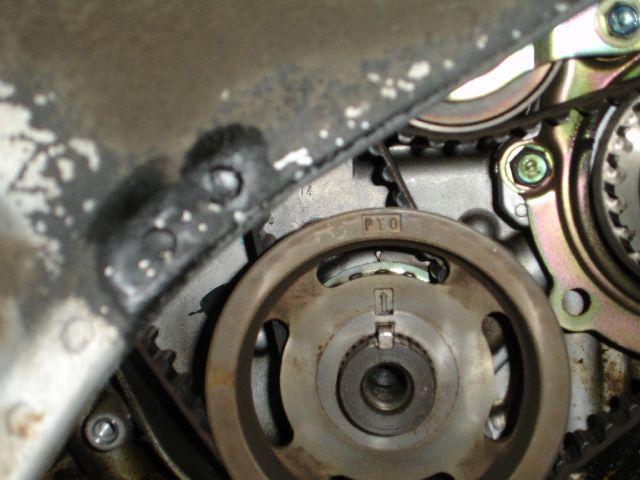
Mark directly on top of front balance shaft and mark on oil pump behind it.
Mark on front balance shart pulley highlighted in white. Notice the shaft seal on oil pump body.
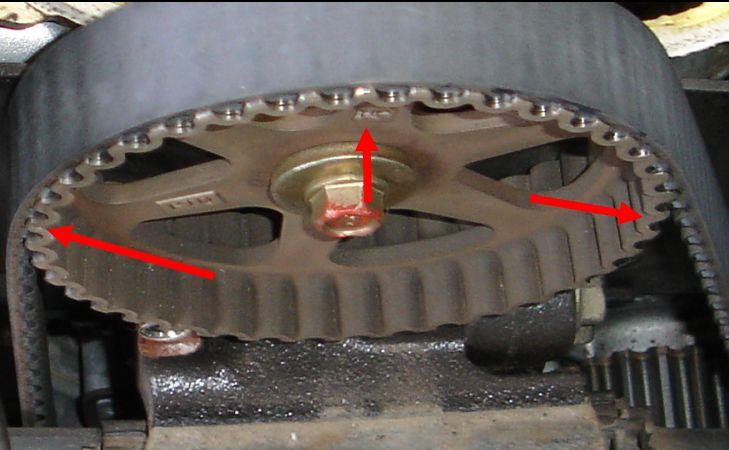
Marks on camshaft pulley. Note that there are the same marks on the BACK of the pulley. They are probably more useful than the ones on the front. Before I removed the old timing belt, I marked on the timing belt with chaulk the "valley" that corresponded to the "tooth" that had the pulley's 9 o'clock mark. I then made a custom mark on a crank timing belt pulley tooth and and marked with chaulk the "valley" that corresponded to it on the timing belt.
12. I shoved a high-speed drill in the rear balancer shaft via the access hole on the rear of the engine block. (Unfortunately, no photo.) This held the balance shaft locked into position. Then I removed the balance belt tensioner, belt and then the gear assembly and re-installed it using a new O-ring.
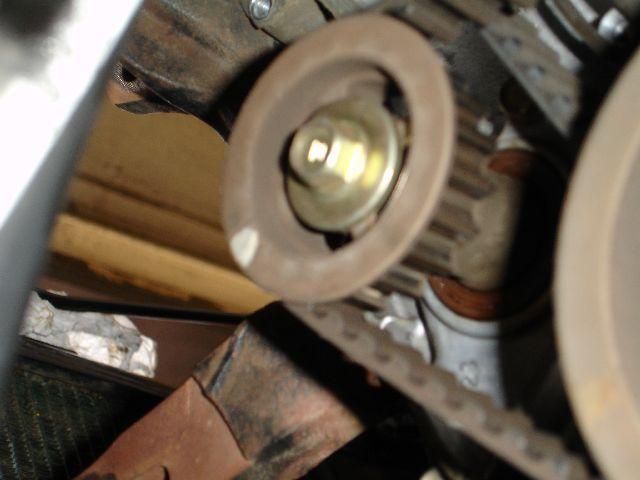
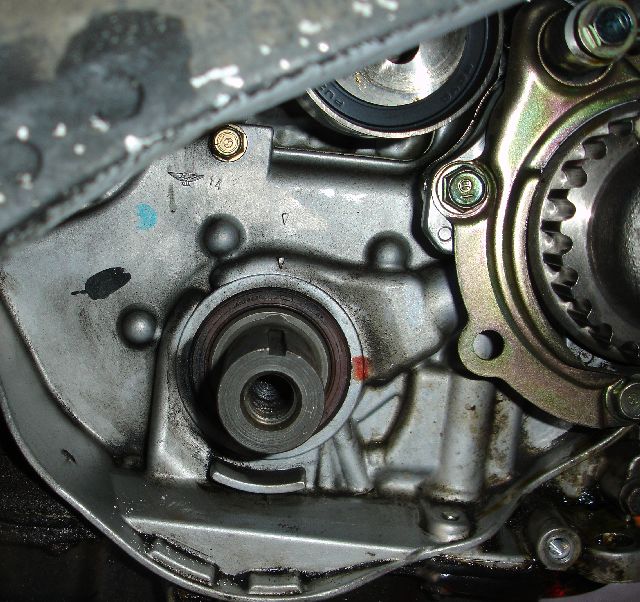
13. Then I removed the timing belt tensioner, timing belt, and crank timing belt pulley. Notice the seal. I then replaced it and reinstalled the crank timing belt pulley.
14. I replaced the water pump with a new Honda unit. Easy to do, but you'd bettter drain the radiator and block beforehand!. Canadians apparently all have a block heater where the block drain would normally be, so I drained the radiator and then removed the block heater. Get a big bucket under that block drain!
15. I removed the front balance shaft pulley and replaced the seal. (All those bloody seals were a pain to remove.)
16. I removed the cam pulley and replaced the cam shaft seal.
17. I counted the valleys between the two marks on the old timing belt and marked the new belt at the same number of valleys. I then reinstalled the timing belt matching the marked valleys with the cam and crank pulley marks - easy. Then the timing tensioner (Koyo is apparently the OEM for these tensioners - the ones I removed were identical to the new ones I installed and they even had "Koyo" marked on them, so go ahead and get Koyo tensioners.)
18. I installed the new balance belt by making sure that the belt was tight between the gear housing, down to the crank pulley, then left up to the front balance shaft pulley (ensuring its shaft mark was still aligned with the mark on the oil pump housing) then I installed the tensioner to tension the top "valley" in the belt between the two balance pulleys. DO NOT forget (like I did) to install the washer on top of the balance belt tensioner before you reinstall the lower cover. (You do not want to know what I said when I had assembled EVERYTHING and knelt down to torque the crank-pulley bolt. I then noticed the washer sitting on top of the old balance belt tensioner sitting on the floor! There's a certain predictable series of emotions that "kick in" in that situation. But there's no getting around the fact that the washer must somehow be installed.)
19. Install lower cover, crank pulley, etc. in the reverse order of removal. Right after putting lower cover on and installing crank pulley, install adjusting nut loosely and then adjust belt tension by turning crank counter-clockwise so that cam pulley rotates about 3 teeth. Check for good belt tension on right and left sides of cam pulley and then tighten adjusting nut.
20. You can do a valve clearance adjustment before installing the valve cover, but if it's 1AM (like it was for me), maybe you'll put it off to another time.
(Later edit - After tightening the adjusting nut, the Haynes manual recommends rotating the crank counter-clockwise a couple of times and then checking the timing marks again at TDC, but I was so confident that I had assembled things correctly, I did not do this. After completing the job, the next day my wife and I went on a 4-hour trip and the car ran smoother than it had in many years.)
I replaced:
Timing and balance shaft belts, crank seal, front balancer shaft seal, cam shaft seal, water pump, both tensioners, coolant, alt and pwr steering belts, and all gaskets and seals for the valve cover.
Here we go:
1. To set number one cylinder at TDC:
A. Jack up the car and put on jack stands.
B. Take neg battery cable off the battery.
C. Remove front wheels.
D. Put a 19mm socket on a long extension, and, going through the access hole in the driver's side wheel well, put on the crank pulley bolt.
E. Remove that rectangular rubber plug on front of engine.
F. Put a breaker bar on the socket extension and rotate the engine counter-clockwise untill stationary v-notch and line on flywheel, indicating 1 TDC, are aligned. (Another set of eyes helps.)
Also find TDC using distributor rotor with contact pointing at #1 location below #1 plug wire on cap.
2. Remove splash guard.
3. Remove cruise control unit and place "out of the way". Remove power stering pump and move out of the way.
4. Remove alternator. (This is what I decided would be best, anyway.)
5. Remove valve cover. (I had to temporarily move the cruise unit back to the right to allow removal of the cover.)
6. Remove motor mount, then upper cover.
7. Loosen passenger side front beam bolts.
8. Support engine using jack and block of wood up against oil pan, then remove 2 bolts from driver's end of main beam and lower engine about 3 or 4 inches.
9. Remove crank pulley bolt (Good luck if you don't have an impact wrench.)
and pull off crank pulley. Mine came off very easily.
10. Remove lower cover. Don't forget to remove adjusting nut - mine was a bugger to remove.
And what you see is a Honda technological marvel.
11. Ensure TDC by looking at various marks on the crank's balancer belt pulley, front balance shaft pulley, rear balance shart gear assembly, and cam pulley.
Crank pulley mark with corresponding mark on oil pump behind it.
Mark directly on top of front balance shaft and mark on oil pump behind it.
Mark on front balance shart pulley highlighted in white. Notice the shaft seal on oil pump body.
Marks on camshaft pulley. Note that there are the same marks on the BACK of the pulley. They are probably more useful than the ones on the front. Before I removed the old timing belt, I marked on the timing belt with chaulk the "valley" that corresponded to the "tooth" that had the pulley's 9 o'clock mark. I then made a custom mark on a crank timing belt pulley tooth and and marked with chaulk the "valley" that corresponded to it on the timing belt.
12. I shoved a high-speed drill in the rear balancer shaft via the access hole on the rear of the engine block. (Unfortunately, no photo.) This held the balance shaft locked into position. Then I removed the balance belt tensioner, belt and then the gear assembly and re-installed it using a new O-ring.
13. Then I removed the timing belt tensioner, timing belt, and crank timing belt pulley. Notice the seal. I then replaced it and reinstalled the crank timing belt pulley.
14. I replaced the water pump with a new Honda unit. Easy to do, but you'd bettter drain the radiator and block beforehand!. Canadians apparently all have a block heater where the block drain would normally be, so I drained the radiator and then removed the block heater. Get a big bucket under that block drain!
15. I removed the front balance shaft pulley and replaced the seal. (All those bloody seals were a pain to remove.)
16. I removed the cam pulley and replaced the cam shaft seal.
17. I counted the valleys between the two marks on the old timing belt and marked the new belt at the same number of valleys. I then reinstalled the timing belt matching the marked valleys with the cam and crank pulley marks - easy. Then the timing tensioner (Koyo is apparently the OEM for these tensioners - the ones I removed were identical to the new ones I installed and they even had "Koyo" marked on them, so go ahead and get Koyo tensioners.)
18. I installed the new balance belt by making sure that the belt was tight between the gear housing, down to the crank pulley, then left up to the front balance shaft pulley (ensuring its shaft mark was still aligned with the mark on the oil pump housing) then I installed the tensioner to tension the top "valley" in the belt between the two balance pulleys. DO NOT forget (like I did) to install the washer on top of the balance belt tensioner before you reinstall the lower cover. (You do not want to know what I said when I had assembled EVERYTHING and knelt down to torque the crank-pulley bolt. I then noticed the washer sitting on top of the old balance belt tensioner sitting on the floor! There's a certain predictable series of emotions that "kick in" in that situation. But there's no getting around the fact that the washer must somehow be installed.)
19. Install lower cover, crank pulley, etc. in the reverse order of removal. Right after putting lower cover on and installing crank pulley, install adjusting nut loosely and then adjust belt tension by turning crank counter-clockwise so that cam pulley rotates about 3 teeth. Check for good belt tension on right and left sides of cam pulley and then tighten adjusting nut.
20. You can do a valve clearance adjustment before installing the valve cover, but if it's 1AM (like it was for me), maybe you'll put it off to another time.
(Later edit - After tightening the adjusting nut, the Haynes manual recommends rotating the crank counter-clockwise a couple of times and then checking the timing marks again at TDC, but I was so confident that I had assembled things correctly, I did not do this. After completing the job, the next day my wife and I went on a 4-hour trip and the car ran smoother than it had in many years.)
Been Around A Long Time Member
Joined: Dec 2005
Posts: 4,754
From: In The Desert ( Sahara ? )
TONY TONY my man...........i am proud of and such nice pics as well..
if you do not mind i would like to use the pics as a DIY timing belt replacement.....
and without insulting or offending you, i have to edit a few parts on your post.......
but in behalf of all of us at HAF i want to give you a big THANK-YOU ...
if you do not mind i would like to use the pics as a DIY timing belt replacement.....
and without insulting or offending you, i have to edit a few parts on your post.......
but in behalf of all of us at HAF i want to give you a big THANK-YOU ...
Thread Starter
|
Senior Member
Joined: Dec 2005
Posts: 774
From: Canada
Desert,
You are very welcome. Without this forum I doubt that I'd have had the courage to undertake the job.
Go ahead and use and edit anything you'd like, in whatever way you'd like.
I'd like to say that I think marking the old timing belt where it meets the cam pulley and a specific tooth on the crank timing-belt pulley is a very good idea and here's why. In order to change the cam seal, naturally one must first remove the cam shaft pulley. Well, this is difficult, if not impossible, to do without slightly rotating the cam pulley. Then you remove the old, and install the new, cam shaft seal. Then you re-install the cam pulley and it moves a bit as you tighten it. You can try to use the inscribed marks on the cam pulley to re-align it with the top of the block, but this only gets you close. Logically, the new timing belt MUST have the same number of valleys as the old one. Therefore, if you align the two belts, or count the valleys on the old belt, and mark the new belt at the same valleys, the new belt can act as a "ruler" in measuring the proper distance between the tooth marked on the cam pulley and the tooth marked on the crank timing-belt pulley. The cam pulley can then be rotated very slightly in either direction to get the appropriate tooth into the marked valley on the belt.
What's nice is the fact that the crank stays put very nicely as the job proceeds.
The front balance shaft spins freely after the belt is taken off. So, when installing the new belt, start at the rear gear housing, then, maintaining proper tightness, down to the bottom of crank belt pulley, then up to the front balance shaft pulley. By rotating the front balnance-shaft pulley, the balance-belt tension is taken up. Looking straight down from the top, one can easily ensure that the balance-shaft-mark and oil-pump-housing mark are still in alignment when the belt is taught. If they're not, you simply move forward or backward one, or more, teeth on the belt by rotating the front balance-shaft-pulley slightly, and once again checking for alignment.
By the way, the plugs are original and their coating was a perfect color. I put them back in the car!
The car actually runs a bit smoother than before, so I think that the last tech who replaced the first set of belts may have been off on the balance belt by a tooth or two when he put things together.
Anyway, I would like to thank the forum for giving me the technical knowledge and confidence to do this job. Having done it gives me a great sense of accomplishment.
(Later edit - Just a couple more specific comments about the job.
First, in an earlier post I have a photo of a Honda diagram which shows a red arrow pointing to an object with the number 14 label. It looks like some kind of seal retainer. This part was NOT on our car and you can see that for yourself by looking at one of the photos I posted later of the job. You can see in that later photo that the old seal's outer surface is flush with the oil pump housing. The new seal, however, would simply not seat that deeply into the pump housing - it poked out very slightly above the surface of the pump. Luckily I bought the seal retainer - also shown in one of the previous posts - and I installed it, so I think I won't have any problem with the seal popping out. There are absolutely no leaks whatsoever on the floor after several long rides. Knock on wood.
Second, in the same earlier diagram, there is an aqua-colored arrow pointing to "something" on the rear balance shaft, between the shaft itself and its gear pulley. That object is not a seal, it is merely some kind of retainer - like a washer. The parts guy told me that this is what it is and that the gear assembly should have oil in it. Indeed this IS the situation - the assembly has quite a bit of oil in it normally. I guess the oil comes into the assembly through that small hole in the O-ring, through the wall of the gear assembly and onto the gears. It either then just sits there until the engine turns off (when it will then drain back through the same hole), or it must flow AROUND the balance shaft pulley and shaft and back into the engine. In either case, just like it is for the water pump, it is the gear assembly's outer O-ring and its shaft-seal that prevent the leakage of oil. UNLIKE the water pump, however, if there is leakage from the shaft seal, it will be directly INSIDE the lower cover. In the water pump's case, if the leak is around the shaft, the coolant will drain to OUTSIDE of the cover via two weep holes. I hope the gear assmebly lasts forever because the parts guy said it costs about $250.)