
F23 Intake Manifold Swap


Thread Starter
|
Senior Member
Joined: Mar 2012
Posts: 731
From: New York
This I originally did on Honda Tech...
So while there already is one, I think its with a Euro manifold. And there aren't as many pics. So heres my contribution.
I AM NOT RESPONSIBLE FOR DAMAGE TO YOURSELF OR YOUR CAR WHEN ATTEMPTING THIS.
The swap is done on an F22B1/2. The F23 intake manifold from the 6th Generation Accords are considered to have a better flow and thus increases HP. Its a pretty cheap swap if you do it right.
Heres the supply list
Parts:
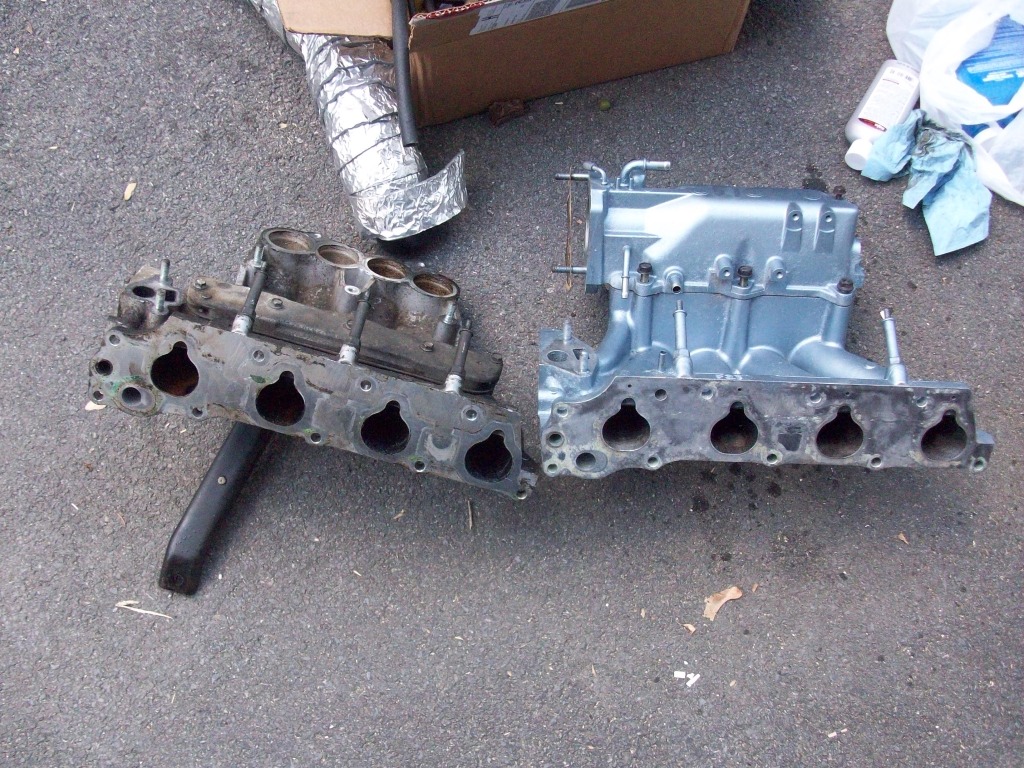
F23 Intake Manifold- If your car has an FIA control valve (runs from fuel injector wires to two vacuums I believe) you need to find a manifold with that extra inlet. I will point it out in the pictures. I got it from a UPullIt for $20. Just cleaned it up and painted it. I will be getting manifolds and prepping them eventually if anyone wants to skip the process and wants to buy a clean and painted intake manifold. Your choice of paint color. Let me know. See photo 1
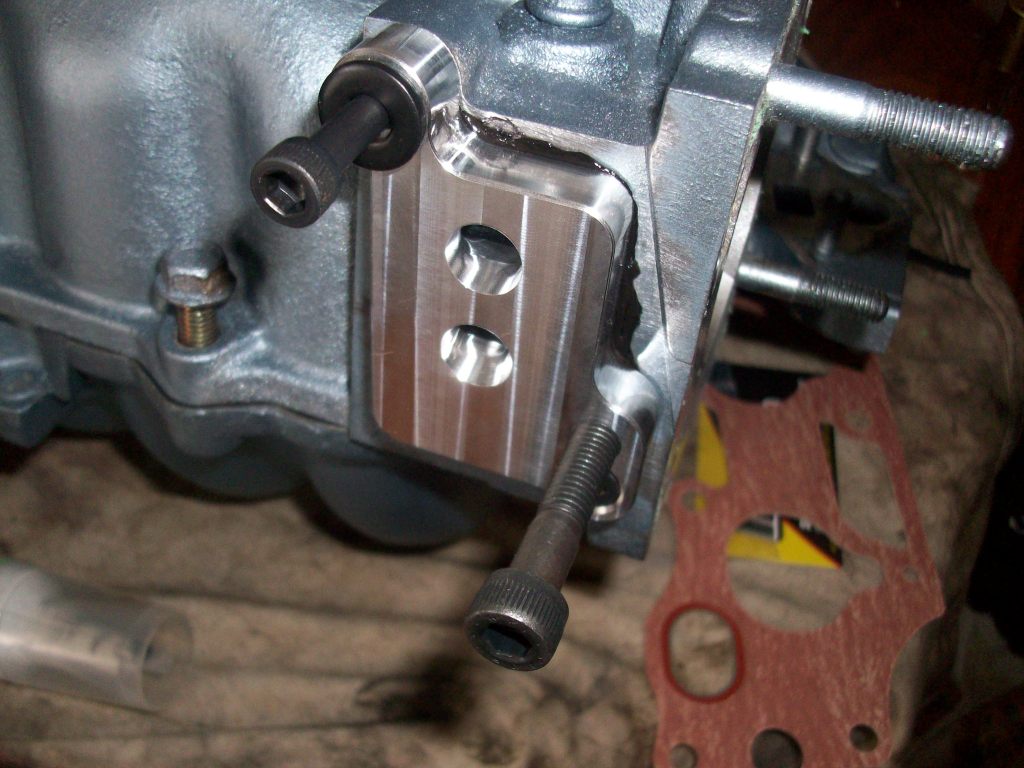
IAC Adapter Plate- Rosko Racing sells the cheapest one I could find ($40.50 total). They say they're for H22s but they do work with the F23. Its a three wire to two wire converter. You can search elsewhere as well. See photo 2
1/8" and 1/4" Vacuum hose- You may be able to switch around the 1/8" to make it all work. 1/4" is for the coolant line into the IAC.
New Gaskets
Optional for added HP:
Throttle Body Spacer- you can google it or go on eBay. It is good because then you will not have to cut the IACV coolant nipples.
Thermal Gasket- Same thing as above, reduces your manifold temp and allows for easy gasket replacement
Tools:
Process:
Preparation
Disconnect the battery
Relieve Fuel Pressure by opening gas cap
Drain Coolant from both radiator and block
Disconnect all Vacuum lines attached to Intake manifold
Unplug EGR
Remove Air Intake Pipe
Throttle Cables
Fuel Injectors with the Rail (held by three bolts) - Careful not to lose the grommets
Larger vacuum line connected that I am not familiar with the name of
Undo some misc bolts from under the intake manifold including the bracket stabilizing it.
Undo the bolts to the throttle body- there are two bolts and two nuts and remove it from the manifold. You can leave it connected to everything else. (Install TB spacer whenever desired)
Its pretty simple, just disconnect everything in the way or attached to it.
Upper Manifold:
I found it easiest to do the upper first.
Unbolt the manifold using a 12mm. Two in the back, one in the front.
Dont take it all the way out though. The IAC and ITS are connected to their wires and the IAC to two coolant lines. One of which you will extend.
Carefully disconnect them and then remove the manifold if everything is free.
Remove the IAC and cuz the coolant nipples back a little (they otherwise will his the TPS) clean it off while you're at it. *Then mount it onto the new intake manifold using the IAC Adapter. Make sure to use silicone sealer on both sides.
*Mount the IAC with the coolant lines facing closest outward so that they will almost hit the TPS when connected to the TB without a throttle body spacer*
Take the Intake Temp Sensor and put it on the new manifold.
Then go back to the engine bay- cut and extend the ITS wires so they reach around. (Wrap the wires so they don't melt)
Lower Manifold:
Us a 12mm wrench and remove all the nuts surrounding the manifold. Theres one by the thermostat housing thats annoying to get too. You'lll be getting under the car for this one too.
Remove the two bolts on the thermostat housing.
Once that is done look around for any miscellaneous bolts connected to the manifold.
Eventually everything will be disconnected and you'll be able to pull out the lower manifold.
Now that that is out you can take the coolant hose running under there to the IAC and replace it with a slightly longer one.
Prep for new manifold
If you're lucky- the crappy paper gasket will be stuck to the manifold, not the head. I wasn't so lucky. :thud:
So you have to make sure there is absolutely nothing between the manifold and the head. Use a razor to get anything off.
Installing New Manifold
Place the gasket on and put the new manifold on. Be sure to clean any connecting surfaces. Same with the upper manifold.
A trick that I wish I new when I did this was to go over the nuts twice or three times. With the lower manifold- tighten them all once and then go around again and tighten them again. This will ensure a good seal and then you wont have constant vacuum issues when starting the car up.
Get the upper manifold on and then put the TB back on. Make sure you hook up the IAC coolant lines.
Put everything back in its place except for the vacuum lines
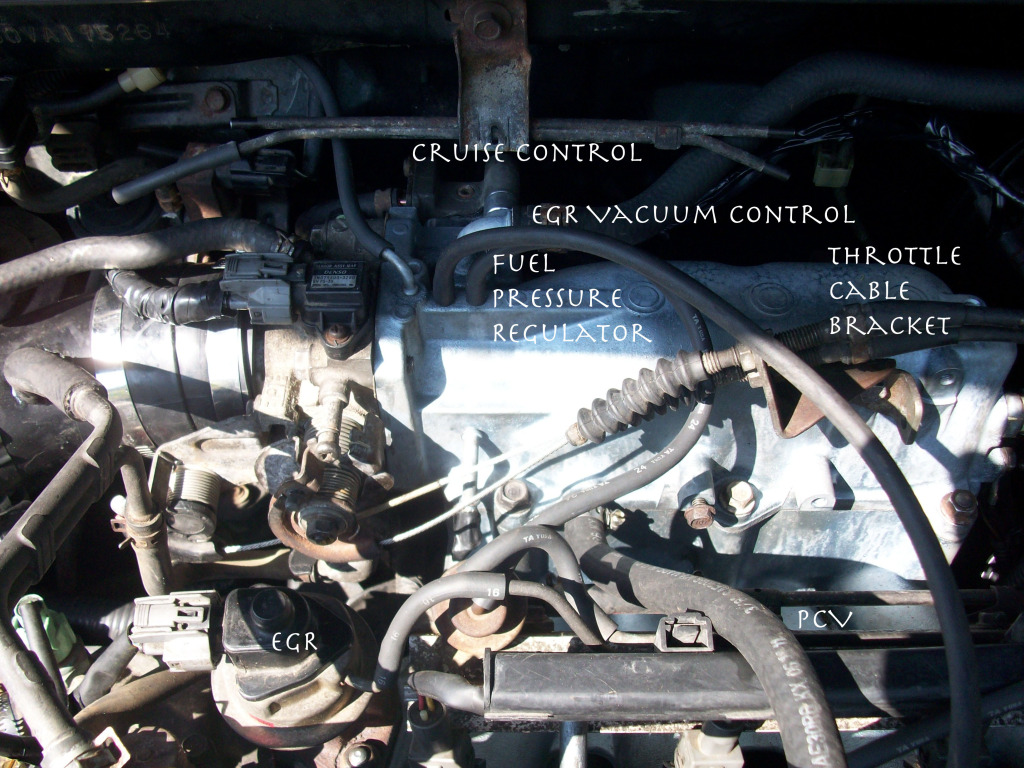
Now there will be some differences that you can see from the pic See photo 3.
Use this as a reference http://repairguide.autozone.com/znet...528003a241.gif
The throttle cable bracket works if you move it one spot over and then angle it.
Three of the four vacuums fit up near the throttle body.
As for the IAR- I'm still figuring out why I need it- but there was a nipple close to the head on the lower manifold that I managed to fit a vacuum line from that over. Its a little big but it fits.
Dont forget the PCV, you may need a new hose for that.
Go through typical coolant replacement procedure
Checklist before starting the car
Everythings tightened and torqued (I had a really annoying vacuum issue)
Coolant is in the car- or water if you're still flushing it.
Sensors are all hooked up:
EGR, TPS, IAC, ITS
Vacuums are hooked up:
Cruise Control, Fuel Pressure Regulator, EGR Vacuum, IAR, FIA (If you have one- see youtube video), and brake booster.
Unused nipples are plugged. (FIA if you dont have one, nipple near engine head)
Tests
Start up the car.
If you're idling high after the cars warmed up check the EGR or any vacuum leaks. You can do this with break cleaner or throttle body cleaner. Spray it in different parts. If the engine changes behavior you've found a leak. Check to see that the throttle cables aren't too tight as well. You can use a propane torch (unlit of course) to check for leaks too.
If the car is rev'ing high and then low, rather violently (like what happened to me :boom: ), you may have not cleaned the surfaces near the engine head well enough. Or you simply did not tighten the nuts through again.
You may need to adjust the idle too. Simply put, warm up the car, detach the IAC wire and then take a screw driver to that screw on the TB until idle reaches 500rpm. You can look up the procedure if unsure.
If nothings out of the ordinary, then congrats, go tear up the road.
then come home and have a beer. you earned it. but dont go back out...
thanks for using my first write up. Comment if you liked it. Comment if you have any corrections. I know there are some.
A fun mod Im going to now pair up with this is a DIY TB boring and tps calibration:
http://www.ozhonda.com/forum/showthr...44#post2732844
http://honda-tech.com/showthread.php?t=2947986
Referenced pics:
1.
2.
3.
Alternate write up- includes instructions for F22B2
DIY F23 Intake Manifold Swap (F22B)
IAC Adapter
https://www.roskoracing.com/cgi-bin/...on&key=200-011
Youtube Vid- This is not me
F22 Vacuum Diagram
| Repair Guides | Vacuum Diagrams | Vacuum Diagrams | AutoZone.com
My post on the IAR
https://www.hondaaccordforum.com/for...uestion-49819/
More pics of my project
Pictures by vegetableman2010 - Photobucket
Let me know if theres anything I missed.
So while there already is one, I think its with a Euro manifold. And there aren't as many pics. So heres my contribution.
I AM NOT RESPONSIBLE FOR DAMAGE TO YOURSELF OR YOUR CAR WHEN ATTEMPTING THIS.
The swap is done on an F22B1/2. The F23 intake manifold from the 6th Generation Accords are considered to have a better flow and thus increases HP. Its a pretty cheap swap if you do it right.
Heres the supply list
Parts:
F23 Intake Manifold- If your car has an FIA control valve (runs from fuel injector wires to two vacuums I believe) you need to find a manifold with that extra inlet. I will point it out in the pictures. I got it from a UPullIt for $20. Just cleaned it up and painted it. I will be getting manifolds and prepping them eventually if anyone wants to skip the process and wants to buy a clean and painted intake manifold. Your choice of paint color. Let me know. See photo 1
IAC Adapter Plate- Rosko Racing sells the cheapest one I could find ($40.50 total). They say they're for H22s but they do work with the F23. Its a three wire to two wire converter. You can search elsewhere as well. See photo 2
1/8" and 1/4" Vacuum hose- You may be able to switch around the 1/8" to make it all work. 1/4" is for the coolant line into the IAC.
New Gaskets
Optional for added HP:
Throttle Body Spacer- you can google it or go on eBay. It is good because then you will not have to cut the IACV coolant nipples.
Thermal Gasket- Same thing as above, reduces your manifold temp and allows for easy gasket replacement
Tools:
- 10mm, 12mm socket, wrench and extensions.
- Needle Nose pliers.
- Coolant draining and replacing supplies.
- Throttle Body Cleaner
- Razor blade with handle
- Flathead screwdriver
Process:
Preparation
Disconnect the battery
Relieve Fuel Pressure by opening gas cap
Drain Coolant from both radiator and block
Disconnect all Vacuum lines attached to Intake manifold
Unplug EGR
Remove Air Intake Pipe
Throttle Cables
Fuel Injectors with the Rail (held by three bolts) - Careful not to lose the grommets
Larger vacuum line connected that I am not familiar with the name of
Undo some misc bolts from under the intake manifold including the bracket stabilizing it.
Undo the bolts to the throttle body- there are two bolts and two nuts and remove it from the manifold. You can leave it connected to everything else. (Install TB spacer whenever desired)
Its pretty simple, just disconnect everything in the way or attached to it.
Upper Manifold:
I found it easiest to do the upper first.
Unbolt the manifold using a 12mm. Two in the back, one in the front.
Dont take it all the way out though. The IAC and ITS are connected to their wires and the IAC to two coolant lines. One of which you will extend.
Carefully disconnect them and then remove the manifold if everything is free.
Remove the IAC and cuz the coolant nipples back a little (they otherwise will his the TPS) clean it off while you're at it. *Then mount it onto the new intake manifold using the IAC Adapter. Make sure to use silicone sealer on both sides.
*Mount the IAC with the coolant lines facing closest outward so that they will almost hit the TPS when connected to the TB without a throttle body spacer*
Take the Intake Temp Sensor and put it on the new manifold.
Then go back to the engine bay- cut and extend the ITS wires so they reach around. (Wrap the wires so they don't melt)
Lower Manifold:
Us a 12mm wrench and remove all the nuts surrounding the manifold. Theres one by the thermostat housing thats annoying to get too. You'lll be getting under the car for this one too.
Remove the two bolts on the thermostat housing.
Once that is done look around for any miscellaneous bolts connected to the manifold.
Eventually everything will be disconnected and you'll be able to pull out the lower manifold.
Now that that is out you can take the coolant hose running under there to the IAC and replace it with a slightly longer one.
Prep for new manifold
If you're lucky- the crappy paper gasket will be stuck to the manifold, not the head. I wasn't so lucky. :thud:
So you have to make sure there is absolutely nothing between the manifold and the head. Use a razor to get anything off.
Installing New Manifold
Place the gasket on and put the new manifold on. Be sure to clean any connecting surfaces. Same with the upper manifold.
A trick that I wish I new when I did this was to go over the nuts twice or three times. With the lower manifold- tighten them all once and then go around again and tighten them again. This will ensure a good seal and then you wont have constant vacuum issues when starting the car up.
Get the upper manifold on and then put the TB back on. Make sure you hook up the IAC coolant lines.
Put everything back in its place except for the vacuum lines
Now there will be some differences that you can see from the pic See photo 3.
Use this as a reference http://repairguide.autozone.com/znet...528003a241.gif
The throttle cable bracket works if you move it one spot over and then angle it.
Three of the four vacuums fit up near the throttle body.
As for the IAR- I'm still figuring out why I need it- but there was a nipple close to the head on the lower manifold that I managed to fit a vacuum line from that over. Its a little big but it fits.
Dont forget the PCV, you may need a new hose for that.
Go through typical coolant replacement procedure
Checklist before starting the car
Everythings tightened and torqued (I had a really annoying vacuum issue)
Coolant is in the car- or water if you're still flushing it.
Sensors are all hooked up:
EGR, TPS, IAC, ITS
Vacuums are hooked up:
Cruise Control, Fuel Pressure Regulator, EGR Vacuum, IAR, FIA (If you have one- see youtube video), and brake booster.
Unused nipples are plugged. (FIA if you dont have one, nipple near engine head)
Tests
Start up the car.
If you're idling high after the cars warmed up check the EGR or any vacuum leaks. You can do this with break cleaner or throttle body cleaner. Spray it in different parts. If the engine changes behavior you've found a leak. Check to see that the throttle cables aren't too tight as well. You can use a propane torch (unlit of course) to check for leaks too.
If the car is rev'ing high and then low, rather violently (like what happened to me :boom: ), you may have not cleaned the surfaces near the engine head well enough. Or you simply did not tighten the nuts through again.
You may need to adjust the idle too. Simply put, warm up the car, detach the IAC wire and then take a screw driver to that screw on the TB until idle reaches 500rpm. You can look up the procedure if unsure.
If nothings out of the ordinary, then congrats, go tear up the road.
then come home and have a beer. you earned it. but dont go back out...
thanks for using my first write up. Comment if you liked it. Comment if you have any corrections. I know there are some.
A fun mod Im going to now pair up with this is a DIY TB boring and tps calibration:
http://www.ozhonda.com/forum/showthr...44#post2732844
http://honda-tech.com/showthread.php?t=2947986
Referenced pics:
1.
2.
3.
Alternate write up- includes instructions for F22B2
DIY F23 Intake Manifold Swap (F22B)
IAC Adapter
https://www.roskoracing.com/cgi-bin/...on&key=200-011
Youtube Vid- This is not me
F22 Vacuum Diagram
| Repair Guides | Vacuum Diagrams | Vacuum Diagrams | AutoZone.com
My post on the IAR
https://www.hondaaccordforum.com/for...uestion-49819/
More pics of my project
Pictures by vegetableman2010 - Photobucket
Let me know if theres anything I missed.
Last edited by RobinsonRicer; Jan 24, 2013 at 12:47 PM.

Thread Starter
|
Senior Member
Joined: Mar 2012
Posts: 731
From: New York
It's been a long time since I've been on but I'll reply anyways.
When I did this, there wasn't a huge difference but it was definitely nicer with the mid range power. This is one of those things that you do in conjunction with other plans- tune and bolt ons or in my current case, forced induction.
The swap should take a few hours. If you're good and have air tools, maybe about 2 hours. That includes drain and refill coolant.
Before installing, I would recommend porting the new manifold runners to create a velocity stack shape for better flow.
But, it's definitely a great option for these engines. Cheap and easy.


Joined: Nov 2018
Posts: 1
I hope you can help clarify this for me. I don't have a lot of wrench time but I am smart and mechanically a quick learner.
So I recently purchased a 1996 Handa Accord Dx with the F22B2 and the manual gearbox. I love the car but had a 2003 Acura TL Type S and the power difference is leaving me wanting for so much more. I purchased the car with a cone filter in place of the stock air box. And A DC Sport Tuned exhaust. I believe it also has upgraded engine and trans mounts. Other than that stock. So in search of more power I wanted to use a skunk2 pro throttle body which requires a skunk2 Pro Series manifold "Or so the website claims". Since they don't make an f22b2 intake manifold could I use the f23 skunk intake manifold as you described with the f23 OEM manifold??? Or what should can I do. Love this car so I don't want to sell it and start with a new base like a civic or something what can I do with what I have? Any thought suggestions or all out plans would be greatly appreciated. The car is a daily driver on a budget so nothing crazy cheaper the better. At most I would consider $5,000 or less. However, if it would make enough difference for the cost, I could maybe consider going into the range of $10,000 but that would have to be a piece by piece build over the next year. Thank you in advance for any insight or help you or anyone else can provide.
Sincerely,
Dave "Desperate Honda Lover in Need of Tutoring"

Joined: Aug 2019
Posts: 3
From: Columbia Falls MT
Ok guys, my question is, why can't I use the IACV from the F23 intake? Can't I get the 3 wire pig tail and add the ground wire? From what I read, that is the third added wire to the plug. I found a IACV for $22 bucks on Amazon, or can find one at the junk yard with the connector attached.
I used the injectors that came with the F23, but used my injector runner from my F22B. The fuel inlet was different.
Am I missing something? Will that not work?
Thanks
I used the injectors that came with the F23, but used my injector runner from my F22B. The fuel inlet was different.
Am I missing something? Will that not work?
Thanks

Thread
Thread Starter
Forum
Replies
Last Post
DaveMcG6thGen
General Tech Help
15
Jul 28, 2014 11:33 AM
JerseyTuscani
PRIVATE For Sale / Trade Classifieds
2
Jul 2, 2007 05:21 PM