
DIY Short Shifter


Thread Starter
|
Been Around A Long Time Member
Joined: Jun 2007
Posts: 7,381
From: St. Paul, MN
*** MODS: Please move this to the DIY section, thanks! ***
DIY Short Shifter
DISCLAIMER: I am not responsible for any damage done to your car. I am merely suggesting a way to get from start to finish, which worked successfully for me, maybe not for you.
All credit goes to http://www.filtsai.com/accord/cut_shifter/index.php for the idea. I do not like the stock shifter in the 6th gen Accord. It's far too long and looks a bit tacky. I'm tired of hitting my knuckles on the storage tray every time I shift into 5th gear. So I borrowed an idea and decided to do it a more correct and precise way, albeit much more difficult. This DIY cuts and threads the shifter outside of the car, with the correct way of rethreading it. You will be removing a lot of trim from your car to do this.
Estimated time: 3 - 4 hours
Tools Needed:
- #2 Phillips Screwdriver
- Medium Flathead Screwdriver
- 12MM 6-point socket (preferably 3/8" drive or larger)
- 10MM 6-point socket
- Pliers
- Needle nose Pliers
- Some sort of hand held grinder (angle or air)
- M10x1.5 die
- Matching die holder
- Cutting Fluid (I used Tap Magic)
- Vise
- Hack saw or cutting wheel
- Masking Tape
*REMOVING THE TRIM PANELS*
Step 1 Remove the cup holder. Pull straight up to release the 2 clips.
Step 2 Remove the shift ****. Grasp the boot collar with your thumb and index finger, while squeezing the 2 clips and pull straight down. Turn the **** counter-clockwise to unscrew it.
Step 3 Remove the shift boot/plastic trim. With the emergency brake on, pull up where the cup holder was and start releasing the clips. There are 2 in front, 2 in the middle, and 2 tabs in the rear.
Step 4 Remove the front storage area. Remove the 2 screws revealed by removing the shifter trim. Pull up on the plastic and then out, remember to unplug the power outlet.
Step 5 Remove the plastic trim above the storage area. Once the storage area has been removed, pull down from the back of the trim above it. There are 4 clips holding it in.
Step 6 Remove the knee bolsters (under the steering wheel/glove box). Each side is the same, except opposite. Two screws were revealed by removing the trim above the storage bin, remove them. On each side, take off the fuse panel covers. Inside you will see two screws holding the knee bolsters, one is gold, the other is black. Once the three
screws are removed you should be able to pull on the panel to release about 4 clips. Be careful not to break the tabs under the stereo or near the fuse panel.
Step 7 Remove the center console. There are 2 screws on each side of the console in the foot wells revealed after removing the knee bolsters. There are 2 more screws on the sides of the emergency brake. The final two screws are in the storage bin under the armrest, under the textured plastic plate at the bottom. Use a flathead screwdriver
to pry up the plate and reveal the last 2 screws. Depending on the car, you may have to remove the emergency brake to pull the console out. If so, there are 2 12MM bolts holding it to the floor. Don't forget to disconnect the switch for the brake indicator light on the side. To remove the emergency brake cables simply rotate each one to the side and lift up.
Step 8 Remove the shifter assembly. Start by removing the 10MM bolt holding the shift cable to the shifter. If you have a short shift adapter, remove the 12MM bolt (most likely) holding the cable to the adapter. Next, remove the cotter pin holding the pin in the second shift cable (the one the moves forward/backward when you move the shifter
side to side. To remove the primary shift cable from the assembly take a screwdriver and pry off the large C-clip until you can pull the slip with a pliers, push the cable toward the back then slide it out. Next remove the 4 12MM bolts holding the assembly to the floor. Once removed, you can rotate the whole assembly to twist the secondary
shift cable and slide it out.
*CUTTING AND THREADING THE SHIFTER*
You can safely cut approximately 2" from the shifter. You must have about 1" of thread for the ****. It is far easier and advised to thread the shifter before cutting it.
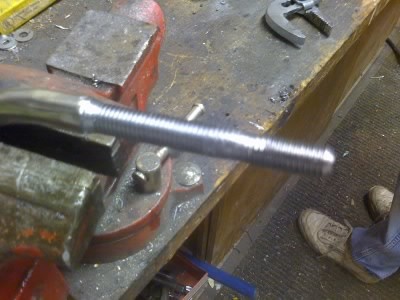
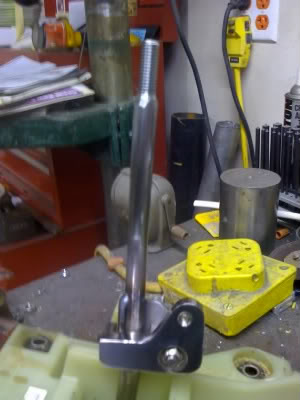
Step 1 Grind down the shifter. Place the shifter in the vise so that it sits horizontally. Start grinding the area between where the threads end and the bend in the rod. The original O.D. of the rod is 13MM, the target O.D. for proper threading is about 11MM. Once the rod is ground, smooth and fairly round move on to step 2.
Step 2 Thread the shifter. I started with a Snap M10x1.5 die, but it had a set-screw to oversize or under size the thread. This ultimately allows the die to expand a little while cutting new threads. I'm a perfectionist so after I cut new threads I used a different M10x1.5 that was completely solid and non-adjustable. To cut threads the CORRECT
way, screw the die onto the existing threads. When you get to the bare metal at the end of the threads, squirt a little cutting fluid into the die and onto the metal to be cut. Advance the die 1/2 turn onto the bare metal. Then back the die 1/2 turn to release the shavings. After this you can advance the die 1 full turn and reverse it 1/2 turn so you are cutting 1/2 of the rod at a time. For every 1/4" of metal cut, squirt more cutting fluid into the die. Once there is a total of 3 inches of thread you can stop. At this point you can wipe the new threads of shavings and then just run the die up and down the shaft to make sure the threads were cut properly. If done right, the die should spin loosely on the shaft.
Step 3 Cut the shifter. Thread the die as far as it can go onto the rod, using masking tape, mark where 1" of thread (minimum) or 2" of shifter cut (maximum) on the rod. Use a cutting wheel on hack saw to cut at the mark. After you have cut the shifter, use the grinder to flatten the tip and taper the beginning threads at a 45* angle. Unscrew the die to re-thread/repair the newly tapered and cut threads.
Congratulations, you have successfully shortened your shifter. A shift shift adapter shortens throws about 2" and the shortened shifter takes about another 1" off the throws, effectively reducing them about 60%.
(Sorry for the bad quality, it's my cell phone. Quality pics coming today with my shift **** install)
*CUTTING THE SHIFT BOOT*
I have not done this yet because I am waiting for my RSX shift **** to come in the mail. I would recommend following the steps on page 2 of the filtsai write-up, but instead of just cutting and zip tying it, I would (and will) re-sew the boot to taper to the original hole size.
Reinstall the shifter and trim in reverse order. Take care when putting the **** on, the new threads are very sharp and will screw up the plastic shift **** if you cross thread it.
Advantages of this method vs. Filtsai
- Threads are aligned properly to the factory machined threads (no crooked shift ****!)
- You will not ruin a nice set of dies by not using cutting oil
- You will save time and stress by not using the filtsai "step-down" method (M13x1.5 to M10x1.5)
- No metal shavings in your car!
Disadvantages:
- More time consuming to remove all the trim and shifter, but worth it!
You can now use any aftermarket or OEM shift **** you like! I personally bought an OEM Acura RSX aluminum ****, but you can buy anything you want. I believe GM uses an 8MM thread, so alter my write up to match the thread you need.
Here are pics of my shorter shifter with the new Acura RSX shift ****. The stock **** sits a lot lower because the new **** has an odd boot bracket and flange bolt setup.
[IMG]http://i2
DIY Short Shifter
DISCLAIMER: I am not responsible for any damage done to your car. I am merely suggesting a way to get from start to finish, which worked successfully for me, maybe not for you.
All credit goes to http://www.filtsai.com/accord/cut_shifter/index.php for the idea. I do not like the stock shifter in the 6th gen Accord. It's far too long and looks a bit tacky. I'm tired of hitting my knuckles on the storage tray every time I shift into 5th gear. So I borrowed an idea and decided to do it a more correct and precise way, albeit much more difficult. This DIY cuts and threads the shifter outside of the car, with the correct way of rethreading it. You will be removing a lot of trim from your car to do this.
Estimated time: 3 - 4 hours
Tools Needed:
- #2 Phillips Screwdriver
- Medium Flathead Screwdriver
- 12MM 6-point socket (preferably 3/8" drive or larger)
- 10MM 6-point socket
- Pliers
- Needle nose Pliers
- Some sort of hand held grinder (angle or air)
- M10x1.5 die
- Matching die holder
- Cutting Fluid (I used Tap Magic)
- Vise
- Hack saw or cutting wheel
- Masking Tape
*REMOVING THE TRIM PANELS*
Step 1 Remove the cup holder. Pull straight up to release the 2 clips.
Step 2 Remove the shift ****. Grasp the boot collar with your thumb and index finger, while squeezing the 2 clips and pull straight down. Turn the **** counter-clockwise to unscrew it.
Step 3 Remove the shift boot/plastic trim. With the emergency brake on, pull up where the cup holder was and start releasing the clips. There are 2 in front, 2 in the middle, and 2 tabs in the rear.
Step 4 Remove the front storage area. Remove the 2 screws revealed by removing the shifter trim. Pull up on the plastic and then out, remember to unplug the power outlet.
Step 5 Remove the plastic trim above the storage area. Once the storage area has been removed, pull down from the back of the trim above it. There are 4 clips holding it in.
Step 6 Remove the knee bolsters (under the steering wheel/glove box). Each side is the same, except opposite. Two screws were revealed by removing the trim above the storage bin, remove them. On each side, take off the fuse panel covers. Inside you will see two screws holding the knee bolsters, one is gold, the other is black. Once the three
screws are removed you should be able to pull on the panel to release about 4 clips. Be careful not to break the tabs under the stereo or near the fuse panel.
Step 7 Remove the center console. There are 2 screws on each side of the console in the foot wells revealed after removing the knee bolsters. There are 2 more screws on the sides of the emergency brake. The final two screws are in the storage bin under the armrest, under the textured plastic plate at the bottom. Use a flathead screwdriver
to pry up the plate and reveal the last 2 screws. Depending on the car, you may have to remove the emergency brake to pull the console out. If so, there are 2 12MM bolts holding it to the floor. Don't forget to disconnect the switch for the brake indicator light on the side. To remove the emergency brake cables simply rotate each one to the side and lift up.
Step 8 Remove the shifter assembly. Start by removing the 10MM bolt holding the shift cable to the shifter. If you have a short shift adapter, remove the 12MM bolt (most likely) holding the cable to the adapter. Next, remove the cotter pin holding the pin in the second shift cable (the one the moves forward/backward when you move the shifter
side to side. To remove the primary shift cable from the assembly take a screwdriver and pry off the large C-clip until you can pull the slip with a pliers, push the cable toward the back then slide it out. Next remove the 4 12MM bolts holding the assembly to the floor. Once removed, you can rotate the whole assembly to twist the secondary
shift cable and slide it out.
*CUTTING AND THREADING THE SHIFTER*
You can safely cut approximately 2" from the shifter. You must have about 1" of thread for the ****. It is far easier and advised to thread the shifter before cutting it.
Step 1 Grind down the shifter. Place the shifter in the vise so that it sits horizontally. Start grinding the area between where the threads end and the bend in the rod. The original O.D. of the rod is 13MM, the target O.D. for proper threading is about 11MM. Once the rod is ground, smooth and fairly round move on to step 2.
Step 2 Thread the shifter. I started with a Snap M10x1.5 die, but it had a set-screw to oversize or under size the thread. This ultimately allows the die to expand a little while cutting new threads. I'm a perfectionist so after I cut new threads I used a different M10x1.5 that was completely solid and non-adjustable. To cut threads the CORRECT
way, screw the die onto the existing threads. When you get to the bare metal at the end of the threads, squirt a little cutting fluid into the die and onto the metal to be cut. Advance the die 1/2 turn onto the bare metal. Then back the die 1/2 turn to release the shavings. After this you can advance the die 1 full turn and reverse it 1/2 turn so you are cutting 1/2 of the rod at a time. For every 1/4" of metal cut, squirt more cutting fluid into the die. Once there is a total of 3 inches of thread you can stop. At this point you can wipe the new threads of shavings and then just run the die up and down the shaft to make sure the threads were cut properly. If done right, the die should spin loosely on the shaft.
Step 3 Cut the shifter. Thread the die as far as it can go onto the rod, using masking tape, mark where 1" of thread (minimum) or 2" of shifter cut (maximum) on the rod. Use a cutting wheel on hack saw to cut at the mark. After you have cut the shifter, use the grinder to flatten the tip and taper the beginning threads at a 45* angle. Unscrew the die to re-thread/repair the newly tapered and cut threads.
Congratulations, you have successfully shortened your shifter. A shift shift adapter shortens throws about 2" and the shortened shifter takes about another 1" off the throws, effectively reducing them about 60%.
(Sorry for the bad quality, it's my cell phone. Quality pics coming today with my shift **** install)
*CUTTING THE SHIFT BOOT*
I have not done this yet because I am waiting for my RSX shift **** to come in the mail. I would recommend following the steps on page 2 of the filtsai write-up, but instead of just cutting and zip tying it, I would (and will) re-sew the boot to taper to the original hole size.
Reinstall the shifter and trim in reverse order. Take care when putting the **** on, the new threads are very sharp and will screw up the plastic shift **** if you cross thread it.
Advantages of this method vs. Filtsai
- Threads are aligned properly to the factory machined threads (no crooked shift ****!)
- You will not ruin a nice set of dies by not using cutting oil
- You will save time and stress by not using the filtsai "step-down" method (M13x1.5 to M10x1.5)
- No metal shavings in your car!
Disadvantages:
- More time consuming to remove all the trim and shifter, but worth it!
You can now use any aftermarket or OEM shift **** you like! I personally bought an OEM Acura RSX aluminum ****, but you can buy anything you want. I believe GM uses an 8MM thread, so alter my write up to match the thread you need.
Here are pics of my shorter shifter with the new Acura RSX shift ****. The stock **** sits a lot lower because the new **** has an odd boot bracket and flange bolt setup.
[IMG]http://i2

Thread
Thread Starter
Forum
Replies
Last Post
markus9175
General Tech Help
2
Mar 27, 2009 10:35 PM