
Aligning strut cap for assembly installation


Thread Starter
|
Senior Member
Joined: Dec 2005
Posts: 774
From: Canada
My wife and I own a 92 Accord 4 dr LX 4AT. It is a very basic car which has been very reliable, except for heater control.
I’m in the process of renewing the suspension of the car and I have a few questions.
I’ve replaced the front dampers and coil springs with ac-delco aftermarket parts. These are parts which match the OEM units as closely as possible, in fact, if there were not a label on the new damper, I could not tell apart from the old one.
For example, all the brake hose fittings are identically installed as on a metal ring which is apparently welded to the body of the damper. On the portion of this metal ring facing the engine there is also a small tab, or tongue, which is supposed to finally reside inside the tightened “yoke” which holds the lower end of the damper/coil assembly to the lower control arm, making it part of the suspension of the car.
The upper end of this assembly is held to the car by a “cap” which has on it three integral bolts which poke up through three corresponding holes in the body of the car and are held in place by three nuts which are tightened from inside the engine compartment.
As I said, the lower end of the damper and yoke are supposed to fit together in only one “radial” position. When properly installed in the yoke, even a relatively loose damper cannot rotate because of the little metal tab in the yoke’s “jaws”.
Therefore, the only means available to line up the bolts in the cap with the holes in the car is to rotate the assembly’s cap until its bolts line up with the holes on the car. Obviously, this must be done when the spring compressor is still attached to the coil. The top nut is then finally installed and the compressor removed.
Once this is done, the tightness of the cap against the compressed spring, and the metal ring’s tab’s position in the yoke, there’s no further opportunity to rotate the cap to line up its bolts with the holes on the car. Therefore, the initial positioning of the cap on the compressed spring is critical to the final installation of the assembly in the car. “Close” is not good enough in this case.
Although I have not actually tested to see if it can be done, I do not believe that it’s possible to install the assembly, with the spring compressors still on the spring, and then rotate the cap into position for a perfect fit into those holes. If one were to remove the upper control arm/ball joint, just maybe it could be done, but I’m far from certain about that.
As of right now I have the new assemblies in the car, but I’ve raised the damper’s position within in the yoke about 1/8 inch so that I was able to rotate the damper slightly and get those upper holes lined up. Because I replaced the upper control arms, outer tie rod ends, lower ball joints, and stabilizer bushings, the car drives like it did 14 years ago, but I’d like to get those tabs where they’re supposed to be inside the jaws of that yoke.
Anyone have any suggestions about how to line up those upper caps with their holes while the springs are still compressed and the yoke is properly installed on the lower end of the damper?
Failing that, is it OK to operate the car they way it is?
(I suppose I could grind off the portion of the metal tab which is supposed to be held by the yoke. As I said, it pokes down from the edge of the metal ring about 1/8”. If I ground it off, I could then loosen the yoke and slide the damper down into it a bit so that the bottom edge of the metal ring would butt up against the top edge of the yoke.)
Another question, is the inner tie rod end easy to replace on this car? I don’t want to monkey around with the boot if I cannot easily replace that end.
Thanks very much for any advice.

Senior Member
Joined: Feb 2006
Posts: 6,290
From: Montana
I feel your pain on this one... I fought my civic when I did the suspension on more than one occasion.... What I ended up doing was getting it as close as possible by taking it off the car, marking where it was and estimating how far I would need to rotate the cap to get it to line up, put on the compressors and rotate it. then if it's a tad bit off you can put a long wrench through the yoke and have someone rotate it just a bit so it lines up and slide the bolt through the lower arm... Just make a mental note of how far it should be rotated, mark the current settings of the upper bolt and the yoke on a piece of plywood. then compress the springs and rotate the cap with the 3 bolts on it the desired amount. then you have a pattern to go by for the other one. Save this for future referance...
Thread Starter
|
Senior Member
Joined: Dec 2005
Posts: 774
From: Canada
sir_nasty,
Thanks for the adivice.
One of the problems I had making the initial estimate of the position of the cap was that I installed new springs - aftermarket springs, at that - along with the new dampers. The top end of the spring did not line up precisely with the OEM, so proper cap/damper alignment was a guessing game right from the start.
My guess got me fairly close, but, as I said, for this job "close" is not good enough - "exact" is what is necessary, and I think I may have a way to do it.
The spring compressor I rented was an over-engineered device - large and beefy. I've been looking at some less expensive compressors and they are quite a bit smaller and sleeker than the rental units - so much so that I think I can install them and compress the spring while the assembly is still in the car. I just hope that there's enough room to get a ratchet wrench on the compressors' bolts.
I'll even remove the upper control arm again, if necessary to install the compressor.
If I'm successful, I'll then compress the spring, loosen the damper within the yoke by removing the tightening-bolt in the yoke, and then, finally, position the damper properly in the loosened yoke by rotating the damper and coil spring as a single unit within the cap so as to align the damper's tab with the yoke's slot.
It shouldn't be necessary to loosen the three nuts that hold the cap up against the body of the car, the single damper-rod nut above the rubber bushing inside the engine compartment, or the bolt through the bottom of the yoke/control arm.
As I rotate the damper and spring to fit it into the yoke, the damper rod should rotate freely within the damper and the coil should rotate freely against the robber insert within the cap.
Once the damper tab drops into its proper space in the yoke, everything will be perfectly aligned and I can then tighten the yoke on the damper and remove the compressor.
As long as I can get the spring tension off the rubber spacer/cushion under the cap, this method should work.
I'll post my results.
Thread Starter
|
Senior Member
Joined: Dec 2005
Posts: 774
From: Canada
I just figured out why this job is so difficult.
Honda uses their own spring compressor for this job. It's design ensures that the cap bolts and alignment tab line up properly before the assembly is put in the car. Without this tool, alignment off the car is problematic.
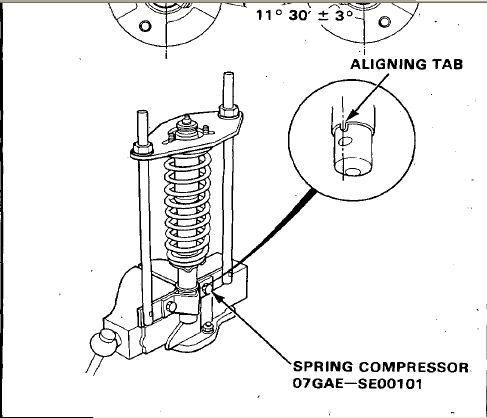
Honda uses their own spring compressor for this job. It's design ensures that the cap bolts and alignment tab line up properly before the assembly is put in the car. Without this tool, alignment off the car is problematic.
Senior Member
Joined: Feb 2006
Posts: 6,290
From: Montana
nice find... I wonder what a dealer would charge you to just swap out the springs if you brought everything in... probably $100.00 which just seems obsurd to me but whatever.... that spring compressor looks like it would make life a WHOLE lot easier than my guess and check template method... I was using aftermarked struts/springs as well and I tried the same thing with getting the spring compressors under there but with the ones I had they needed to be rotated slightly to get them off so it wasn't and option for me since there wasn't much room...
Thread Starter
|
Senior Member
Joined: Dec 2005
Posts: 774
From: Canada
I already have the new springs and damper installed, so I could remove the assemblies from the car and take them to Honda on my motorcycle. Then all they'd have to do is put the assemblies in their compressor, compress the springs, align the caps and tabs and, finally, remove the compressor.
For a competent Honda tech the job should take 15 min at most, but, yeah, I'd be lucky to be out of there for under a hundred because they'd likely charge a flat rate for "the job".
I'll try the "on the car" method first and, if it cannot be done, I'll simply have to pay Honda their "gotcha" money.
Come to think of it, if it is indeed going to be a hundred, maybe I could buy the compressor for about the same money. Then at least I'd have something in the tool box for what I've spent, and this would be the last time I'd have to worry about strut alignment.
Thread Starter
|
Senior Member
Joined: Dec 2005
Posts: 774
From: Canada
You know, I think this job can be done fairly easily off the car.
Here's a portion of the above service page that was cut off when I last posted it: (The view is straight down on top of both assemblies, with parts of the caps cut away to veiw the locations of the aligning tabs and brake brackets beneath them.)
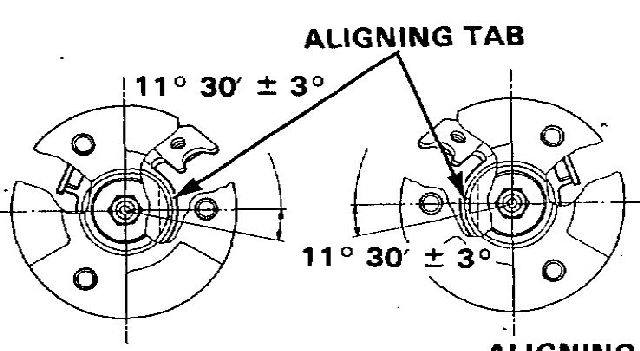
The only problem would be to somehow accurately transfer the position of the tab to the cap, so that the cap could then be rotated 11.5 degrees relative to it.
Here's one idea - off the car, put the damper in the yoke and mount the whole assembly in a vise by clamping the yoke at the lower-most part of its "legs". I believe that the bolt going through the legs of the yoke (and lower arm of the car) runs 90 degrees to the position of the yoke's tightening-slot and, therefore, to the damper tab being held within it.
One could then temporarily clamp in the slot of the yoke a piiece of appropriately-shaped, flat sheet metal - a right-angle piece whose upper end would act as a pointer at the edge of the top cap. (It may even be possible to use a carpenter's square for this purpose, but I haven't thought about it enough yet for this idea to fully gell.) This pointer would indicate on the cap the radial location of the tab beneath it.
Then it should be a simple matter to rotate the cap 11.5 degrees relative to it, remove the compressor and voila - it should be properly aligned for installation.
Here's a portion of the above service page that was cut off when I last posted it: (The view is straight down on top of both assemblies, with parts of the caps cut away to veiw the locations of the aligning tabs and brake brackets beneath them.)
The only problem would be to somehow accurately transfer the position of the tab to the cap, so that the cap could then be rotated 11.5 degrees relative to it.
Here's one idea - off the car, put the damper in the yoke and mount the whole assembly in a vise by clamping the yoke at the lower-most part of its "legs". I believe that the bolt going through the legs of the yoke (and lower arm of the car) runs 90 degrees to the position of the yoke's tightening-slot and, therefore, to the damper tab being held within it.
One could then temporarily clamp in the slot of the yoke a piiece of appropriately-shaped, flat sheet metal - a right-angle piece whose upper end would act as a pointer at the edge of the top cap. (It may even be possible to use a carpenter's square for this purpose, but I haven't thought about it enough yet for this idea to fully gell.) This pointer would indicate on the cap the radial location of the tab beneath it.
Then it should be a simple matter to rotate the cap 11.5 degrees relative to it, remove the compressor and voila - it should be properly aligned for installation.
Thread Starter
|
Senior Member
Joined: Dec 2005
Posts: 774
From: Canada
Yesterday evening I successfully aligned and installed the struts.
I removed the assemby, put the yoke back on the damper with the tab in its proper location in the yoke's slot, locked the yoke/damper in a B&D Workmate, and then installed my new, less-beefy, compressors.
I compressed the spring and then I used a carpenter's square to mark the alignment tab's relative location on the cap. To do this, I simply put the square's short side flat on the table of the Workmate and aligned its long, perpendicular side with both the yoke slot and the center of the top of the damper rod. I then made a mark on the cap in line with that position.
The 11.5 degree arc corresponds to a distance of 12 mm (just shy of 1/2 inch) on the circumference of the cap, so that is the position where I adjusted the center-line of the appropriate cap-bolt.
I then removed the compressor, removed the yoke, loosly installed the strut in the car, installed the yoke on the damper, crossed my fingers and, sure enough, the bolt holes in the yoke's legs lined up properly with the holes in the lower arm bushings.
I torqued all the nuts, and the job was done.
I'm getting very good at removal and installation of those front struts. The first side took me about 1/2 hour to figure things out and complete, and the other side took me half that time. I've become somewhat of an expert in this process. Of course by the time I have to do it again, I will have forgotten everything.
If I had investigated this thoroughly on initial repalcemnet, I would have saved myself quite a bit of trouble.
Hopefully, reading this thread will help someone to aviod what I went through. It is a job any DIY'er can accomplish in a professional manner without fancy tools. All one needs is a decent socket set and, of course, a strut spring compressor. My compressor cost only about $20. A torque wrench is nice to have, too, but whether it is necessity is at least debatable.
As we used to say in the '60's - thanks for the opportunity to share.

Thread
Thread Starter
Forum
Replies
Last Post
kris_loehr
General Tech Help
9
Sep 21, 2010 03:30 AM
03Sleeper
Do-It-Yourself Section
13
May 17, 2007 10:52 PM