
Suspension work complete with one question remaining


Thread Starter
|
Senior Member
Joined: Dec 2005
Posts: 774
From: Canada
Using our new IR Hammerhead, I replaced the following parts on our 92 LX:
Front and rear upper control arms
Sway bar links
Front lower control arm inner and outer bushings
Front lower ball joints
Front outer tie rod ends (inners still very good)
Driver's side outer CV boot
New front Monroe Quick Strut assemblies (rear struts and springs still very good)
The job went smoothly, maybe except for the inner and outer lower control arm bushings. First, I drilled out a good deal of the rubber in all the bushings, then, using a hack saw, I cut through the outer metal ring of the bushing mostly without touching the metal of the arm itself. Then, using a sharp chisel, I worked the ring out of the arm. I used a ball joint C-press to press in the new bushings.
Lower ball joint removal and installation went smoothly with the press, too. There was a thread recently which mentioned various ways of popping out the lower ball joint from the steering knuckle, so I'll mention mine. I mostly went by the instructions given in a Youtube video in which you put the car on jack stands, then raise the lower control arm using a jack to open up the space between the ball joint and arm. Then you insert a piece of metal snugly into that space, lower and remove the jack and then, if necessary, push down on the knuckle to separate the joint from the knuckle. I inserted a pickle fork instead of the handle of the ratchet wrench that the video's creator recommended. Before lowering the knuckle, I gave the pickle fork just a couple of light taps to ensure it was in there nice and snug. Then, as I was slowly lowering the knuckle, without pushing down on the knuckle at all, I heard the ball joint pop out of the knuckle. In short, this is the easiest way to pop out that ball joint that I've ever used. I highly recommend it to anyone doing this job, especially if you're going to replace rather than re-use the joint.
For the uppers, I used the two-hammer, simultaneous hitting of the knuckle from opposite sides method and those ball joints popped out in maybe 20 hits.
The rear upper joints were a different matter. Because the rubber bushing of the arm had deteriorated to the point where the axis of the arm would rotate freely within the rubber, there was no upward force being exerted by the arm to pull up on the ball joint. No amount of simultaneous opposite-side-hitting would make the ball joint pop. So, because I was definitely going to replace the arm and ball joint and not reuse it, I got our trusy 6-lb sledge hammer and struck the ball joint's stem upward. One strike on one side and two strikes on the other popped out the ball joints.
The rubber boots on several of the ball joints had torn and on a couple they had not. The joints that had torn boots were all bad, and the joints that had the intact boots were all still good, albeit with some loosening up, but no free play. Because of this fact, I'm glad I installed some polyurethane boots on the front ball joints and tie rod ends. The rears have the rubber boots they came with, but I'm going to replace them with either a polyurethane or a Honda OEM, the latter of which are incredibly expensive. Because I think that keeping the weather out of the joint is critical to their longevity, I've also used some marine grease at the top and bottom of each boot where it meets the metal of the knuckle or tie rod end. I'll give the boots a quick check each spring when I change the oil.
I left all of the bushing bolts loose until the job on each side was complete. Then I put the jack back under the front lower ball joint and raised the knuckle until the body just barely lifted off the jack stand on that side. Then I tightened the upper and lower control arm bushing bolts to spec. and this is where I have my one and only question about the whole affair. The torque spec for the bolt/nut going trough the upper control arm bushings is either 22 ft-lb or 28 ft-lb (I can't remember which at the moment and I'm not getting up off my butt to get the manual!). Anyway, I don't think that either of those torques are going to solidly lock into position the inner metal tube of the bushing. My understanding is that this type of bushing is supposed to work by only the rubber "giving" during arm rotation. Whatever rotational position the arm is in when the through-bolt is finally tightened is where the rubber of the bushing is "at rest". This is why it is recommended that final tightening of those bolts be done when the full weight of the car sits normally on its suspension after a couple of good pushes downward to let the suspension cycle up and down a couple of times. Anyway, again, I don't think that 22 or 28 ft-lbs is going to fully prevent that inner metal tube of the bushing from rotating if and when a severe rotational force on the arm occurs, but, nevertheless, that is Honda's specification. Do you think that it is Honda's intention that the inner tube should rotate under severe rotational force, rather than have the rubber between the two tubes fail?
Thanks.
BTW, the car now rides and handles like a new vehicle, with no squeaking or rattling whatsoever. My wife is still very impressed with the car that she bought new almost 20 years ago.
The Ingersol Rand Hammerhead worked great, but I wish I had a 220V compressor. Our 120V unit just doesn't have the capacity to drive the tool for longer than maybe 5 or 6 seconds at full torque. If the bolt hasn't broken free by that time, I have to wait for the tanks to re-charge pressure. I now realize what a torque monster our Ridgid electric impact really is. There is no way that the Hammer head could ever remove more than a few wheel lugs before a re-charge of the compressor tanks, let alone hammer loose a crank bolt or an axle nut the way the Ridgid does.
Last edited by Tony1M; Jul 23, 2011 at 06:50 PM.
Thread Starter
|
Senior Member
Joined: Dec 2005
Posts: 774
From: Canada
To complete all of this front suspension work, this morning I took the car to a tire place that has a genuine alignment specialist. This man (in his 50's, I believe) is the technician that all of the local car-lowering/modifying enthusiasts allow to touch their cars.
When the job was done, the tech, Jim, told me about two significant issues with our car.
1. The passenger-side lower control arm is slightly bent toward the rear of the car between the arm's ball joint hole and where the radius rod bolts to the arm.
2. The portion of the car's body ("frame", if you will) where the radius rod connects to it is bent toward the rear of the car by about 1 inch.
Jim said that both of these issues were likely caused by the car striking a good-sized pothole, or similar object. Edmonton is notorious for its pavement-destroying winters and the resulting vehicle suspension damage due to potoles, etc. He says that these are common issues in the Edmonton area with many types of vehicles and that these strikes often also cause damage to aluminum wheels, especially those with "low profile" tires.
Below is a copy of the relevant portion of the alignment report:
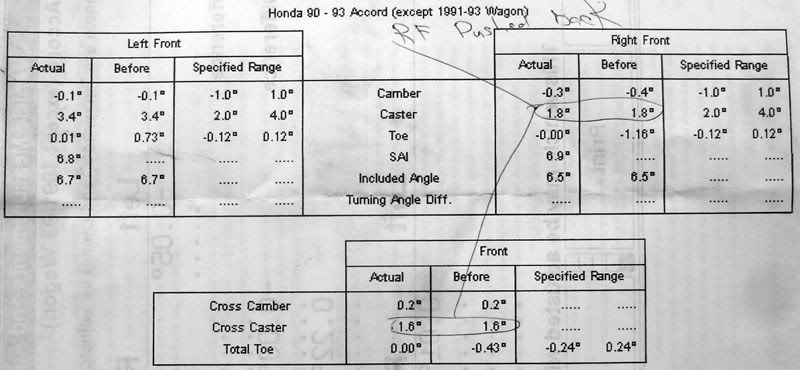
After he completed aligning the car, Jim took the car for a test drive. He said he noticed a very slight pull to the right. I drove the car and, quite honestly, I could only notice that on a straight, level portion of the road, after releasing the wheel, the car would eventually drift to the right, but that took quite some time, IMO.
Jim said that the car was perfectly safe to drive and I did not really have to do anything further to it. "Just drive it that way, if you want", he said. "But", he said, "if it were my vehicle, I'd install a new control arm and bend into proper position the portion of the car's body where the radius rod attaches to it". He said he could do the bend right on the alignment machine and the car's alignment and handling would be perfect thereafter.
He said he could do the bend and yet another alignmnent in about two hours, at a total cost of about $250. A new, OEM arm (which I will install), with new bushings already installed on the new arm, is $150, so the total to fix this issue will be $400. (Too bad I replaced the bushings in that arm!)
Anyway, I'd be interested in hearing any comments or advice on what other members would do in this situation. I know absoutely zero about alignments and what those numbers on the report really mean. Is what the tech tells me believable?
If I replace the arm, unfortunately, I'm going to have to pop out that lower ball joint and I do not want to damage its new polyurethane boot, so I cannot use the method shown in that video, nor a pickle fork. Here are two alternative styles of ball joint poppers that hold the control arm and press the stem up through it, supposedly without damaging the boot:
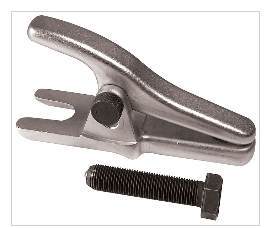

Which of the above tools is most appropriate for popping a 92 Accord lower ball joint? If neither of these, please tell me what has worked for you, but whatever it is, it must not damage the boot.
Thanks for any advice.
When the job was done, the tech, Jim, told me about two significant issues with our car.
1. The passenger-side lower control arm is slightly bent toward the rear of the car between the arm's ball joint hole and where the radius rod bolts to the arm.
2. The portion of the car's body ("frame", if you will) where the radius rod connects to it is bent toward the rear of the car by about 1 inch.
Jim said that both of these issues were likely caused by the car striking a good-sized pothole, or similar object. Edmonton is notorious for its pavement-destroying winters and the resulting vehicle suspension damage due to potoles, etc. He says that these are common issues in the Edmonton area with many types of vehicles and that these strikes often also cause damage to aluminum wheels, especially those with "low profile" tires.
Below is a copy of the relevant portion of the alignment report:
After he completed aligning the car, Jim took the car for a test drive. He said he noticed a very slight pull to the right. I drove the car and, quite honestly, I could only notice that on a straight, level portion of the road, after releasing the wheel, the car would eventually drift to the right, but that took quite some time, IMO.
Jim said that the car was perfectly safe to drive and I did not really have to do anything further to it. "Just drive it that way, if you want", he said. "But", he said, "if it were my vehicle, I'd install a new control arm and bend into proper position the portion of the car's body where the radius rod attaches to it". He said he could do the bend right on the alignment machine and the car's alignment and handling would be perfect thereafter.
He said he could do the bend and yet another alignmnent in about two hours, at a total cost of about $250. A new, OEM arm (which I will install), with new bushings already installed on the new arm, is $150, so the total to fix this issue will be $400. (Too bad I replaced the bushings in that arm!)
Anyway, I'd be interested in hearing any comments or advice on what other members would do in this situation. I know absoutely zero about alignments and what those numbers on the report really mean. Is what the tech tells me believable?
If I replace the arm, unfortunately, I'm going to have to pop out that lower ball joint and I do not want to damage its new polyurethane boot, so I cannot use the method shown in that video, nor a pickle fork. Here are two alternative styles of ball joint poppers that hold the control arm and press the stem up through it, supposedly without damaging the boot:
Which of the above tools is most appropriate for popping a 92 Accord lower ball joint? If neither of these, please tell me what has worked for you, but whatever it is, it must not damage the boot.
Thanks for any advice.


Member
Joined: Aug 2010
Posts: 84
From: Worcester, MA
the second tool is what u want. It shows that tool in my haynes manual.
IMO I would leav the car alone, he said he would do it if it was his car cuz it wouldnt cost him anything but the part cuz he could do it all himself. It isnt bad and I dont think it will harm anything to drive it like that. U did a lot more to ur car than I did to my 93. Must hav been a long day.
BTW that had to be 1 of the longest post I hav ever seen and I didnt even get bored reading it.
Thread Starter
|
Senior Member
Joined: Dec 2005
Posts: 774
From: Canada
I bit the bullet and replaced the lower control arm with what, surprisingly, turned out to be a Honda part (for a remarkably good price).
To replace the control arm I had to first pop that lower ball joint. To do that I purchased the inexpensive ball-joint/tie-rod separator below:

For Accord lower ball joints, at least, the thing works fantastic. It is remarkably similiar in design to the Honda tool/part that they recommend for this job. Once inserted, it doesn't lose its grip and, most importantly, it does not damage the boot. You just loosen the castle nut a few turns, then insert the tool, perhaps giving it a bit of a tap to get it squeezed in there underneath the boot. Then install the lower half of the tool and start tightening the tool's bolt. After the bottom of the tool contacts the ball joint's stem, the bolt's resistance to turning increases nearly instantaneously, but only to a certain point and then a sudden "crack" sound indicates the the joint has separated from the knuckle. No sweat, or cursing, whatsoever. The tool then pulls right out and the castle nut can be removed, etc. I should have gotten this tool years ago.
Yesterday I took the car back to the alignment guru Jim. The first thing he did was put the car on the alignment machine and install its sensors on the four wheels. Thankfully, the new control arm corrected a good portion of the RF wheel's backward position and, to make a short story shorter, he then bent the car back into shape. The car remained hooked up to the alignment machine as he did the remaining minor adjustment.
So now the car's four wheels' positions on the road are perfect and it drives straight down the road with absolutely no pull to either side.
With all the new suspension components doing their collective thing, the car now handles like it did when it was new.
I think those Monroe Quick Struts give a fantastic ride and they are bone-simple to install because the angular relationship between its three top bolts and the "tongue" that protrudes downward into fork is perfect, right out of the box.
Even though the market value of our car is about as low as a car can be, to us it is worth the cost of a car to replace it -- and the car that would replace it would probably be less reliable!
To replace the control arm I had to first pop that lower ball joint. To do that I purchased the inexpensive ball-joint/tie-rod separator below:
For Accord lower ball joints, at least, the thing works fantastic. It is remarkably similiar in design to the Honda tool/part that they recommend for this job. Once inserted, it doesn't lose its grip and, most importantly, it does not damage the boot. You just loosen the castle nut a few turns, then insert the tool, perhaps giving it a bit of a tap to get it squeezed in there underneath the boot. Then install the lower half of the tool and start tightening the tool's bolt. After the bottom of the tool contacts the ball joint's stem, the bolt's resistance to turning increases nearly instantaneously, but only to a certain point and then a sudden "crack" sound indicates the the joint has separated from the knuckle. No sweat, or cursing, whatsoever. The tool then pulls right out and the castle nut can be removed, etc. I should have gotten this tool years ago.
Yesterday I took the car back to the alignment guru Jim. The first thing he did was put the car on the alignment machine and install its sensors on the four wheels. Thankfully, the new control arm corrected a good portion of the RF wheel's backward position and, to make a short story shorter, he then bent the car back into shape. The car remained hooked up to the alignment machine as he did the remaining minor adjustment.
So now the car's four wheels' positions on the road are perfect and it drives straight down the road with absolutely no pull to either side.
With all the new suspension components doing their collective thing, the car now handles like it did when it was new.
I think those Monroe Quick Struts give a fantastic ride and they are bone-simple to install because the angular relationship between its three top bolts and the "tongue" that protrudes downward into fork is perfect, right out of the box.
Even though the market value of our car is about as low as a car can be, to us it is worth the cost of a car to replace it -- and the car that would replace it would probably be less reliable!
Last edited by Tony1M; Aug 23, 2011 at 02:48 PM. Reason: typos and syntax

Senior Member
Joined: Apr 2011
Posts: 394
From: Portland, Oregon

Great write up, glad to hear it all worked out!


Almost A Senior Member
Joined: Apr 2012
Posts: 328
From: Redwood City, CA 94065
I left all of the bushing bolts loose until the job on each side was complete. Then I put the jack back under the front lower ball joint and raised the knuckle until the body just barely lifted off the jack stand on that side. Then I tightened the upper and lower control arm bushing bolts to spec. and this is where I have my one and only question about the whole affair.
...
My understanding is that this type of bushing is supposed to work by only the rubber "giving" during arm rotation. Whatever rotational position the arm is in when the through-bolt is finally tightened is where the rubber of the bushing is "at rest". This is why it is recommended that final tightening of those bolts be done when the full weight of the car sits normally on its suspension after a couple of good pushes downward to let the suspension cycle up and down a couple of times. Anyway, again, I don't think that 22 or 28 ft-lbs is going to fully prevent that inner metal tube of the bushing from rotating if and when a severe rotational force on the arm occurs, but, nevertheless, that is Honda's specification.
Do you think that it is Honda's intention that the inner tube should rotate under severe rotational force, rather than have the rubber between the two tubes fail?
If the answer to the above question is NO, then I have an additional question: Considering the fact that the "at rest" position of the bushing inner cores will be at a higher up angle than stock, when the car is jacked up and the suspension drops to it's bottom rest point, will the bushing rubber still have sufficient flexibility to twist that extra amount without getting damaged? I plan to use Tokico HP or Illumina shocks which have full stock travel, so the suspension should fall to the standard stock bottom height when the car is jacked up.
Thanks. John
Last edited by jkowtko; Jun 27, 2012 at 07:18 PM.


Thread
Thread Starter
Forum
Replies
Last Post
dreamweave12
General Tech Help
2
Mar 17, 2008 04:18 PM
dreamweave12
PRIVATE For Sale / Trade Classifieds
1
Mar 16, 2008 01:45 PM