
Climate Control Blinks then Dies


Thread Starter
|
Newest Of Newbies
Joined: Aug 2012
Posts: 13
I have a 1998 Honda Accord on which I replaced the control panel with a junkyard panel a few years ago. Recently the replacement panel failed too leaving the heater blowing full blast. While looking for a schematic I stumbled on this thread and tried soldering on the jumper. It worked perfectly. Thanks, guys!
Glad this old post is still helpful!

Joined: Feb 2021
Posts: 9
My climate control was going off randomly, and I replaced all the LEDs, think I need higher powered led for circulation, and front defroster, as they stopped working again. Otherwise this hot wire fix has worked amazingly. Thank you.
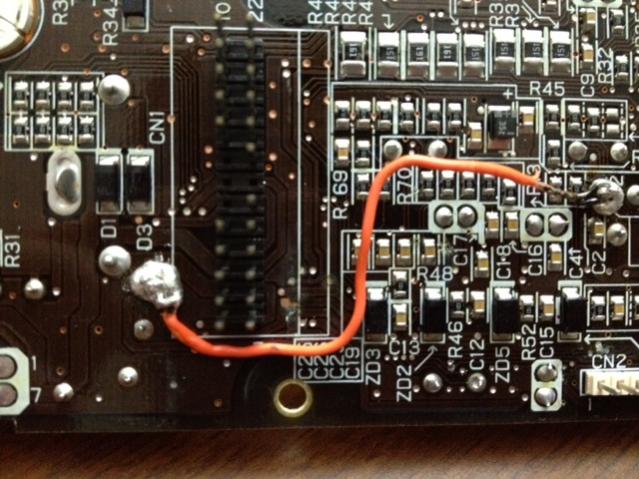
For some reason that link is dead. I found bits and pieces of info from other sites adn put them together for you. Basically, on the underside of the climate control board, just jumper the input (leftmost) leg of the78dl05 voltage regulator in the middle of the board to the positive leg of capacitor C1. That's it.
You can look up how to access the radio for detailed directions but in a nutshell:
- Remove plastic shroud/surround in center of dash
*remove 2 screws at bottom
*FOr third scres, it's hidden behind the clock. Using a thin bladed knife (I used a kitchen knife wrapped in a paper ticcue to avoid scratshing) or screwdriver, pry the bottom of the clock out and pull the unit out. Unplug the wires and set aside. Take out 3rd screw behind in dash. Lift shroud from bottom out.
- AC control unit is mounted to the back of the shroud.
*Disconnect the 2 wiring harnesses from AC control unit.
*Remove the 5 mounting screws and remove AC unit panel.
*Before mounting new unit, lug in the 2 wiring harnesses and check operation...you should be good to go if the original part was the failure.
- Replace pieces in reverse order.

Joined: May 2021
Posts: 1
I have done this and it still doesn't work.....I have power coming in and the ground is good.....I installed the jumper wire and still nothing....any ideas

Newest Of Newbies
Joined: May 2013
Posts: 12
you are in luck! same problem here, jumper wire did not work for me. However replacing all 5 capacitors did!. there is one cap however that was suspicious, the new capacitor I had was only half the size, so possibly the old one is a low ESR type. I went with the next best option and went to the next size voltage, the size was close to the old one. the rest of the caps matched fairly well. I got them on Amazon. I have tested it and the lights remain on and I can use my AC. seems to work. all junkyard ones will fail, if the jumper doesn't work or you want an actual fix, replace the caps. cap life is recommended to be replaced every 10 years, nobody does of coarse so getting 20 years out of these in hot and cold weather is impressive. I did not use the original nichicon brand, I needed to test out my theory first, would have been nice to get nichicon though

Thread
Thread Starter
Forum
Replies
Last Post
Aaron Kyle Green
General Tech Help
4
Feb 5, 2018 05:18 PM
greenbean
General Tech Help
2
Sep 21, 2007 03:14 PM